
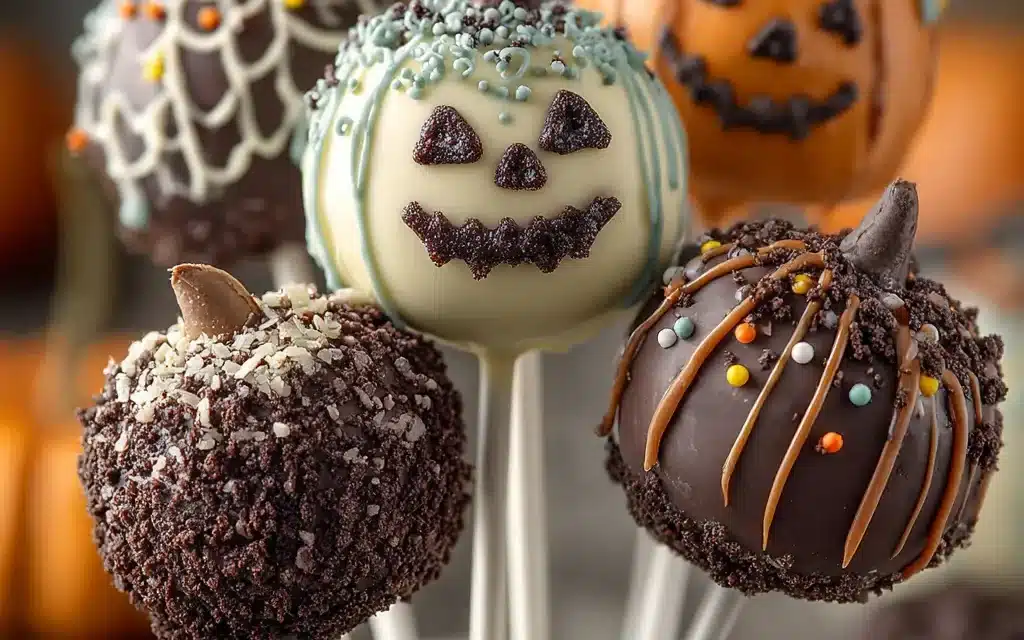
It was a crisp autumn evening, the kind where the air has a distinct chill and the smell of pumpkin spice lingers in the breeze. I was in the kitchen, surrounded by bowls of melted chocolate, sprinkles, and cake crumbs – my annual tradition of making Halloween Cake Pops was in full swing. As I carefully dipped each round treat into the glossy coating, I couldn’t help but reminisce about the first time I ever tried my hand at these festive confections.
I had been so eager to impress my friends and family that year, determined to create the spookiest, most mouthwatering Halloween Cake Pops they had ever seen. It took a few tries to get the technique just right – from mixing the perfect cake-to-frosting ratio to mastering the art of dipping and decorating. But when I finally unveiled my creation, the reactions were priceless. My niece’s eyes lit up with delight as she carefully selected a pumpkin-shaped pop adorned with orange sprinkles, while my neighbor couldn’t stop raving about the ghoulish green ones with edible eyeballs.
That’s the magic of Halloween Cake Pops – they’re not just a dessert, they’re an experience. A way to unleash your creativity and bring a little extra joy to any Halloween celebration. And after perfecting my recipe over the years, I’m confident that this Halloween Cake Pops will become your new go-to.
Why This Halloween Cake Pops Recipe Will Become Your Go-To
The Secret Behind Perfect Halloween Cake Pops
The secret to making the best Halloween Cake Pops lies in the perfect balance of moist, flavorful cake and rich, creamy frosting. By starting with a homemade cake base and blending it seamlessly with just the right amount of buttercream, you’ll achieve a texture that’s dense yet light, allowing the pops to hold their shape while still melting in your mouth. But the real magic happens in the decorating stage, where you can let your imagination run wild with spooky and whimsical designs.
Essential Ingredients You’ll Need
- Unsalted butter
- Granulated sugar
- Eggs
- All-purpose flour
- Baking powder
- Salt
- Milk
- Vanilla extract
- Cream cheese
- Powdered sugar
- Chocolate melting wafers (in assorted Halloween colors)
- Sprinkles, edible eyes, and other festive toppings
Step-by-Step Halloween Cake Pops Instructions
Preparing Your Halloween Cake Pops
Making Halloween Cake Pops is a fun and rewarding process that takes a bit of time and patience, but the end result is so worth it. In total, you’re looking at about 2-3 hours of hands-on work, including baking the cake, assembling the pops, and decorating them to perfection.
1- Start by baking your cake. Preheat the oven to 350°F and grease a 9×13 inch baking pan. In a large bowl, cream together the butter and sugar until light and fluffy. Beat in the eggs one at a time, then stir in the vanilla. In a separate bowl, whisk together the flour, baking powder, and salt. Alternate adding the dry ingredients and milk to the butter mixture, mixing just until combined.
2- Spread the batter evenly into the prepared pan and bake for 25-30 minutes, until a toothpick inserted in the center comes out clean. Allow the cake to cool completely before crumbling it into a large bowl.
3- In a separate bowl, beat the cream cheese and powdered sugar together until smooth and creamy. Gently fold the frosting into the cake crumbs until fully incorporated. The mixture should be able to hold its shape when rolled into balls.
4- Using a small cookie scoop or spoon, portion out the cake pop mixture and roll into smooth, uniform balls. Place them on a parchment-lined baking sheet and freeze for at least 30 minutes.
5- Melt the chocolate melting wafers according to package instructions. Working with one pop at a time, dip the end of a lollipop stick into the melted chocolate, then insert it into the center of a frozen cake ball. Dip the entire pop into the chocolate, allowing any excess to drip off.
6- Immediately decorate with sprinkles, edible eyes, or other festive toppings before the chocolate sets. Place the finished pops back on the baking sheet and refrigerate until ready to serve.
Pro Tips for Success
The key to perfectly smooth and sturdy Halloween Cake Pops is to make sure the cake-to-frosting ratio is just right. Too much frosting can make the pops too soft and prone to falling apart, while not enough will result in a dry, crumbly texture. I recommend starting with a 1:1 ratio and adjusting as needed.
Another common mistake is not chilling the cake balls long enough before dipping. Rushing this step can cause the pops to fall off the sticks or become misshapen. Be patient and let them freeze for at least 30 minutes to ensure a clean, professional-looking dip.
Serving and Storing Your Halloween Cake Pops
Perfect Pairings for Halloween Cake Pops
These spooky and delightful Halloween Cake Pops are the perfect sweet treat to serve at any festive gathering, from Halloween parties to fall-themed baby showers. They pair beautifully with a mug of hot apple cider or a glass of chilled apple sangria for a truly autumnal experience. You can also set up a DIY Halloween Cake Pops bar, complete with an assortment of toppings and dipping sauces like melted caramel, peanut butter, or white chocolate.
Storage and Make-Ahead Tips
Properly stored, these Halloween Cake Pops will keep for up to 1 week in the refrigerator. Simply place them in an airtight container or cover them tightly with plastic wrap. For longer storage, they can also be frozen for up to 3 months. Just be sure to thaw them in the refrigerator overnight before serving.
To make them in advance, bake the cake and prepare the cake pop mixture up to 3 days ahead of time. Roll the balls, insert the sticks, and store them in the freezer until ready to dip and decorate. The finished pops can also be made 2-3 days in advance and kept chilled until serving.
Variations and Dietary Adaptations for Halloween Cake Pops
Creative Halloween Cake Pops Variations
The best part about Halloween Cake Pops is the endless possibilities for creativity and customization. Try swapping out the classic chocolate coating for white chocolate or orange candy melts for a vibrant citrus twist. You can also experiment with different cake flavors, like spiced pumpkin or rich dark chocolate. And the decorating possibilities are truly endless – from classic jack-o’-lanterns to ghostly meringue toppers.
Making Halloween Cake Pops Diet-Friendly
For a gluten-free version of these Halloween Cake Pops, simply substitute the all-purpose flour with a 1:1 gluten-free flour blend. You can also make them vegan by using dairy-free cream cheese and plant-based chocolate melts. And for a lower-carb option, replace the granulated sugar with your favorite zero-calorie sweetener and opt for sugar-free chocolate.
Frequently Asked Questions
Q: Can I use store-bought cake mix instead of making it from scratch?
A: Absolutely! Using a pre-made cake mix is a great time-saving shortcut. Just be sure to bake it according to the package instructions before crumbling and mixing with the frosting.
Q: How do I get the cake pops to stay on the sticks?
A: Chilling the cake balls in the freezer before dipping is key. The frozen center helps the stick adhere securely. You can also try dipping the end of the stick in a bit of melted chocolate before inserting it into the ball.
Q: Can I make the cake pops ahead of time?
A: Yes, these Halloween Cake Pops are perfect for making in advance. You can prepare the cake and frosting mixture up to 3 days ahead, then assemble and decorate the pops 1-2 days before your event.
Q: How many cake pops does this recipe make?
A: This recipe will yield approximately 24-30 Halloween Cake Pops, depending on the size you roll them. Feel free to double or triple the recipe if you need to feed a larger crowd.
Q: What if the chocolate coating cracks or becomes discolored?
A: Don’t worry, minor imperfections in the coating are totally normal. The chocolate can sometimes develop a white “bloom” if it’s exposed to moisture or temperature changes. Simply re-dip the pops in fresh melted chocolate to smooth out any cracks or discoloration.

Halloween Cake Pops
- Total Time: 50
- Yield: 24
Description
Indulge in these delightfully moist and flavorful Halloween Cake Pops, perfect for parties, bake sales, or an afternoon snack. With a rich, creamy center and a spooky-sweet coating, these festive treats are sure to delight.
Ingredients
– 1 box chocolate cake mix
– 1 (8 oz) package cream cheese, softened
– 1 cup confectioners’ sugar
– 1 (12 oz) package chocolate candy melts
– Halloween-themed sprinkles, candies, and decorations
Instructions
1. Prepare the chocolate cake mix according to package instructions and bake in a 9×13 inch pan. Allow to cool completely.
2. In a large bowl, crumble the baked cake into fine crumbs. Add the softened cream cheese and confectioners’ sugar, and mix until well combined.
3. Roll the cake mixture into 1-inch balls and place them on a parchment-lined baking sheet. Refrigerate for at least 30 minutes.
4. Melt the chocolate candy melts according to package directions. Dip each cake pop into the melted chocolate, coating it completely. Allow any excess chocolate to drip off.
5. Immediately sprinkle the coated cake pops with your desired Halloween-themed sprinkles, candies, or other decorations.
6. Return the decorated cake pops to the refrigerator and chill for at least 30 minutes before serving.
Notes
For a variation, try using different flavors of cake mix or candy melts to create unique Halloween-inspired cake pops. Store the finished cake pops in an airtight container in the refrigerator for up to 1 week.
- Prep Time: 30
- Cook Time: 20
- Category: Dessert
- Method: Baking
- Cuisine: American
Conclusion
Halloween Cake Pops are the ultimate festive treat – they’re fun to make, endlessly customizable, and guaranteed to delight your family and friends. With this foolproof recipe in your arsenal, you’ll be whipping up spooky batches of these delicious pops year after year. So what are you waiting for? Grab your sprinkles and get ready to create some Halloween magic in the kitchen!

