
Growing up, my grandma’s homemade Apple Samoas were always the highlight of our family gatherings. I can still remember the mouthwatering aroma that would fill the kitchen as she carefully assembled each batch, her skilled hands effortlessly shaping the tender dough around the sweet apple filling. There was something so comforting and nostalgic about biting into those golden, cinnamon-dusted pastries – the way the buttery crust gave way to reveal the warm, cinnamony apples within. It was like taking a bite of pure childhood bliss.
Why This Apple Samoas Recipe Will Become Your Go-To
To this day, my grandma’s Apple Samoas recipe remains one of my most treasured culinary heirlooms. It’s the kind of recipe that not only tastes incredible but also carries with it a lifetime of memories and traditions. And now, I’m excited to share this beloved family recipe with you, so you can experience the same joy and satisfaction that I’ve known my whole life.
The Secret Behind Perfect Apple Samoas
The secret to making these Apple Samoas truly exceptional lies in the perfect balance of flavors and textures. The flaky, buttery pastry shell provides a delightful contrast to the soft, cinnamon-spiced apple filling, while a dusting of powdered sugar on top adds a touch of sweetness that ties it all together. But what really sets this recipe apart is the use of a special technique that ensures the apples retain their perfect texture, never becoming mushy or watery.
Essential Ingredients You’ll Need
To make these Apple Samoas, you’ll need a few key ingredients: all-purpose flour, unsalted butter, granulated sugar, ground cinnamon, a pinch of salt, and of course, crisp, juicy apples. The type of apples you choose can make a big difference in the overall flavor, so I recommend using a blend of tart and sweet varieties, such as Granny Smith and Honeycrisp.
Step-by-Step Apple Samoas Instructions
Preparing Your Apple Samoas
Making Apple Samoas is a straightforward process that’s sure to impress your friends and family. From start to finish, the entire recipe takes about an hour and a half, with the majority of that time devoted to the apple filling preparation and dough chilling. You’ll need a rolling pin, a sharp knife, and a baking sheet to get started.
1- Begin by peeling, coring, and dicing your apples into small, even cubes. This will ensure they cook through evenly and maintain their texture.
2- In a large skillet, melt a pat of butter over medium heat. Add the diced apples, granulated sugar, and a generous sprinkle of ground cinnamon. Cook the apple mixture, stirring occasionally, until the apples are tender and the sauce has thickened, about 15-20 minutes.
3- While the apple filling cools, make the pastry dough by combining the flour, butter, sugar, and a pinch of salt in a food processor until it resembles coarse crumbs. Gradually add ice water and pulse until the dough just begins to come together.
4- Shape the dough into a disc, wrap it in plastic, and refrigerate for at least 30 minutes to allow the gluten to relax.
5- Once the dough is chilled, roll it out on a lightly floured surface to about 1/8-inch thickness. Use a round cookie cutter or biscuit cutter to cut out circles from the dough.
6- Place a spoonful of the cooled apple filling onto the center of each dough circle, then fold the dough over to create a half-moon shape. Crimp the edges with a fork to seal.
Pro Tips for Success
The key to perfect Apple Samoas is to not overfill the pastries, as this can cause them to burst or become soggy. Additionally, be sure to chill the dough thoroughly before rolling and assembling to ensure the pastries hold their shape during baking. Finally, keep a close eye on the Apple Samoas in the oven, as the delicate crust can easily burn if left unattended.
Serving and Storing Your Apple Samoas
Perfect Pairings for Apple Samoas
These Apple Samoas are delightful on their own, but they also pair beautifully with a scoop of vanilla ice cream or a warm cup of coffee or tea. They make a wonderful dessert for any occasion, from cozy family gatherings to holiday celebrations.
Storage and Make-Ahead Tips
Freshly baked Apple Samoas can be stored in an airtight container at room temperature for up to 3 days. For longer-term storage, you can freeze the unbaked assembled pastries for up to 2 months. When ready to bake, simply transfer them straight from the freezer to the oven, adding a few extra minutes to the baking time.
Variations and Dietary Adaptations for Apple Samoas
Creative Apple Samoas Variations
If you’re feeling adventurous, you can try experimenting with different fruit fillings, such as pears, peaches, or even a mixture of berries. You could also add a sprinkle of chopped nuts or a drizzle of caramel sauce to the apple filling for an extra layer of flavor.
Making Apple Samoas Diet-Friendly
For a gluten-free version of Apple Samoas, simply swap the all-purpose flour for a gluten-free flour blend. To make them vegan, use a plant-based butter or shortening in the dough and omit the egg wash. And for a low-carb option, you can reduce the amount of sugar in the filling and use a sugar substitute instead.
Frequently Asked Questions
Q: Can I use a different type of apple in this recipe?
A: Absolutely! While I recommend a blend of tart and sweet apples, you can use any variety you like. Just be sure to adjust the amount of sugar in the filling to suit the sweetness of your chosen apples.
Q: How long do the Apple Samoas need to bake?
A: The Apple Samoas should be baked in a preheated 375°F oven for 20-25 minutes, or until the pastry is golden brown and flaky.
Q: Can I make the Apple Samoas ahead of time?
A: Yes, you can prepare the Apple Samoas in advance. The assembled, unbaked pastries can be frozen for up to 2 months. When ready to bake, simply transfer them straight from the freezer to the oven, adding a few extra minutes to the baking time.
Q: How many Apple Samoas does this recipe make?
A: This recipe will yield approximately 16-18 Apple Samoas, depending on the size of your dough circles.
Q: What if the apples are too juicy or the filling is too runny?
A: If the apple filling seems too wet, you can try adding a teaspoon or two of cornstarch to help thicken it up. Alternatively, you can let the filling cool completely before assembling the pastries, which will help it set up and become less runny.

Classic Apple Samoas
- Total Time: 38
- Yield: 18
Description
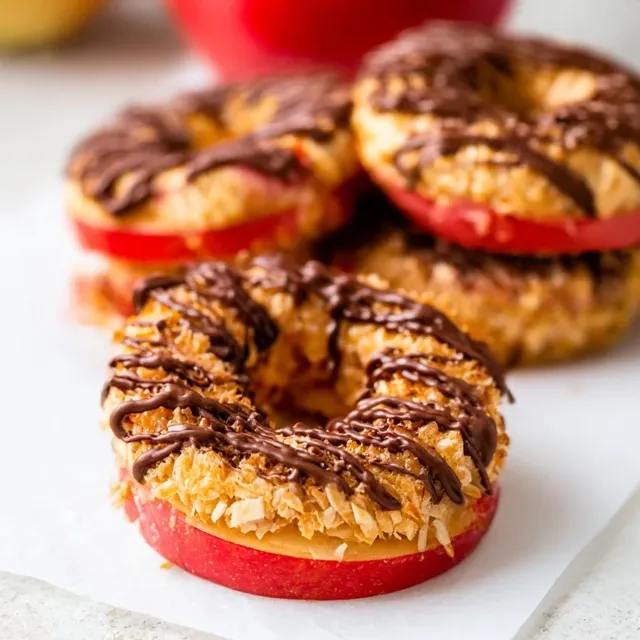
Indulge in the best of both worlds with these Classic Apple Samoas – a mouthwatering fusion of buttery shortbread and sweet apple pie flavors. Bursting with autumn spices and drizzled in caramel, these homemade treats are sure to become a new family favorite.
Ingredients
– 1 cup unsalted butter, softened
– 1/2 cup granulated sugar
– 1/4 cup brown sugar
– 1 egg
– 1 teaspoon vanilla extract
– 2 1/4 cups all-purpose flour
– 1/2 teaspoon salt
– 2 medium apples, peeled, cored, and diced
– 1/4 cup brown sugar
– 1 teaspoon ground cinnamon
– 1/4 teaspoon ground nutmeg
– 1/4 cup caramel sauce, for drizzling
Instructions
1. – Preheat oven to 350°F (175°C). Line a baking sheet with parchment paper.
2. – In a large bowl, cream the butter and sugars together until light and fluffy. Beat in the egg and vanilla.
3. – In a separate bowl, whisk together the flour and salt. Gradually add the dry ingredients to the wet ingredients, mixing until just combined.
4. – In a small bowl, toss the diced apples with the brown sugar, cinnamon, and nutmeg.
5. – Scoop about 1-2 tablespoons of dough and flatten it into a round disc. Place a spoonful of the apple mixture in the center, then fold the dough over to create a half-moon shape. Crimp the edges to seal.
6. – Arrange the filled cookies on the prepared baking sheet, spacing them about 2 inches apart.
7. – Bake for 15-18 minutes, or until the cookies are lightly golden. Allow to cool on the baking sheet for 5 minutes before transferring to a wire rack.
8. – Drizzle the cooled cookies with caramel sauce before serving.
Notes
For best results, use a firm, crisp apple variety like Honeycrisp or Gala. The cookie dough can be made ahead of time and chilled in the refrigerator for up to 3 days. When ready to bake, let the dough sit at room temperature for 30 minutes before shaping and baking.
- Prep Time: 20
- Cook Time: 18
- Category: Dessert
- Method: Baking
- Cuisine: American
Conclusion
There’s nothing quite like the comforting, nostalgic flavors of homemade Apple Samoas. This beloved family recipe is sure to become a new favorite in your household, whether you’re baking them for a cozy weekend treat or a special occasion. So, what are you waiting for? Grab your apples, preheat your oven, and get ready to create a little bit of magic in your kitchen. I can’t wait to hear how your Apple Samoas turn out!

