
I’ll never forget the first time I tried Bloomin’ Apples. It was at my best friend’s annual fall party, and the moment I took that first bite, I was hooked. The crisp, golden-brown exterior gave way to a soft, sweet interior that practically melted in my mouth. The blend of flavors – the tart apples, the warm spices, the buttery goodness – it was like nothing I’d ever tasted before. From that day on, Bloomin’ Apples have become a must-have recipe in my repertoire, a dish that never fails to impress and delight.
Why This Bloomin’ Apples Recipe Will Become Your Go-To
The Secret Behind Perfect Bloomin’ Apples
What sets this Bloomin’ Apples recipe apart is the unique technique that ensures the perfect balance of textures and flavors. By par-cooking the apples before assembling the dish, we lock in their natural sweetness and prevent them from becoming soggy or mushy during the baking process. And the secret ingredient? A touch of brown sugar that caramelizes to create a simply irresistible crunchy topping. Trust me, once you try these Bloomin’ Apples, you’ll be making them again and again.
Essential Ingredients You’ll Need
- Apples: Choose a crisp, tart variety like Granny Smith or Honeycrisp for the best results.
- Brown sugar: This adds a delightful caramelized sweetness to the topping.
- Butter: Use unsalted for the perfect balance of flavors.
- Cinnamon: The warm, fragrant spice complements the apples beautifully.
- Nutmeg: Just a pinch enhances the overall flavor profile.
- Salt: A small amount helps to balance the sweetness.
Step-by-Step Bloomin’ Apples Instructions
Preparing Your Bloomin’ Apples
This Bloomin’ Apples recipe is a true showstopper, perfect for any occasion. With just a few simple steps, you’ll have a stunning and delicious dessert that’s sure to impress. The total prep and cooking time is around 45 minutes, and all you’ll need is a sharp knife, a baking sheet, and a little bit of patience.
1- Start by preheating your oven to 375°F (190°C). Peel, core, and slice your apples into 1/4-inch thick rings.
2- In a large skillet, melt the butter over medium heat. Add the apple slices and cook for 3-4 minutes per side, just until they’re slightly softened but still hold their shape.
3- Remove the apple slices from the heat and arrange them in a single layer on a parchment-lined baking sheet.
4- In a small bowl, mix together the brown sugar, cinnamon, nutmeg, and a pinch of salt. Sprinkle this mixture evenly over the top of the apple slices.
5- Bake the Bloomin’ Apples for 20-25 minutes, or until the topping is golden brown and bubbly.
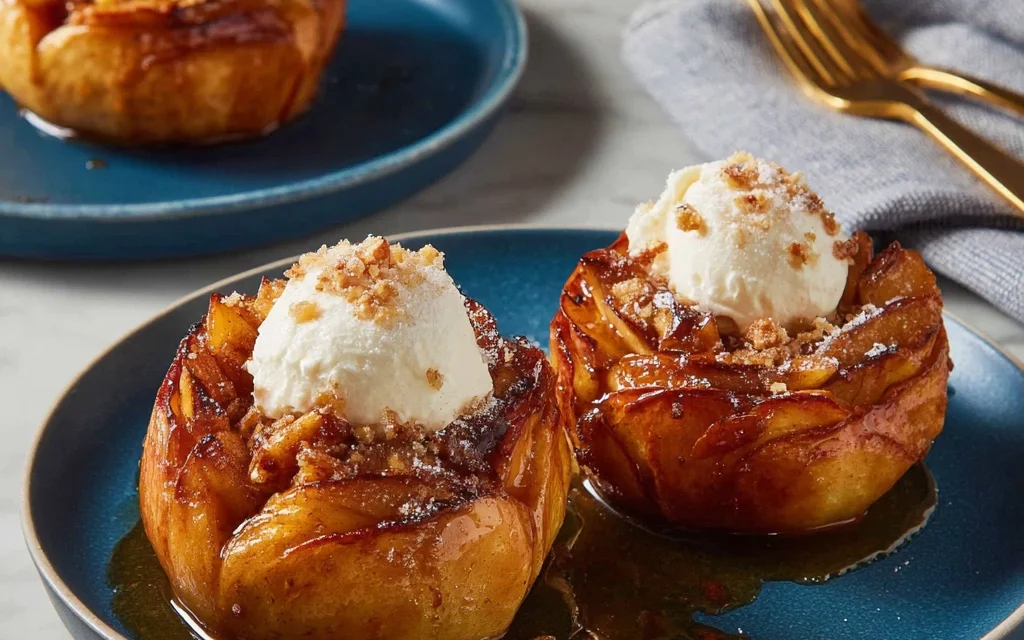
6- Let the Bloomin’ Apples cool for a few minutes before serving. Enjoy them warm, with a scoop of vanilla ice cream or a dollop of whipped cream, if desired.
Pro Tips for Success
For the best Bloomin’ Apples, be sure to use a firm, tart apple variety like Granny Smith or Honeycrisp. Avoid softer, sweeter apples, as they can become mushy during the cooking process. Also, keep a close eye on the apples during the initial sautéing step to prevent them from becoming too soft. And don’t be afraid to experiment with different spice blends or add-ins like chopped nuts or a drizzle of caramel sauce.
Serving and Storing Your Bloomin’ Apples
Perfect Pairings for Bloomin’ Apples
Bloomin’ Apples are the ultimate fall dessert, and they pair wonderfully with a variety of beverages and accompaniments. Serve them warm with a scoop of vanilla ice cream or a dollop of whipped cream for a classic treat. They also make a delightful addition to a cozy autumn brunch, complemented by a hot cup of coffee or a spiced cider. And for a truly indulgent experience, try them with a glass of port or a small pour of bourbon.
Storage and Make-Ahead Tips
Leftover Bloomin’ Apples can be stored in an airtight container in the refrigerator for up to 3 days. To reheat, simply pop them back in the oven at 350°F (175°C) for 5-10 minutes, or until heated through. You can also make the entire dish in advance and bake it just before serving. Just prepare the apple slices and the topping, then assemble and bake when ready to enjoy.
Variations and Dietary Adaptations for Bloomin’ Apples
Creative Bloomin’ Apples Variations
The beauty of this Bloomin’ Apples recipe is that it’s endlessly customizable. Try swapping out the apples for pears or even sweet potatoes for a seasonal twist. You can also experiment with different spice blends, like adding a hint of ginger or a touch of cardamom. For a more decadent version, top the Bloomin’ Apples with a streusel-like crumb topping or a drizzle of caramel sauce.
Making Bloomin’ Apples Diet-Friendly
To make this recipe more diet-friendly, you can opt for a sugar substitute in place of the brown sugar, or use a smaller amount of it. For a gluten-free version, simply use a gluten-free flour blend in the topping. And for a vegan adaptation, swap the butter for a plant-based alternative and serve the Bloomin’ Apples with a dairy-free ice cream or whipped topping.
Frequently Asked Questions
Q: Can I use a different type of apple for this recipe?
A: Absolutely! While Granny Smith and Honeycrisp are excellent choices, you can experiment with other tart, firm apple varieties like Fuji, Jonagold, or Braeburn. Just keep in mind that softer apples may become too mushy during the cooking process.
Q: How do I ensure the apples don’t become soggy?
A: The key is to par-cook the apple slices before assembling the dish. By sautéing them briefly in the skillet, you’re helping to firm up the texture and prevent them from becoming waterlogged during baking.
Q: Can I make Bloomin’ Apples ahead of time?
A: Yes, you can prepare the entire dish in advance and bake it just before serving. Simply assemble the apples and topping, then cover and refrigerate until you’re ready to pop it in the oven.
Q: How many Bloomin’ Apples does this recipe yield?
A: This recipe will make 8-10 individual Bloomin’ Apples, depending on the size of your apple slices. If you need to serve a larger crowd, you can easily double or triple the recipe.
Q: What should I do if the topping starts to burn?
A: If you notice the topping browning too quickly, simply cover the baking sheet loosely with foil to prevent further browning while allowing the apples to finish cooking through.

Bloomin’ Apples
- Total Time: 40
- Yield: 4
Description
Warm, cinnamon-spiced Bloomin’ Apples are a must-try seasonal treat! These baked apples are filled with a sweet and fragrant brown sugar mixture, creating a cozy and indulgent dessert or snack.
Ingredients
– 4 large Fuji or Honeycrisp apples
– 1/2 cup brown sugar
– 2 tablespoons unsalted butter, softened
– 1 teaspoon ground cinnamon
– 1/4 teaspoon ground nutmeg
– 1/4 cup chopped walnuts or pecans (optional)
– Vanilla ice cream or caramel sauce, for serving (optional)
Instructions
1. – Preheat the oven to 375°F. Grease a baking dish or cast-iron skillet.
2. – Core the apples, leaving the bottom intact. Use a paring knife or melon baller to scoop out the core, creating a well in the center of each apple.
3. – In a small bowl, mix together the brown sugar, butter, cinnamon, and nutmeg until well combined.
4. – Stuff the brown sugar mixture into the center of each apple, packing it in tightly. Top with the chopped nuts, if using.
5. – Place the stuffed apples in the prepared baking dish or skillet. Pour a small amount of water or apple cider into the bottom of the dish.
6. – Bake for 30-35 minutes, or until the apples are tender and the tops are golden brown.
7. – Serve the Bloomin’ Apples warm, with a scoop of vanilla ice cream or a drizzle of caramel sauce, if desired.
Notes
– For a more indulgent version, add a scoop of vanilla ice cream or a drizzle of caramel sauce on top.
– Experiment with different apple varieties, such as Honeycrisp, Gala, or Fuji, to find your favorite.
– Store any leftover Bloomin’ Apples in the refrigerator for up to 3 days.
- Prep Time: 10
- Cook Time: 30
- Category: Dessert
- Method: Baking
- Cuisine: American
Conclusion
Bloomin’ Apples are a true fall showstopper, and this recipe is sure to become a new family favorite. With its perfect balance of sweet and tart, and that irresistible crunchy topping, it’s a dish that will impress your guests and have them coming back for seconds. So what are you waiting for? Grab some apples and get baking – your Bloomin’ Apples await!


