The smell of peppermint always takes me back to the Christmas mornings of my childhood. I can still see my grandma’s warm smile as she pulled a tray of freshly baked Christmas Peppermints from the oven, the rich aroma filling the air. It was a tradition that had been passed down through generations, and the ritual of making these minty treats together was one of my favorite parts of the holiday season.
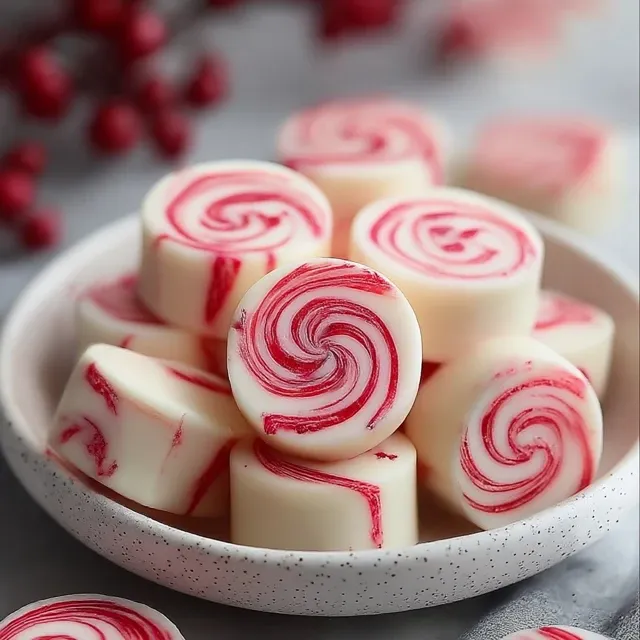
As a kid, I loved watching Grandma carefully roll and shape the dough, her skilled hands working with practiced precision. The way she’d gently place each peppermint on the baking sheet, perfectly aligned, was mesmerizing. And when they emerged from the oven, their crisp edges and glossy red tops were like little edible works of art.
Popping one of those Christmas Peppermints into my mouth, I’d savor the cool, refreshing burst of peppermint that would melt on my tongue. There was something so satisfying about the perfect balance of sweetness and minty freshness. These weren’t just any ordinary candies – they were a treasured family tradition, a tangible connection to my cherished memories of Christmas past.
Why This Christmas Peppermints Recipe Will Become Your Go-To
Even as an adult, the allure of Christmas Peppermints hasn’t faded. In fact, I’ve made it my mission to perfect Grandma’s recipe and share it with everyone I know. This isn’t your average peppermint candy – it’s a true labor of love, a recipe that’s been honed and perfected over generations. From the delicate texture to the bold, vibrant flavor, these Christmas Peppermints are simply unbeatable.
The Secret Behind Perfect Christmas Peppermints
The secret lies in the careful attention to detail and the use of high-quality ingredients. By following a few essential techniques, you’ll be able to craft Christmas Peppermints that are sure to impress. From the precise temperature control during baking to the perfect peppermint-to-sugar ratio, every step of this recipe has been meticulously designed to ensure the best possible result.
Essential Ingredients You’ll Need
- Granulated sugar: The foundation of the candy, providing sweetness and structure.
- Corn syrup: This helps to prevent the candy from crystallizing, ensuring a smooth, glossy finish.
- Peppermint extract: The star of the show, delivering that classic peppermint flavor.
- Food coloring (optional): For a vibrant red hue, adding a few drops of red food coloring can take these Christmas Peppermints to the next level.
- Baking soda: A small amount of baking soda helps to create the perfect texture, giving the candies a delightful crunch.
Step-by-Step Christmas Peppermints Instructions
Preparing Your Christmas Peppermints
Making these Christmas Peppermints is a true labor of love, but the end result is well worth the effort. The process takes some time and attention to detail, but with a little patience, you’ll be rewarded with a batch of minty, melt-in-your-mouth perfection. Let’s dive in!
1- Begin by lining a baking sheet with parchment paper or a silicone mat. This will ensure the Christmas Peppermints don’t stick to the pan.
2- In a medium saucepan, combine the granulated sugar, corn syrup, and a splash of water. Heat the mixture over medium, stirring constantly, until it reaches 300°F on a candy thermometer.
3- Once the mixture has reached the desired temperature, remove it from the heat and quickly stir in the peppermint extract and baking soda. Be careful, as the mixture will bubble up.
4- Carefully pour the hot peppermint mixture onto the prepared baking sheet, spreading it out into a thin, even layer. Allow the Christmas Peppermints to cool completely, which should take around 30 minutes.
5- Once the candy has set, use a sharp knife or pizza cutter to cut the sheet into individual peppermint candies.
6- Finally, store the Christmas Peppermints in an airtight container at room temperature, where they’ll keep for up to two weeks.
Pro Tips for Success
To ensure your Christmas Peppermints turn out perfectly every time, here are a few expert tips:
- Be very careful when handling the hot peppermint mixture – it can cause serious burns if it comes into contact with your skin.
- Make sure to use a high-quality peppermint extract for the best flavor.
- Experiment with adding a few drops of red food coloring to achieve that iconic Christmas Peppermint hue.
- Avoid over-mixing the batter, as this can lead to a grainy texture.
Serving and Storing Your Christmas Peppermints
Perfect Pairings for Christmas Peppermints
Christmas Peppermints are the perfect festive treat to enjoy on their own, but they also pair beautifully with a variety of holiday beverages and desserts. Try serving them alongside a steaming mug of hot cocoa or a glass of mulled wine for a cozy, wintertime indulgence. They also make a lovely addition to a holiday cookie platter or can be used to decorate a festive cake or cupcakes.
Storage and Make-Ahead Tips
These Christmas Peppermints are incredibly easy to store, making them the perfect homemade gift or party favor. Once the candies have cooled and been cut, simply transfer them to an airtight container and store them at room temperature for up to two weeks. For longer-term storage, you can also freeze the peppermints for up to three months.
Variations and Dietary Adaptations for Christmas Peppermints
Creative Christmas Peppermints Variations
While the classic Christmas Peppermints recipe is a true delight, there’s always room for a little creativity. Try experimenting with different flavor extracts, such as cinnamon or vanilla, for a unique twist. You can also play with color by using various food colorings to create a rainbow of peppermint candies. And for a truly decadent treat, consider dipping the peppermints in melted chocolate.
Making Christmas Peppermints Diet-Friendly
Looking to enjoy these minty treats while sticking to a special diet? No problem! To make the Christmas Peppermints gluten-free, simply use a gluten-free corn syrup or maple syrup in place of the regular corn syrup. For a vegan version, you can substitute the regular sugar with coconut sugar or a sugar-free sweetener like erythritol or xylitol.
Frequently Asked Questions
Q: Can I use peppermint oil instead of extract?
A: While peppermint oil can be used in place of extract, it’s important to use it sparingly as it’s much more concentrated. Start with just a few drops and adjust to taste.
Q: How long do the Christmas Peppermints take to set?
A: The peppermints will need to cool completely, which should take around 30 minutes. Be patient and resist the urge to touch them until they’ve had time to firm up.
Q: Can I make the Christmas Peppermints ahead of time?
A: Absolutely! These peppermints keep very well. Once they’ve cooled and been cut, store them in an airtight container at room temperature for up to two weeks.
Q: How many peppermints does this recipe make?
A: This recipe will yield approximately 24-30 individual Christmas Peppermints, depending on how you cut them.
Q: Why did my peppermints turn out sticky?
A: If your peppermints are coming out sticky, it’s likely because the candy mixture didn’t reach the proper temperature. Make sure to use a reliable candy thermometer and heat the mixture to 300°F for best results.

Christmas Peppermints
- Total Time: 10
- Yield: 12
Description
Discover the secret to making the most scrumptious Christmas Peppermints in just 10 minutes! These festive candies are perfect for holiday gifting or indulging.
Ingredients
– 1 cup white chocolate chips
– 1/2 teaspoon peppermint extract
– 2-3 drops red food coloring
Instructions
1. In a microwave-safe bowl, melt the white chocolate chips in the microwave in 30-second intervals, stirring in between, until completely smooth.
2. Stir in the peppermint extract and red food coloring until well combined.
3. Pour the mixture into a silicone mold or onto a parchment-lined baking sheet, spreading it out evenly.
4. Refrigerate for 30 minutes to 1 hour, or until the peppermints have completely hardened.
5. Gently remove the peppermints from the mold or break them apart on the baking sheet.
6. Serve and enjoy!
Notes
For a more professional look, temper the white chocolate before adding the peppermint extract and food coloring. Store the peppermints in an airtight container at room temperature for up to 2 weeks.
- Prep Time: 10
- Category: Dessert
- Method: No-Bake
- Cuisine: American
Conclusion
Christmas Peppermints are a timeless holiday tradition that deserve a place in every home during the festive season. With this foolproof recipe, you can capture the essence of those cherished childhood memories and share the joy of homemade peppermint candies with your loved ones. So what are you waiting for? Grab your ingredients and get ready to create a batch of minty, melt-in-your-mouth perfection!

