
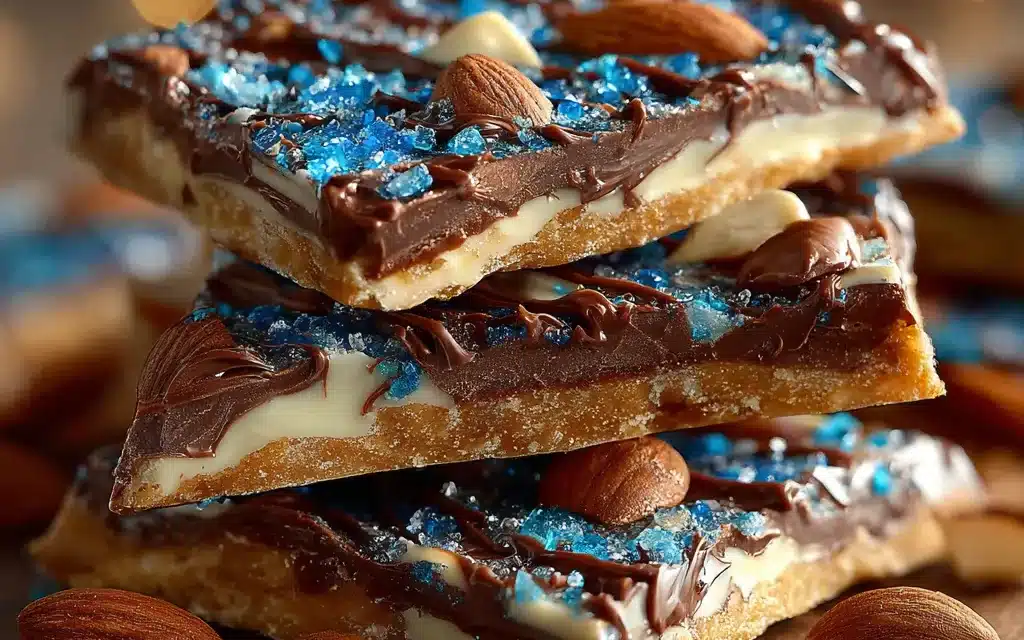
Hanukkah was always my favorite holiday growing up. The twinkling lights, the family traditions, the delicious fried foods – it just felt so cozy and magical. One of the best parts was helping my grandma make her famous Hanukkah Candy Bark. I can still picture her carefully layering the melted chocolate, sprinkling the crushed candies, and shaping the final bark to perfection. The aroma of the warm chocolate and toasted nuts would fill the whole house, making our mouths water in anticipation.
When it was finally ready, we’d break off big pieces and savor every bite, reminiscing about past Hanukkah celebrations. There was something so special about that homemade Hanukkah Candy Bark – it was the perfect balance of rich, sweet, and salty. It became the star of our holiday dessert table year after year. Now that I’m older, I still crave that nostalgic flavor, and I love sharing the tradition with my own family. That’s why this Hanukkah Candy Bark recipe will become your go-to – it’s easy to make, full of festive flavor, and sure to impress.
Why This Hanukkah Candy Bark Recipe Will Become Your Go-To
The Secret Behind Perfect Hanukkah Candy Bark
The secret to truly outstanding Hanukkah Candy Bark is all in the preparation. Most recipes call for simply melting chocolate, pouring it onto a baking sheet, and sprinkling on toppings. But that method often results in a thick, uneven bark that’s difficult to break apart. My grandma’s technique produces a thin, crisp, and beautifully-textured Hanukkah Candy Bark every time. The key is tempering the chocolate just right and using a clever layering method to create those perfect cracks and shards. Trust me, once you try this approach, you’ll never go back to the basic recipe.
Essential Ingredients You’ll Need
- Dark chocolate – Choose a high-quality dark chocolate bar or chocolate chips. The better the chocolate, the more rich and decadent your Hanukkah Candy Bark will be.
- White chocolate – Adding a layer of creamy white chocolate creates an eye-catching contrast and delicious flavor pairing.
- Crushed peppermint candies – These classic Hanukkah candies add a fun, festive crunch.
- Chopped walnuts – The toasted nuts provide amazing texture and a subtle nutty taste.
- Sea salt – Just a sprinkle of flaky sea salt enhances all the other flavors.
Step-by-Step Hanukkah Candy Bark Instructions
Preparing Your Hanukkah Candy Bark
Making Hanukkah Candy Bark is quick and easy, but it does require a bit of precise technique. The total time from start to finish is about 1 hour, with 30 minutes of hands-on prep work. You’ll need a large baking sheet, a double boiler or microwave, and a few basic kitchen tools.
1- Begin by lining a large baking sheet with parchment paper or a silicone baking mat. This will make it easy to remove the finished Hanukkah Candy Bark.
2- In the top of a double boiler or in a microwave-safe bowl, melt the dark chocolate, stirring frequently, until it’s smooth and glossy. Be careful not to overheat the chocolate, which can cause it to seize up.
3- Pour the melted dark chocolate onto the prepared baking sheet and use an offset spatula to spread it into an even layer, reaching all the way to the edges.
4- Place the baking sheet in the refrigerator for 10-15 minutes, until the dark chocolate layer is firm to the touch but still slightly soft.
5- Meanwhile, melt the white chocolate using the same method as the dark chocolate. Pour the melted white chocolate over the firm dark chocolate layer and spread it into an even layer.
6- Immediately sprinkle the crushed peppermint candies and chopped walnuts all over the top of the white chocolate. Finish with a light dusting of flaky sea salt.
Pro Tips for Success
The key to perfect Hanukkah Candy Bark is all in the tempering of the chocolate. Be sure to melt the chocolate slowly and gently, and don’t overheat it. Also, resist the urge to skip the refrigeration step – this is what helps the layers set up properly and creates those beautiful cracks and shards.
Another common mistake is overcrowding the toppings. You want an even, not-too-thick layer of peppermint and walnuts so the chocolate shines through. And don’t be afraid to get creative with your toppings – crushed gingerbread cookies, shredded coconut, or even sprinkles would also be delicious!
Serving and Storing Your Hanukkah Candy Bark
Perfect Pairings for Hanukkah Candy Bark
Hanukkah Candy Bark is the ultimate holiday treat – rich, festive, and utterly irresistible. It’s perfect for gifting, setting out on dessert tables, or enjoying as an after-dinner indulgence. The peppermint and chocolate flavors pair beautifully with a cup of hot cocoa or a glass of mulled wine. You can also serve it alongside other traditional Hanukkah sweets like sufganiyot (jelly doughnuts) or homemade latkes.
Storage and Make-Ahead Tips
Hanukkah Candy Bark is incredibly easy to make ahead and store. Once the bark has set completely, simply break it into irregular pieces and store in an airtight container at room temperature for up to 2 weeks. You can even make it up to 1 month in advance and keep it in the freezer – just thaw at room temperature before serving.
Variations and Dietary Adaptations for Hanukkah Candy Bark
Creative Hanukkah Candy Bark Variations
The beauty of this recipe is that it’s so versatile. You can easily switch up the flavors to suit your tastes or the season. Try using milk chocolate instead of dark, or swap the peppermint for crushed gingerbread cookies, toffee bits, or toasted coconut. For a festive twist, add a drizzle of melted white chocolate or sprinkle on some edible glitter.
Making Hanukkah Candy Bark Diet-Friendly
Hanukkah Candy Bark can also be adapted for dietary restrictions. For a gluten-free version, simply use certified gluten-free chocolate and skip the peppermint candies. To make it vegan, substitute dairy-free chocolate and leave off the walnuts. And for a low-carb spin, use sugar-free chocolate and replace the peppermint with unsweetened coconut flakes or chopped nuts.
Frequently Asked Questions
Q: Can I use milk chocolate instead of dark chocolate?
A: Absolutely! Milk chocolate will result in a sweeter, creamier Hanukkah Candy Bark. Just be sure to temper it properly so it sets up nicely.
Q: How long does the chocolate need to chill before adding the toppings?
A: You’ll want to chill the dark chocolate layer for 10-15 minutes, until it’s firm but still slightly soft. This helps the white chocolate layer adhere properly.
Q: Can I make Hanukkah Candy Bark ahead of time?
A: Yes, Hanukkah Candy Bark keeps very well. Once it’s set, you can store it at room temperature in an airtight container for up to 2 weeks. You can also freeze it for up to 1 month.
Q: How many servings does this recipe make?
A: This recipe will yield about 20-24 generous pieces of Hanukkah Candy Bark, depending on how you break it apart. It’s rich, so a little goes a long way!
Q: What if my chocolate seizes up while melting?
A: If your chocolate starts to stiffen up and become grainy, it’s likely seized due to overheating or getting water in the bowl. Try adding a teaspoon of coconut oil or vegetable oil to smooth it out again.

Hanukkah Candy Bark
- Total Time: 35
- Yield: 24
Description
Indulge in the rich, chocolatey goodness of this easy-to-make Hanukkah Candy Bark! This festive treat is perfect for gifting or enjoying with family during the holiday season.
Ingredients
– 12 oz semi-sweet chocolate chips
– 1 cup white chocolate chips
– 1/2 cup crushed peppermint candies
– 1/4 cup crushed walnuts
– 2 tbsp sprinkles (blue and white)
Instructions
1. 1. Line a baking sheet with parchment paper.
2. 2. In a microwave-safe bowl, melt the semi-sweet chocolate chips in 30-second intervals, stirring between each, until completely smooth.
3. 3. Pour the melted chocolate onto the prepared baking sheet and spread it out into an even layer.
4. 4. Sprinkle the white chocolate chips, crushed peppermint candies, crushed walnuts, and sprinkles over the top of the semi-sweet chocolate.
5. 5. Refrigerate the bark for at least 30 minutes, or until completely set.
6. 6. Break the bark into pieces and serve.
Notes
– For a healthier option, use dark chocolate instead of semi-sweet.
– Feel free to customize the toppings with your favorite Hanukkah-themed decorations.
– Store the candy bark in an airtight container in the refrigerator for up to 2 weeks.
- Prep Time: 5
- Category: Dessert
- Method: No-Bake
- Cuisine: American
Conclusion
Hanukkah Candy Bark is the ultimate holiday treat – festive, delicious, and so much fun to make. With its layers of rich chocolate, crunchy toppings, and signature cracks and shards, it’s sure to impress everyone at your Hanukkah celebrations. This recipe captures all the nostalgic flavors of my grandma’s version, but with a few modern twists. I hope you’ll give it a try and enjoy making your own cherished Hanukkah memories. Let me know how it turns out in the comments below!


