
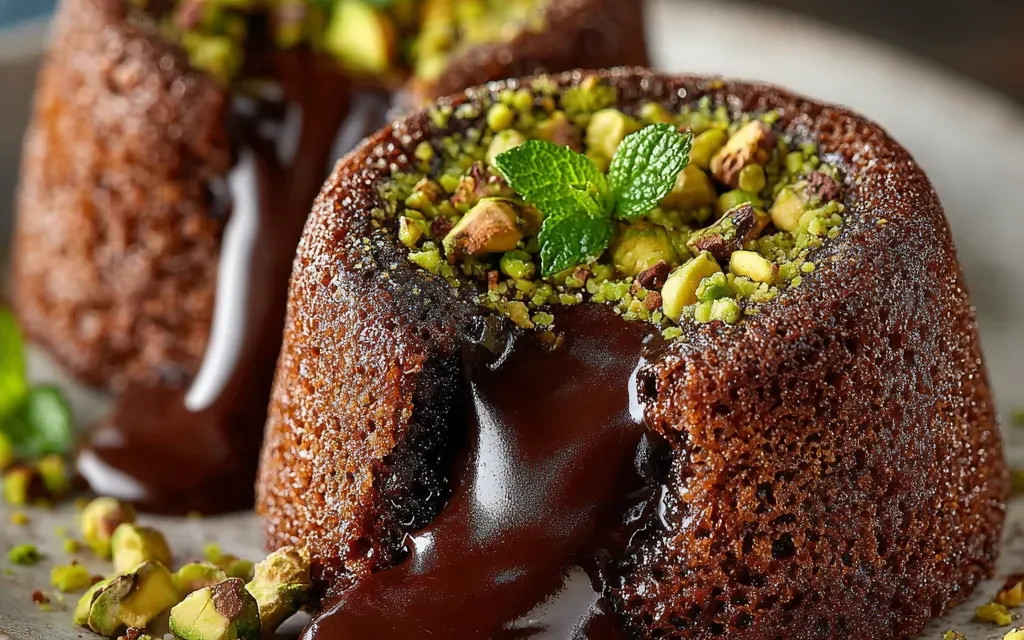
t’s been years since I last made Pistachio Chocolate Lava Cakes, but I can still remember the first time I tried them. I was at a fancy restaurant for a special anniversary dinner with my husband, and when the waiter placed that warm, gooey chocolate cake in front of me, I couldn’t believe my eyes. The vibrant green pistachios peeking through the rich, molten chocolate center – it was like a work of art. And let me tell you, that first bite was nothing short of heavenly. The contrast of the crisp, crunchy shell and the soft, luscious center had me hooked from the very first moment. From that day on, Pistachio Chocolate Lava Cakes have been my go-to dessert for any special occasion.
Why This Pistachio Chocolate Lava Cakes Recipe Will Become Your Go-To
The Secret Behind Perfect Pistachio Chocolate Lava Cakes
What makes this Pistachio Chocolate Lava Cakes recipe so special is the unique combination of flavors and textures. The addition of pistachios not only adds a beautiful pop of color, but it also brings a delightful crunch and nutty flavor that perfectly complements the rich, velvety chocolate. Plus, the trick to achieving that iconic molten center is all in the baking time – just a few minutes shy of fully cooked, and you’ll end up with a dessert that’ll have your guests swooning.
Essential Ingredients You’ll Need
To make these decadent Pistachio Chocolate Lava Cakes, you’ll need just a handful of ingredients: unsalted butter, dark chocolate, granulated sugar, eggs, all-purpose flour, and of course, those vibrant green pistachios. The key is to use high-quality chocolate and freshly shelled pistachios for the best flavor and texture.
Step-by-Step Pistachio Chocolate Lava Cakes Instructions
Preparing Your Pistachio Chocolate Lava Cakes
Ready to dive into the world of Pistachio Chocolate Lava Cakes? This recipe is surprisingly easy to make, and with a little bit of practice, you’ll be whipping up these gooey, irresistible treats in no time. The total prep and baking time is just 30 minutes, and all you’ll need are a few ramekins or small oven-safe dishes.
1- Start by preheating your oven to 400°F (200°C) and generously greasing your ramekins or dishes with butter or non-stick cooking spray.
2- In a medium saucepan, melt the butter and dark chocolate together over low heat, stirring constantly until the mixture is smooth and glossy.
3- Remove the pan from the heat and let the chocolate mixture cool slightly, then whisk in the granulated sugar and eggs until well combined.
4- Gently fold in the all-purpose flour until just incorporated, being careful not to overmix.
5- Divide the batter evenly among your prepared ramekins, then top each one with a generous handful of chopped pistachios.
6- Bake the Pistachio Chocolate Lava Cakes for 10-12 minutes, or until the edges are set but the centers are still soft and gooey.
Pro Tips for Success
To ensure your Pistachio Chocolate Lava Cakes turn out perfectly every time, here are a few pro tips:
- Make sure your oven is fully preheated before baking – this helps the cakes rise and develop that iconic molten center.
- Don’t be tempted to overbake the cakes – they should still have a jiggly center when you remove them from the oven.
- Let the cakes cool for just a minute or two before inverting them onto plates – this will help them hold their shape.
- Garnish with a dusting of powdered sugar, a scoop of vanilla ice cream, or a drizzle of chocolate sauce for an extra special touch.
Serving and Storing Your Pistachio Chocolate Lava Cakes
Perfect Pairings for Pistachio Chocolate Lava Cakes
These Pistachio Chocolate Lava Cakes are the ultimate indulgence, and they pair beautifully with a variety of accompaniments. For a classic pairing, serve them with a scoop of creamy vanilla ice cream or a dollop of freshly whipped cream. They also pair wonderfully with a glass of rich, bold red wine or a hot cup of freshly brewed coffee.
Storage and Make-Ahead Tips
Fortunately, Pistachio Chocolate Lava Cakes are easy to store and can even be made ahead of time. If you have any leftovers, simply let them cool completely, then cover and refrigerate for up to 3 days. To reheat, pop them back in the oven for a few minutes until the centers are warm and gooey again. You can also prepare the batter ahead of time and refrigerate it for up to 2 days before baking.
Variations and Dietary Adaptations for Pistachio Chocolate Lava Cakes
Creative Pistachio Chocolate Lava Cakes Variations
While the classic Pistachio Chocolate Lava Cakes are hard to beat, there are plenty of ways to put your own spin on this decadent dessert. Try swapping out the pistachios for another type of nut, like almonds or hazelnuts, for a different flavor profile. You could also experiment with different types of chocolate, like milk chocolate or white chocolate, to create unique flavor combinations.
Making Pistachio Chocolate Lava Cakes Diet-Friendly
For those with dietary restrictions, you can easily adapt this recipe to be gluten-free, vegan, or low-carb. Simply swap out the all-purpose flour for a gluten-free blend, use plant-based butter and dairy-free chocolate, and replace the granulated sugar with a low-calorie sweetener like erythritol or stevia.
Frequently Asked Questions
Q: Can I use pre-shelled pistachios instead of shelling them myself?
A: Absolutely! Using pre-shelled pistachios is a great time-saving hack. Just be sure to give them a quick chop before adding them to the batter.
Q: How do I know when the Pistachio Chocolate Lava Cakes are done?
A: The key is to bake them until the edges are set but the centers are still soft and gooey. Start checking them at the 10-minute mark, and pull them out of the oven when the centers still have a slight jiggle.
Q: Can I make Pistachio Chocolate Lava Cakes ahead of time?
A: Yes, you can prepare the batter up to 2 days in advance and keep it refrigerated until you’re ready to bake. Just be sure to bring it back to room temperature before portioning and baking.
Q: How many Pistachio Chocolate Lava Cakes does this recipe make?
A: This recipe will yield 4-6 individual lava cakes, depending on the size of your ramekins or oven-safe dishes.
Q: What should I do if my Pistachio Chocolate Lava Cakes don’t have a molten center?
A: If your cakes come out a bit more cake-like than gooey, it’s likely that they were overbaked. Next time, try reducing the baking time by a minute or two to achieve that perfect molten center.

Pistachio Chocolate Lava Cakes
- Total Time: 20
- Yield: 4 servings
Description
Indulge in the rich, gooey decadence of Pistachio Chocolate Lava Cakes, a quick and easy dessert that will elevate your sweet tooth.
Ingredients
– 6 oz dark chocolate, chopped
– 1/2 cup unsalted butter, softened
– 3 large eggs
– 3 egg yolks
– 1/3 cup granulated sugar
– 1/4 cup all-purpose flour
– 1/4 cup shelled pistachios, chopped
Instructions
1. 1. Preheat oven to 450°F. Grease four 6-oz ramekins and dust with cocoa powder.
2. 2. In a double boiler, melt the chocolate and butter, stirring occasionally until smooth. Remove from heat and let cool slightly.
3. 3. In a medium bowl, whisk together the eggs, egg yolks, and sugar until light and fluffy.
4. 4. Fold the chocolate mixture into the egg mixture, then gently fold in the flour and chopped pistachios.
5. 5. Divide the batter evenly among the prepared ramekins.
6. 6. Bake for 8-10 minutes, until the edges are set but the centers are still soft and gooey.
7. 7. Carefully invert the ramekins onto plates and serve immediately.
Notes
For a more intense pistachio flavor, substitute 1/4 cup of the flour with ground pistachio flour. Enjoy these lava cakes warm, with a scoop of vanilla ice cream for an extra indulgent treat.
- Prep Time: 10
- Cook Time: 10
- Category: Dessert
- Method: Baking
- Cuisine: American
Conclusion
Pistachio Chocolate Lava Cakes are the ultimate indulgence – a decadent dessert that’s sure to impress your family and friends. With their vibrant green pistachios, rich chocolate center, and crisp, golden edges, these cakes are a true work of art. And the best part? They’re surprisingly easy to make at home. So what are you waiting for? Grab your ramekins and get baking – your new go-to dessert awaits!


