
I’ll never forget the day I first tasted Red Velvet Earthquake Cake. It was my cousin’s birthday, and she had spent hours meticulously preparing this decadent dessert. When the first bite hit my tongue, it was as if the earth had shifted beneath me – the rich, velvety texture combined with the unexpected burst of cream cheese was simply out of this world. From that moment on, I knew I had to master this recipe and share it with everyone I knew.
Why This Red Velvet Earthquake Cake Recipe Will Become Your Go-To
The Secret Behind Perfect Red Velvet Earthquake Cake
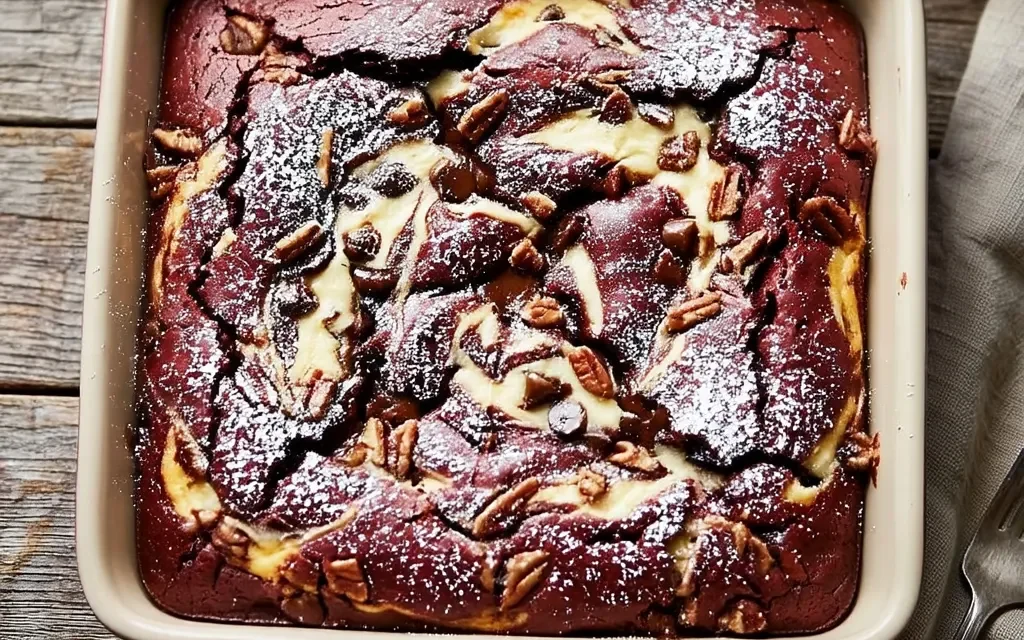
Red Velvet Earthquake Cake is a true showstopper, both in terms of its stunning appearance and its incredible flavor. The secret lies in the perfect balance of the rich, chocolaty cake base and the creamy, tangy cream cheese swirl that runs through the center. The result is a dessert that’s equal parts indulgent and irresistible, with a moist, fudgy texture that will have your guests reaching for seconds (or thirds!).
Essential Ingredients You’ll Need
The key to this Red Velvet Earthquake Cake recipe lies in the carefully selected ingredients. First, you’ll need 2 cups of all-purpose flour to provide the sturdy foundation for the cake. Next, 2 cups of granulated sugar add the perfect sweetness to balance the cocoa powder. Speaking of which, 1/2 cup of unsweetened cocoa powder is essential for that rich, chocolaty flavor.
To ensure a light and airy texture, you’ll need 1 teaspoon of baking soda and 1/2 teaspoon of salt. The 1 cup of buttermilk adds moisture and a subtle tang, while the 2 large eggs and 1/2 cup of vegetable oil help bind the batter together. And of course, no Red Velvet Earthquake Cake would be complete without 1 tablespoon of red food coloring, which gives the cake its signature deep red hue.
Finally, the creamy, tangy swirl that sets this cake apart comes from the 1 (8 ounce) package of softened cream cheese and 1/2 cup of confectioners’ sugar.
Step-by-Step Red Velvet Earthquake Cake Instructions
Preparing Your Red Velvet Earthquake Cake
With a total time of 60 minutes, this Red Velvet Earthquake Cake is surprisingly simple to make. You’ll only need a few essential kitchen tools, like a large mixing bowl, a hand mixer or stand mixer, and a 9×13-inch baking pan. Once you have everything ready, it’s time to get started!
1- Begin by preheating your oven to 350°F and greasing your baking pan with nonstick cooking spray. In a large bowl, whisk together the 2 cups of all-purpose flour, 2 cups of granulated sugar, 1/2 cup of unsweetened cocoa powder, 1 teaspoon of baking soda, and 1/2 teaspoon of salt until well combined.
2- In a separate bowl, whisk together the 1 cup of buttermilk, 2 large eggs, 1/2 cup of vegetable oil, 1 tablespoon of red food coloring, and 1 teaspoon of vanilla extract. Slowly pour the wet ingredients into the dry ingredients and mix until just combined, being careful not to overmix.
3- Pour the batter into your prepared baking pan, smoothing the top with a spatula. In a small bowl, beat the 1 (8 ounce) package of softened cream cheese with the 1/2 cup of confectioners’ sugar until smooth and creamy.
4- Using a spoon or a piping bag, dollop the cream cheese mixture over the top of the cake batter, then use a knife or a toothpick to swirl it through the batter, creating a beautiful marble effect.
5- Bake the Red Velvet Earthquake Cake for 45 minutes, or until a toothpick inserted into the center comes out clean. Allow the cake to cool completely before serving.
6- Once cooled, slice the Red Velvet Earthquake Cake into 12 generous servings and enjoy the delightful combination of moist, fudgy cake and tangy cream cheese swirl.
Pro Tips for Success
1- Be sure to use room-temperature ingredients, especially the cream cheese, to ensure a smooth, creamy swirl.
2- Don’t overmix the batter once the wet and dry ingredients are combined, as this can lead to a dense, tough cake.
3- Resist the temptation to open the oven door during baking, as this can cause the cake to fall.
4- Allow the cake to cool completely before slicing, as this will help the cream cheese swirl set and prevent it from oozing out.
Serving and Storing Your Red Velvet Earthquake Cake
Perfect Pairings for Red Velvet Earthquake Cake
This Red Velvet Earthquake Cake is a true showstopper, serving 12 generous portions. It’s the perfect dessert to share with friends and family, whether you’re celebrating a special occasion or just looking for an indulgent treat. The rich, velvety cake pairs beautifully with a scoop of vanilla ice cream or a dollop of fresh whipped cream. For a more decadent touch, try serving it with a drizzle of chocolate sauce or a sprinkle of toasted pecans.
Storage and Make-Ahead Tips
Once your Red Velvet Earthquake Cake has cooled completely, you can store it in an airtight container in the refrigerator for up to 5 days. For longer-term storage, you can freeze the cake for up to 3 months. Simply wrap it tightly in plastic wrap and aluminum foil, or place it in a freezer-safe container. When you’re ready to serve, thaw the cake in the refrigerator overnight before slicing and enjoying.
Variations and Dietary Adaptations for Red Velvet Earthquake Cake
Creative Red Velvet Earthquake Cake Variations
While the classic Red Velvet Earthquake Cake is a true delight, there’s plenty of room for creativity. For a festive touch, try adding a layer of crushed peppermint or a swirl of homemade caramel sauce. You could also experiment with different mix-ins, like chopped pecans, shredded coconut, or even a sprinkle of cinnamon.
Making Red Velvet Earthquake Cake Diet-Friendly
If you’re looking to make this recipe a bit more diet-friendly, there are a few simple substitutions you can try. For a gluten-free version, swap the all-purpose flour for a high-quality gluten-free flour blend. To make it vegan, use plant-based milk in place of the buttermilk and a dairy-free cream cheese alternative. And for a low-carb twist, try using a granulated sugar substitute and a keto-friendly cream cheese filling.
Frequently Asked Questions
Q: Can I use a different type of flour in this Red Velvet Earthquake Cake recipe?
A: While all-purpose flour is the best choice for this recipe, you could try substituting up to 1/2 cup of the flour with whole wheat flour or almond flour for a slightly different texture.
Q: How long does the Red Velvet Earthquake Cake take to bake?
A: According to the recipe, the total baking time for this cake is 45 minutes. Be sure to keep an eye on it and test for doneness with a toothpick to avoid over or underbaking.
Q: Can I make the Red Velvet Earthquake Cake in advance?
A: Absolutely! This cake can be stored in the refrigerator for up to 5 days or in the freezer for up to 3 months. Just be sure to allow it to thaw completely before serving.
Q: How many servings does this Red Velvet Earthquake Cake recipe make?
A: The recipe states that it yields 12 generous servings, so you can easily feed a crowd or enjoy leftovers throughout the week.
Q: What should I do if the cream cheese swirl doesn’t turn out as expected?
A: If the cream cheese swirl doesn’t quite come together as you’d hoped, don’t worry! You can still salvage the cake by dolloping the cream cheese mixture over the top and using a knife to gently swirl it into the batter.
Conclusion
Red Velvet Earthquake Cake is a true showstopper of a dessert, and this recipe is sure to become a new family favorite. With its rich, chocolaty cake, tangy cream cheese swirl, and stunning presentation, it’s the perfect way to impress your guests and satisfy your sweet tooth. So why not give it a try today? I promise, once you take that first bite, your world will be rocked by the sheer deliciousness of this incredible cake.


