
Thanksgiving has always been my favorite holiday. There’s just something so warm and cozy about gathering with loved ones, sharing a delicious meal, and creating special memories. And when it comes to desserts, I can’t think of anything more festive than homemade Thanksgiving Cake Pops!
I still remember the first time I made them a few years ago. It was the day before the big family feast, and I was scrambling to put together some last-minute treats. I had this vision of cute little pumpkin-shaped cake pops that would be the perfect addition to our Thanksgiving spread. As I mixed the cake, whipped up the frosting, and carefully formed each pop, I felt a sense of excitement and accomplishment. And when I saw the final result – those adorable Thanksgiving Cake Pops all dressed up in orange and gold sprinkles – I couldn’t wait to share them with everyone.
The reaction was even better than I’d hoped. My aunt took one bite and her eyes lit up. “These are incredible!” she exclaimed. “They taste just like Thanksgiving in a bite.” Even my picky little cousin, who usually turns his nose up at anything homemade, couldn’t get enough. He must have had three or four of those Thanksgiving Cake Pops! Needless to say, they were a huge hit.
Ever since that first year, Thanksgiving Cake Pops have become a staple on our dessert table. They’re just so fun and festive, and they really capture the essence of the holiday. That’s why I’m excited to share my tried-and-true recipe with you today. Trust me, once you make these Thanksgiving Cake Pops, they’re going to become your new go-to!
Why This Thanksgiving Cake Pops Recipe Will Become Your Go-To
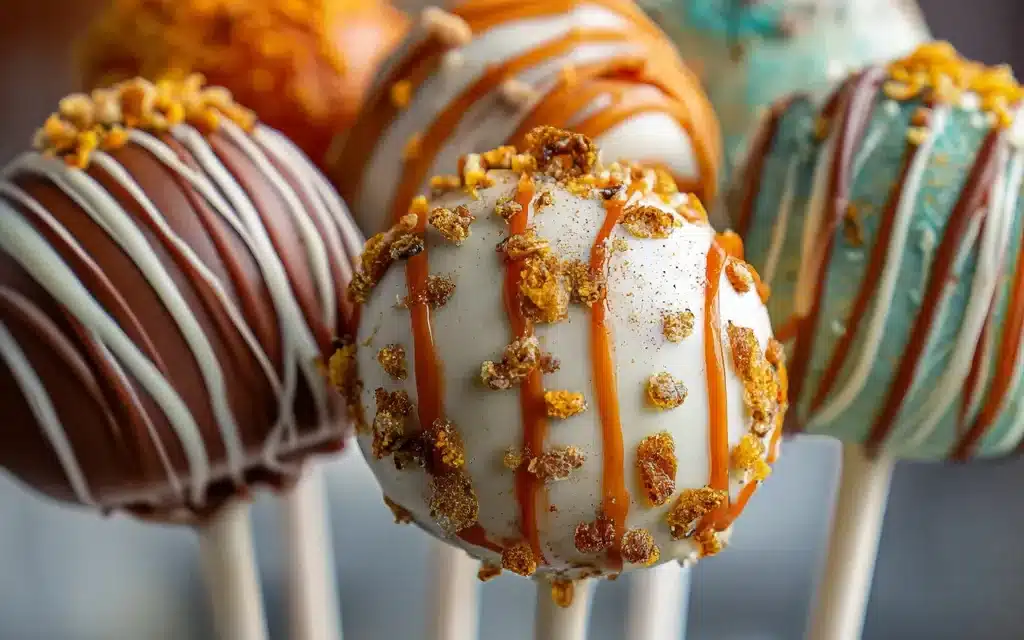
The secret behind these perfect Thanksgiving Cake Pops is all in the technique. Most recipes call for simply mixing cake crumbs with frosting and shaping them into balls. But I’ve discovered a few little tricks that take these pops to the next level. First, I use a combination of spices like cinnamon, ginger, and nutmeg to really amp up the autumnal flavor. And instead of just rolling the mixture into balls, I carefully shape each one into a mini pumpkin or acorn. The result is a dessert that’s not only delicious, but also incredibly cute and Instagram-worthy.
The Secret Behind Perfect Thanksgiving Cake Pops
Another key to success is in the coating. I always use a high-quality white chocolate or candy melts, and I make sure to temper it properly so it has a smooth, shiny finish. Then I top each Thanksgiving Cake Pop with festive sprinkles, edible glitter, or even a little dollop of orange frosting. The attention to detail really makes all the difference.
Essential Ingredients You’ll Need
– Baked yellow cake – The cake serves as the base for these pops, and yellow is the perfect neutral flavor to complement the Thanksgiving spices.
– Cream cheese frosting – This rich, creamy frosting helps bind the cake crumbs together and adds moisture.
– Cinnamon, ginger, nutmeg – These warm, fragrant spices evoke the flavors of fall and Thanksgiving.
– White chocolate or candy melts – The chocolate coating gives the pops their signature hard shell.
– Orange and gold sprinkles – For that extra touch of Thanksgiving flair!
Step-by-Step Thanksgiving Cake Pops Instructions
Preparing Your Thanksgiving Cake Pops
Baking and assembling these Thanksgiving Cake Pops is a multi-step process, but I promise it’s worth the effort. Plan to set aside about 2-3 hours from start to finish. You’ll need a few key tools like a cake pop maker or lollipop sticks, a double boiler or microwave for melting the chocolate, and a piping bag for drizzling and decorating.
1- Start by baking a simple yellow cake according to the package instructions. Allow it to cool completely, then crumble the cake into fine pieces in a large mixing bowl.
2- In a separate bowl, prepare your cream cheese frosting. Fold the frosting into the cake crumbs until the mixture is well combined and holds its shape when squeezed.
3- Using a small cookie scoop or your hands, portion the cake pop mixture into 1-inch balls. Carefully shape each ball into a mini pumpkin or acorn shape, pinching the top to create a stem-like point.
4- Place the shaped cake pops on a parchment-lined baking sheet and freeze for 30 minutes to firm up.
5- Meanwhile, melt your white chocolate or candy melts in a double boiler or the microwave, stirring frequently until smooth.
6- One by one, dip the chilled cake pops into the melted chocolate, making sure to coat them completely. Tap off any excess, then place the coated pops back on the baking sheet. Immediately top with orange and gold sprinkles before the chocolate sets.
Pro Tips for Success
The key to perfect Thanksgiving Cake Pops is all in the details. Make sure to fully chill the cake pop centers before dipping them, and be patient when melting the chocolate – you want a silky smooth consistency for that flawless coating. And don’t be afraid to get creative with your decorations! A drizzle of orange frosting or a sprinkle of edible glitter can take these pops to the next level.
Serving and Storing Your Thanksgiving Cake Pops
Perfect Pairings for Thanksgiving Cake Pops
These festive Thanksgiving Cake Pops are the perfect sweet treat to enjoy alongside your holiday feast. Serve them as part of a dessert spread with classic pumpkin pie, apple crisp, and pecan bars. They also make a great hostess gift or after-dinner nibble. And don’t forget the coffee or hot apple cider to wash them down!
Storage and Make-Ahead Tips
Thanksgiving Cake Pops are actually really easy to make ahead of time. Once the chocolate coating has set, you can store them in an airtight container at room temperature for up to 5 days. For longer storage, pop them in the freezer for up to 3 months. When ready to serve, simply thaw at room temperature. You can also refrigerate the uncoated cake pop centers in advance and dip them in chocolate the day of.
Variations and Dietary Adaptations for Thanksgiving Cake Pops
Creative Thanksgiving Cake Pops Variations
There are so many ways to customize these Thanksgiving Cake Pops to suit your tastes. Try swapping the yellow cake for spice cake or pumpkin cake for an even more autumnal flavor. You could also experiment with different colored chocolates, like milk chocolate or dark chocolate. And the decorating possibilities are endless – try topping them with crushed graham crackers, chopped pecans, or even a drizzle of caramel.
Making Thanksgiving Cake Pops Diet-Friendly
For a healthier twist, you can make these Thanksgiving Cake Pops gluten-free by using a gluten-free yellow cake mix. They can also be made dairy-free by using a non-dairy cream cheese alternative and vegan chocolate or carob melts. Just be sure to adjust the sweetness to taste, since some sugar-free and plant-based ingredients can be less sweet than their traditional counterparts.
Frequently Asked Questions
Q: Can I use a store-bought cake instead of baking from scratch?
A: Absolutely! Using a pre-baked cake is a great time-saver. Just be sure to crumble it finely before mixing with the frosting.
Q: How do I get the cake pops to hold their pumpkin/acorn shape?
A: The key is to freeze the shaped cake pops before dipping them in chocolate. This helps them retain their form and prevents them from becoming misshapen.
Q: Can I make Thanksgiving Cake Pops ahead of time?
A: Yes, these pops keep really well! Store them in an airtight container at room temperature for up to 5 days, or in the freezer for up to 3 months.
Q: How many cake pops does this recipe make?
A: This recipe will yield approximately 24-30 Thanksgiving Cake Pops, depending on the size you make them.
Q: What if my cake pops keep cracking when I dip them in chocolate?
A: Make sure your cake pop centers are thoroughly chilled before dipping. You can also try thinning out the chocolate coating with a bit of coconut oil or vegetable shortening to get a smoother, more pliable consistency.

Thanksgiving Cake Pops
- Total Time: 40
- Yield: 24 cake pops
Description
Thanksgiving Cake Pops are a fun and easy holiday treat that combines moist cake, rich cream cheese, and a decadent chocolate coating. Perfect for parties, these bite-sized pops are sure to delight your guests.
Ingredients
– 1 box of your favorite cake mix, baked and crumbled
– 1 (8 oz) package of cream cheese, softened
– 1 cup of melted chocolate (milk, dark, or white)
– Festive sprinkles, crushed graham crackers, or other toppings
Instructions
1. – In a large bowl, mix the crumbled cake and softened cream cheese until well combined.
2. – Using a small cookie scoop or spoon, form the mixture into 1-inch balls and place them on a parchment-lined baking sheet.
3. – Refrigerate the cake pops for at least 30 minutes to firm up.
4. – Melt the chocolate in a double boiler or in the microwave, stirring frequently until smooth.
5. – Dip the chilled cake pops into the melted chocolate, allowing any excess to drip off.
6. – Immediately top the chocolate-coated pops with your desired sprinkles or other toppings.
7. – Return the decorated cake pops to the refrigerator and chill for an additional 30 minutes to set the chocolate.
8. – Serve and enjoy your delicious Thanksgiving Cake Pops!
Notes
For a twist, try using different cake flavors or decorating the pops with edible glitter, crushed nuts, or a drizzle of white chocolate. Store any leftovers in an airtight container in the refrigerator.
- Prep Time: 30
- Cook Time: 10
- Category: Dessert
- Method: Baking
- Cuisine: American
Conclusion
There’s just something so special about homemade Thanksgiving Cake Pops. They capture all the cozy, festive flavors of the holiday in one delightful bite-sized treat. Plus, they’re incredibly fun and easy to make – perfect for getting the whole family involved in the kitchen.
So what are you waiting for? Whip up a batch of these adorable Thanksgiving Cake Pops and get ready to wow your guests. I promise they’ll be the talk of your holiday feast. And don’t forget to share your creations with me on social media – I can’t wait to see how you put your own spin on this recipe!


