Growing up, I have the fondest memories of my grandma’s Ube Butter Mochi. It was a staple in our household, and the mere sight of those pillowy purple squares would instantly transport me back to her cozy kitchen, the scent of vanilla and coconut wafting through the air. Grandma would spend hours carefully preparing the dough, kneading it with such love and precision, before gently folding in the sweet, vibrant ube.
When the Ube Butter Mochi finally emerged from the steamer, perfectly puffed and glistening, my siblings and I would crowd around the table, barely able to contain our excitement. We’d pop those chewy, decadent bites into our mouths, the rich, creamy filling melting on our tongues, and I can still feel the pure joy that would wash over me with each delightful morsel.
Those memories are the reason why this Ube Butter Mochi recipe has become my go-to. It’s not just a dessert – it’s a connection to my roots, a taste of my beloved grandmother’s legacy. And I’m thrilled to share it with you, because I know it’ll become a new favorite in your household too.
Why This Ube Butter Mochi Recipe Will Become Your Go-To
The secret behind the perfection of this Ube Butter Mochi lies in the balance of flavors and textures. The pillowy, chewy mochi exterior perfectly complements the rich, silky ube filling, creating a harmonious blend that’s simply irresistible. Plus, the addition of creamy butter takes this traditional Filipino treat to new heights of indulgence.
The Secret Behind Perfect Ube Butter Mochi
What sets this recipe apart is the careful attention to detail in the preparation process. By steaming the mochi dough to achieve the ideal texture, and then meticulously folding in the ube and butter, you’ll end up with a result that’s truly sublime. Trust me, one bite and you’ll be hooked!
Essential Ingredients You’ll Need
- Mochi Rice Flour: The foundation of the perfect Ube Butter Mochi, this special flour gives the dough its signature chewy and elastic texture.
- Ube Halaya: The vibrant, sweet ube filling is the star of the show, providing that vibrant purple hue and delectable flavor.
- Unsalted Butter: Adding a touch of richness and creaminess, the butter complements the ube beautifully.
- Coconut Milk: For a hint of tropical flavor and to keep the mochi moist and tender.
- Sugar: Just the right amount of sweetness to balance the other ingredients.
- Vanilla Extract: A classic flavor pairing that enhances the ube and brings it all together.
Step-by-Step Ube Butter Mochi Instructions
Preparing Your Ube Butter Mochi
Crafting the perfect Ube Butter Mochi is a labor of love, but the results are so worth it. In total, you’ll need about 1 hour and 15 minutes to complete this recipe, including the steaming and cooling time. Be sure to have a steamer basket or pot ready, as well as a lightly oiled surface for shaping the mochi.
1- Begin by combining the mochi rice flour, sugar, and a pinch of salt in a large bowl. Gradually stir in the coconut milk and vanilla extract, mixing until a soft dough forms.
2- Transfer the dough to a lightly greased steamer basket and steam for 15-20 minutes, until the mochi is puffed and translucent.
3- Remove the steamed mochi from the basket and transfer it to a clean, lightly oiled surface. Knead the dough for 2-3 minutes, until it becomes smooth and elastic.
4- Divide the mochi dough into 12 equal pieces, then use your hands to flatten each one into a round disc. Place a heaping teaspoon of ube halaya in the center of each disc, then bring the edges up and around the filling, pinching to seal.
5- Gently roll the filled mochi balls in a bit of mochi rice flour to prevent sticking, then place them on a parchment-lined baking sheet.
6- Finally, melt the butter in a small saucepan over low heat, then use a spoon to drizzle a bit of melted butter over the top of each Ube Butter Mochi. Serve immediately, or allow to cool completely before enjoying.
Pro Tips for Success
The key to perfect Ube Butter Mochi is all about technique. Be sure to steam the mochi dough just until it’s puffed and translucent, but not overcooked, which can make it dry and brittle. And when it comes to filling and shaping the mochi, a light, gentle touch is essential to maintain that soft, pillowy texture.
Another pro tip? Don’t be afraid to get creative with the filling. While the classic ube halaya is divine, you could also try swapping in other sweet fillings like sweetened red bean paste or even a luscious chocolate ganache for a fun twist.
Serving and Storing Your Ube Butter Mochi
Perfect Pairings for Ube Butter Mochi
Ube Butter Mochi is the kind of treat that can be enjoyed anytime, anywhere. Serve it up as a sweet afternoon snack, a decadent dessert after a meal, or even as a unique addition to a holiday spread. For optimal enjoyment, I recommend pairing it with a steaming cup of jasmine or green tea, which complement the richness of the ube and butter beautifully.
Storage and Make-Ahead Tips
Luckily, Ube Butter Mochi keeps quite well, making it the perfect make-ahead treat. Once cooled, you can store the mochi in an airtight container in the refrigerator for up to 5 days. When you’re ready to serve, simply let them come to room temperature for about 30 minutes before enjoying. They can also be frozen for up to 2 months – just be sure to thaw them in the fridge overnight before serving.
Variations and Dietary Adaptations for Ube Butter Mochi
Creative Ube Butter Mochi Variations
While the classic Ube Butter Mochi is a true delight, there are plenty of ways to put your own spin on this recipe. For a seasonal twist, you could try incorporating pumpkin or sweet potato purée into the filling for a festive fall version. Or, for a tropical flair, add a touch of coconut extract to the dough and top the mochi with toasted coconut flakes.
Making Ube Butter Mochi Diet-Friendly
Craving Ube Butter Mochi but following a special diet? No problem! This recipe can easily be adapted to suit gluten-free, vegan, or low-carb preferences. Simply swap the mochi rice flour for a gluten-free variety, use dairy-free butter or coconut oil in place of the regular butter, and opt for a sugar-free ube halaya or keto-friendly sweetener. With a few simple substitutions, you can enjoy this delectable treat without compromising your dietary needs.
Frequently Asked Questions
Q: Can I use store-bought ube halaya instead of making it from scratch?
A: Absolutely! Store-bought ube halaya works wonderfully in this recipe. Just be sure to check the label and choose a high-quality brand without any artificial additives.
Q: How do I know when the mochi dough is properly steamed?
A: The mochi dough is ready when it’s puffed up and translucent. You can also do a quick test by pressing on the dough – it should be soft and springy, but not at all sticky or wet.
Q: Can I make the Ube Butter Mochi in advance?
A: Yes, Ube Butter Mochi is a great make-ahead treat. Once cooled, you can store them in an airtight container in the fridge for up to 5 days, or in the freezer for up to 2 months. Just be sure to let thawed mochi come to room temperature before serving.
Q: How many Ube Butter Mochi does this recipe make?
A: This recipe yields 12 individual Ube Butter Mochi. The portion size is quite generous, so you may want to consider scaling the recipe up or down depending on your needs.
Q: Why are my Ube Butter Mochi cracking?
A: Overly dry mochi dough or over-kneading can cause the mochi to crack during the filling and shaping process. Be sure to follow the steaming and kneading instructions closely, and handle the dough gently to prevent this issue.
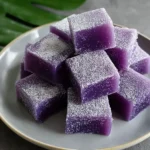
Ube Butter Mochi
- Total Time: 25
- Yield: 18 mochi
Description
Discover the magic of Ube Butter Mochi – a quick, easy, and utterly delicious Hawaiian treat. Featuring the vibrant purple hue and rich, creamy flavor of ube, this soft, pillowy mochi is a must-try for any sweet tooth.
Ingredients
– 1 cup ube puree
– 1/2 cup unsalted butter, softened
– 1/2 cup granulated sugar
– 1 cup mochiko (sweet rice flour)
– 2 tablespoons all-purpose flour
– 1/4 teaspoon salt
Instructions
1. – In a medium bowl, combine the ube puree, softened butter, and sugar. Mix until well incorporated.
2. – In a separate bowl, whisk together the mochiko, all-purpose flour, and salt.
3. – Add the dry ingredients to the ube mixture and stir until a smooth, sticky dough forms.
4. – Lightly grease a baking sheet or line it with parchment paper.
5. – Scoop heaping tablespoons of the dough and roll them into balls, placing them on the prepared baking sheet.
6. – Bake at 350°F for 15-18 minutes, or until the mochi are puffed and slightly golden on the edges.
7. – Allow the mochi to cool completely before serving.
Notes
– For a softer, more melt-in-your-mouth texture, you can steam the mochi instead of baking.
– Experiment with different toppings or fillings, such as sweetened coconut, chopped nuts, or a dollop of ube halaya.
– Store the mochi in an airtight container at room temperature for up to 3 days.
- Prep Time: 10
- Cook Time: 15
- Category: Dessert
- Method: Baking
- Cuisine: Hawaiian
Conclusion
Ube Butter Mochi holds a special place in my heart, and I’m thrilled to share this cherished recipe with you. The vibrant ube filling, the soft and chewy mochi exterior, and the rich, creamy butter – it’s a flavor combination that’s simply out of this world.
I encourage you to give this Ube Butter Mochi a try, and I’m certain it’ll become a new family favorite in your household too. Let me know how it turns out in the comments below, and don’t forget to share your creations on social media using the hashtag #UbeButterMochi. Enjoy!


