
As a child, I can vividly remember the excitement of Easter morning. My siblings and I would scramble down the stairs, eager to see what the Easter Bunny had left for us. But one of my favorite parts of the holiday was always helping my mom make our traditional Easter Deviled Egg Chicks. There’s just something so whimsical and joyful about transforming ordinary hard-boiled eggs into these adorable little chicks.
My mom would patiently guide us through the process, letting us arrange the sliced olives and stuff the creamy yolk mixture into the egg whites. I can still picture the proud look on her face as we presented our colorful, polka-dotted creations. It was a cherished family ritual that always felt like the perfect way to kick off the spring season.
Why This Easter Deviled Egg Chicks Recipe Will Become Your Go-To
The Secret Behind Perfect Easter Deviled Egg Chicks
Even as an adult, I still turn to this Easter Deviled Egg Chicks recipe year after year. There’s just something so satisfying about the rich, tangy filling paired with the crisp, fresh egg whites and the playful olive accents. But what really sets this recipe apart is the attention to detail that goes into each step. From perfectly cooked hard-boiled eggs to a silky-smooth yolk mixture, every element comes together to create a truly impressive (and delicious) final product.
Essential Ingredients You’ll Need
At the heart of this recipe are, of course, the hard-boiled eggs. You’ll need 12 in total, which will yield 24 adorable deviled egg chicks. The key is to make sure you cook the eggs just right – not too soft, not too firm.
The filling is a simple blend of mayonnaise and Dijon mustard, which provides a creamy, tangy base. A sprinkle of paprika adds a subtle warmth and beautiful color. And of course, you can’t forget a pinch of salt and pepper to really make the flavors sing.
The real stars of the show, though, are the black olives and red pimiento-stuffed olives. These provide the perfect finishing touches, transforming the plain egg whites into the cutest little chicks you’ve ever seen.
Step-by-Step Easter Deviled Egg Chicks Instructions
Preparing Your Easter Deviled Egg Chicks
This Easter Deviled Egg Chicks recipe is a breeze to make, with a total prep and cook time of just 15 minutes. All you’ll need are a few basic tools – a pot for boiling the eggs, a bowl for mixing the filling, and a sharp knife for slicing the olives.
1- Start by carefully placing the 12 eggs in a single layer in a pot and covering them with cold water. Bring the water to a boil over high heat, then reduce the heat and let the eggs simmer for 12 minutes. Drain the hot water and cover the eggs with cold water to stop the cooking.
2- Once the eggs are cool enough to handle, gently peel off the shells. Slice each egg in half lengthwise, carefully scooping out the yolks and placing them in a mixing bowl.
3- Add the mayonnaise, Dijon mustard, paprika, and a pinch of salt and pepper to the yolks. Use a fork to mash and mix the ingredients until you have a smooth, creamy filling.
4- Scoop the yolk mixture back into the egg white halves, making sure to fill each one evenly. The filling should be slightly mounded on top.
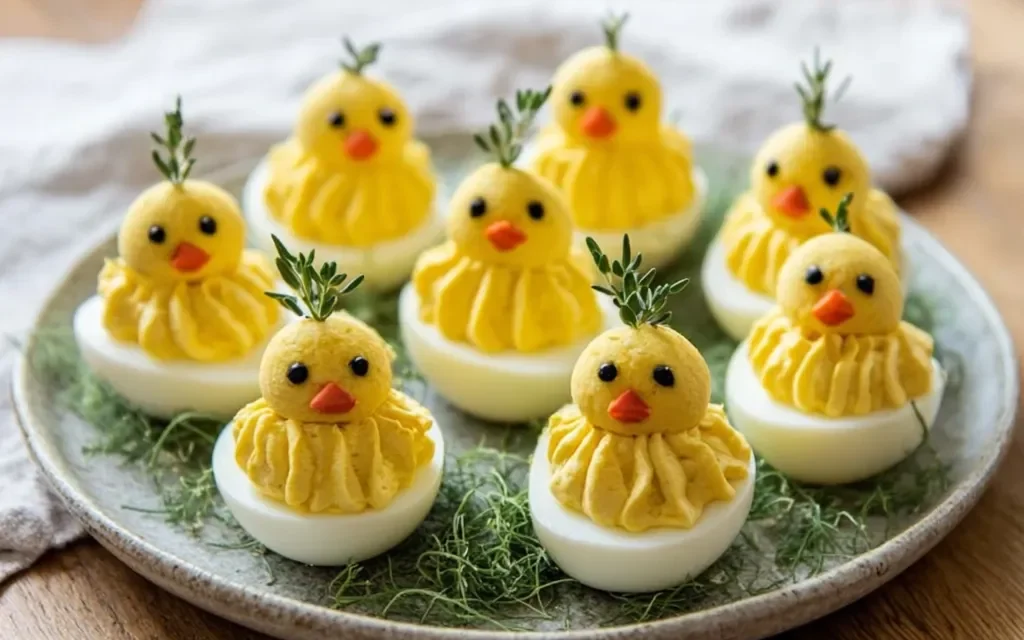
5- Slice the black olives and the red pimiento-stuffed olives. Arrange the sliced olives on top of the filled egg whites to create the “chick” features – the black olives for the eyes and feet, and the red olives for the beaks.
6- Arrange your Easter Deviled Egg Chicks on a serving platter and marvel at their adorable, whimsical appearance. Serve immediately, or refrigerate until ready to enjoy.
Pro Tips for Success
- Make sure to boil the eggs for exactly 12 minutes to achieve the perfect hard-boiled consistency. Overcooking can lead to green yolks and a rubbery texture.
- Gently tap the eggs against the counter to crack the shells before peeling – this will help the shells slide off more easily.
- For the smoothest, creamiest filling, be sure to mash the yolks thoroughly before adding the mayonnaise and mustard.
- Get creative with the olive placement! You can experiment with different patterns and configurations to make each chick unique.
Serving and Storing Your Easter Deviled Egg Chicks
Perfect Pairings for Easter Deviled Egg Chicks
These adorable Easter Deviled Egg Chicks are the perfect appetizer or side dish for any spring gathering. Serve them alongside a fresh salad, some crusty bread, and a crisp white wine or refreshing iced tea. They also make a delightful contribution to an Easter brunch spread, complementing dishes like quiche, breakfast casseroles, and fresh fruit.
With 24 deviled egg chicks in this recipe, you’ll have plenty to share with family and friends. They’re sure to be the hit of any Easter celebration!
Storage and Make-Ahead Tips
One of the best things about this Easter Deviled Egg Chicks recipe is that it’s a total breeze to prepare in advance. You can hard-boil the eggs and make the yolk filling up to 3 days ahead of time, then simply assemble and garnish with the olives right before serving.
To store the prepared deviled egg chicks, place them in an airtight container in the refrigerator. They’ll stay fresh for up to 3 days. Just be sure to keep them chilled until you’re ready to enjoy them.
If you’d like to make the deviled eggs further in advance, you can even freeze the filling. Simply scoop the yolk mixture into a freezer-safe container and freeze for up to 2 months. When you’re ready to serve, thaw the filling in the refrigerator overnight, then fill the egg whites and top with the olive garnishes.
Variations and Dietary Adaptations for Easter Deviled Egg Chicks
Creative Easter Deviled Egg Chicks Variations
While the classic Easter Deviled Egg Chicks recipe is a surefire hit, there are plenty of ways to put your own spin on this spring favorite. Try swapping out the Dijon mustard for a zestier horseradish or spicy brown mustard. You could also add a sprinkle of finely chopped fresh chives or dill for a pop of color and flavor.
For a Mexican-inspired twist, stir in a teaspoon of cumin and a dash of hot sauce to the yolk mixture. Top the chicks with diced jalapeño or crumbled queso fresco for a south-of-the-border flair.
And if you really want to get creative, you could use the same technique to make “Easter Bunny” deviled eggs, using carrot shreds for the ears and a pink pimiento-stuffed olive for the nose.
Making Easter Deviled Egg Chicks Diet-Friendly
This Easter Deviled Egg Chicks recipe is already naturally gluten-free, but you can easily adapt it to fit other dietary needs as well. For a vegan or dairy-free version, simply swap the mayonnaise for a plant-based alternative, like cashew cream or silken tofu.
If you’re watching your carb intake, you can skip the Dijon mustard and use a low-carb sweetener instead. Just be sure to taste and adjust the seasoning as needed. You could also serve the deviled egg chicks on a bed of mixed greens for a light and healthy appetizer.
No matter how you choose to tweak this recipe, the end result is sure to be a delightful and Instagram-worthy addition to your Easter celebration.
Frequently Asked Questions
Q: Can I substitute the mayonnaise with something else?
A: Absolutely! For a dairy-free or vegan version, you can use a plant-based mayo alternative, like cashew cream or silken tofu. Just be sure to adjust the seasoning as needed.
Q: How long does it take to prepare the Easter Deviled Egg Chicks?
A: This recipe has a total time of just 15 minutes – 12 minutes for boiling the eggs, and 3 minutes for assembling the deviled egg chicks. The hands-on prep time is only about 15 minutes.
Q: Can I make the deviled egg chicks in advance?
A: Yes, you can definitely prepare this recipe ahead of time! The hard-boiled eggs and yolk filling can be made up to 3 days in advance. Simply assemble the chicks and add the olive garnishes right before serving.
Q: How many deviled egg chicks does this recipe make?
A: This Easter Deviled Egg Chicks recipe yields 24 individual servings. It’s the perfect amount to share with family and friends at your Easter celebration.
Q: What if my deviled egg chicks don’t turn out perfect?
A: Don’t worry – even if your chicks aren’t 100% picture-perfect, they’ll still taste delicious! Focus on getting the yolk filling just right, and have fun with the olive placements. Your guests will appreciate the homemade touch.
Conclusion
Easter Deviled Egg Chicks have been a beloved tradition in my family for as long as I can remember. There’s just something so whimsical and joyful about transforming ordinary hard-boiled eggs into these adorable little chicks. And this recipe makes it easier than ever to create this springtime showstopper.
With its perfect balance of creamy, tangy, and savory flavors, and the playful olive accents, this Easter Deviled Egg Chicks recipe is sure to become a new family favorite. So this year, why not ditch the boring old deviled eggs and give these cheeky chicks a try? I promise your guests will be delighted – and you’ll have a blast making them, too. Hop to it and let me know how they turn out!


