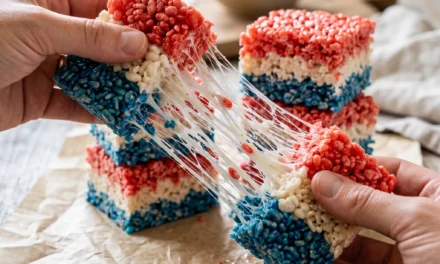
I remember the first time I made Brown Butter Rice Krispie Treats. It was a rainy Sunday afternoon, and the clouds hung low, promising a cozy day indoors. I had just returned from a trip to the farmer’s market, where I’d picked up some fresh ingredients, but it was the bag of Rice Krispies that caught my eye on the shelf at home. It brought back memories of childhood—those classic treats that always felt like a hug in dessert form. But I wanted to elevate this nostalgic favorite, so I decided to brown the butter.
As the butter melted in the pan, it transformed from a pale yellow to a deep golden brown, releasing an intoxicating nutty aroma that filled my kitchen. I couldn’t help but smile, reminiscing about the countless times I’d whipped up those gooey bars with my mom. When I stirred in the mini marshmallows, they melted into a dreamy, velvety mixture, and as I added the Rice Krispies, the magic happened.
The combination of the crunchy cereal and the sweet, caramel-like flavor from the browned butter and brown sugar made each bite an irresistible treat. I remember serving them to friends later that day, and their eyes lit up with delight as they took their first bites. The joy of sharing those Brown Butter Rice Krispie Treats created a moment that lingered long after the last square was eaten. It’s become my go-to recipe for gatherings, and I can’t wait for you to make it your own!
Why This Brown Butter Rice Krispie Treats Recipe Will Become Your Go-To
The Secret Behind Perfect Brown Butter Rice Krispie Treats
What sets this recipe for Brown Butter Rice Krispie Treats apart is the rich, nutty flavor of the browned butter. Browning the butter not only adds depth but creates a sophisticated twist on a classic treat. The caramel undertones from the brown sugar amplify the sweetness while providing a beautifully complex flavor profile that elevates this childhood favorite.
Also, using mini marshmallows ensures a gooey, sticky texture that perfectly binds the Rice Krispies. It’s a perfect blend of crunchy and chewy, with just the right amount of sweetness. This recipe is straightforward yet yields impressive results, making it an ideal choice for both novice bakers and seasoned pros. You’ll love how quick and simple it is to whip up, making it a fantastic last-minute dessert for gatherings or a cozy night in.
Essential Ingredients You’ll Need
To achieve those amazing Brown Butter Rice Krispie Treats, you’ll need the following ingredients:
1/2 cup unsalted butter
Unsalted butter is crucial for controlling the saltiness in your treats. When browned, it adds a deep, nutty flavor that takes your Rice Krispie Treats to the next level.
1 package (10 oz) mini marshmallows
Mini marshmallows melt beautifully, creating a gooey binding for the cereal. Their size ensures even distribution throughout the treat.
1/2 cup brown sugar
Brown sugar gives the treats a rich, caramel-like flavor. The molasses in the sugar not only enhances the sweetness but also adds moisture, making your treats soft and chewy.
1/2 tsp vanilla extract
Vanilla extract adds warmth and depth to the flavor profile, complementing the nuttiness of the brown butter and sweetness of the marshmallows.
6 cups Rice Krispies cereal
Rice Krispies provide the perfect crunch and texture to your treats. They’re light and airy, allowing them to soak in all the delicious flavors from the other ingredients.
Pinch of salt
A pinch of salt balances the sweetness and enhances all the flavors, making every bite irresistible.
Step-by-Step Brown Butter Rice Krispie Treats Instructions
Preparing Your Brown Butter Rice Krispie Treats
Making these Brown Butter Rice Krispie Treats is a breeze! With a prep time of just 15 minutes and a cook time of 10 minutes, you can enjoy these treats in a total of 25 minutes. You’ll need a large saucepan, a mixing spoon, and a baking dish (9×13 inches works perfectly).
1- Start by placing the unsalted butter in your saucepan over medium heat. Keep an eye on it as it melts, stirring occasionally. In about 5 minutes, you’ll notice the butter transitioning from clear to a golden hue, and it will begin to foam. Continue stirring until it turns a rich brown color and smells nutty—this is the point where the magic happens!
2- Once the butter is browned, reduce the heat to low and add the mini marshmallows and brown sugar. Stir continuously until the mixture is smooth and glossy, which should take about 2-3 minutes. The marshmallows will melt quickly, and you’ll want to make sure there are no lumps.
3- Next, remove the saucepan from heat and stir in the vanilla extract and a pinch of salt. The mixture will bubble slightly as you add these ingredients. Be careful—this part is crucial for flavor. Make sure everything is well combined before moving to the next step.
4- In a large mixing bowl, pour the Rice Krispies cereal. Gradually add the melted marshmallow mixture, folding it in gently. You want to coat the cereal evenly without crushing it, which should take about 2 minutes. You’ll notice the texture becoming sticky and cohesive.
5- Once combined, transfer the mixture to your greased baking dish. Use a spatula or your hands (lightly greased) to press it down evenly. Ensure it’s packed tightly but not overly compressed to maintain that wonderful texture.
6- Let the treats cool in the pan for about 10 minutes before cutting them into squares. The final result should be golden-brown squares that are perfectly chewy and hold their shape well. Serve them on a platter, and watch your friends and family devour them!
Pro Tips for Success
To ensure your Brown Butter Rice Krispie Treats turn out perfectly, here are some expert tips:
- Don’t rush the browning process—patience is key. The flavor of browned butter is worth the wait.
- Use a large saucepan to give room for the marshmallows to expand as they melt. This helps prevent overflow.
- If you want extra texture, consider adding mix-ins like chocolate chips or nuts right before pressing the mixture into the pan.
- Be careful not to over-press the mixture into the pan; it should be firm but not overly compacted to maintain a light texture.
- Allow the treats to cool completely before cutting them. This helps them set properly and makes cutting easier.
Serving and Storing Your Brown Butter Rice Krispie Treats
Perfect Pairings for Brown Butter Rice Krispie Treats
These Brown Butter Rice Krispie Treats serve 12, making them perfect for sharing at parties or family gatherings. Pair them with a scoop of vanilla ice cream for a delightful dessert experience. They’re also great alongside a warm cup of hot chocolate, especially during chilly evenings. For a fun twist, consider serving them with a berry compote or fresh fruit. The sweet-tart flavors will complement the rich, buttery treats beautifully.
Storage and Make-Ahead Tips
To store your Brown Butter Rice Krispie Treats, keep them in an airtight container at room temperature for up to three days. If you want to extend their life, you can refrigerate them for about a week. For longer storage, wrap individual squares in plastic wrap and place them in a freezer-safe container. They can last up to two months in the freezer. When you’re ready to enjoy them, let them thaw at room temperature for about 30 minutes or microwave them for a few seconds to soften.
Variations and Dietary Adaptations for Brown Butter Rice Krispie Treats
Creative Brown Butter Rice Krispie Treats Variations
There are so many fun ways to customize your Brown Butter Rice Krispie Treats! Here are a few ideas:
- Chocolate Drizzle: Melt some chocolate and drizzle it over the cooled treats for an extra layer of flavor.
- Nutty Delight: Add chopped nuts like pecans or almonds into the mixture for a crunchy texture.
- Seasonal Flavors: Incorporate pumpkin spice for fall or peppermint extract during the holidays for a festive twist.
- S’mores Style: Mix in crushed graham crackers and mini chocolate chips for a s’mores-inspired treat.
Making Brown Butter Rice Krispie Treats Diet-Friendly
If you’re looking to adapt this recipe for dietary restrictions, here are some options:
- Gluten-Free: Ensure you use gluten-free Rice Krispies, as some brands may contain gluten.
- Vegan: Substitute the unsalted butter for vegan butter or coconut oil, and use dairy-free marshmallows to make these treats vegan-friendly.
- Low-Carb: Replace Rice Krispies with a low-carb cereal alternative and use sugar-free marshmallows to keep the carb count down.
- Sugar-Free: Consider using a sugar substitute for the brown sugar, but keep in mind the texture might vary slightly.
Frequently Asked Questions
Q: Can I substitute the mini marshmallows with regular marshmallows?
A: Yes, you can use regular marshmallows, but you’ll need about 4 cups to equal the volume of the mini ones. They will melt down just as well!
Q: How long does it take to make these treats?
A: The total time for making Brown Butter Rice Krispie Treats is about 25 minutes, with 15 minutes of prep and 10 minutes of cook time.
Q: Can I make these treats ahead of time?
A: Absolutely! You can make them a day in advance and store them in an airtight container at room temperature. They’ll stay fresh and delicious.
Q: How many servings does this recipe yield?
A: This recipe makes 12 servings, perfect for sharing with family and friends at gatherings or parties.
Q: What should I do if my treats turn out too hard?
A: If your treats are too hard, it might be due to overcooking the marshmallows or pressing them too firmly into the pan. To fix this, you can melt more marshmallows and mix them in to soften the texture.
Conclusion
Brown Butter Rice Krispie Treats are not just a dessert; they’re a delightful way to create memories and share joy. The rich, nutty flavor of the brown butter combined with the gooey marshmallows and crunchy Rice Krispies makes for an irresistible treat. I encourage you to try making these at home! Share your experiences in the comments, and let me know how your treats turn out. Don’t forget to spread the love by sharing this recipe with your friends! Happy baking!