
Growing up, I can remember the anticipation building as my grandma would start prepping her famous homemade orange candy. The sweet, citrusy aroma would fill the air, and I just couldn’t wait to get my hands on those bite-sized bursts of sunshine. It was a tradition that brought our family together, and I’ll always cherish those memories of gathered around the kitchen, watching the magic happen.
Now, as an adult, I find myself craving that nostalgic flavor more than ever. That’s why I’m so excited to share this foolproof homemade orange candy recipe with you. Trust me, once you taste the perfect balance of tangy and sweet, you’ll be hooked too.
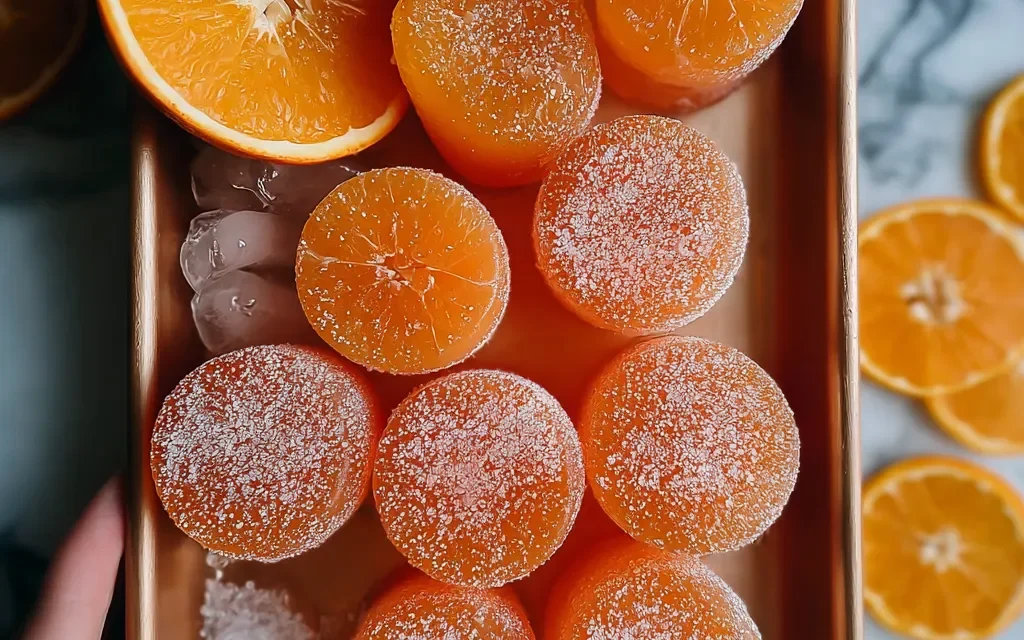
Why This Homemade Orange Candy Recipe Will Become Your Go-To
The Secret Behind Perfect Homemade Orange Candy
What sets this homemade orange candy recipe apart is the attention to detail. By carefully controlling the sugar-to-water ratio and incorporating just the right amount of zest, you end up with a confection that’s not too sticky, not too dry – it’s the Goldilocks of orange candies. And the addition of a pinch of salt? That’s the secret ingredient that really makes the flavors pop.
Essential Ingredients You’ll Need
Let’s take a closer look at the key players in this recipe:
- 2 cups granulated sugar – The foundation of the candy, providing sweetness and structure.
- 1 cup water – Helps dissolve the sugar and creates the perfect syrupy texture.
- 1 tablespoon orange zest – This is where all the bright, citrusy flavor comes from. Don’t skip this!
- 1/4 teaspoon salt – A small but mighty addition that balances the sweetness and enhances the overall taste.
With just these four ingredients, you’re on your way to homemade orange candy bliss.
Step-by-Step Homemade Orange Candy Instructions
Preparing Your Homemade Orange Candy
Homemade orange candy is a quick and easy treat, taking just 15 minutes of prep time and 15 minutes of cook time for a total of 30 minutes. You’ll need a medium saucepan, a candy thermometer, and a silicone baking mat or parchment paper for this recipe.
1- Start by combining the sugar and water in the saucepan. Bring the mixture to a boil over medium-high heat, stirring constantly until the sugar has completely dissolved.
2- Once boiling, stop stirring and allow the mixture to cook, undisturbed, until it reaches 300°F on your candy thermometer. This should take around 10-12 minutes.
3- As the mixture heats up, it will start to turn a light golden color. Keep a close eye on it to prevent burning.
4- When the syrup reaches 300°F, immediately remove it from the heat and stir in the orange zest and salt. Be careful, as the mixture will bubble up vigorously.
5- Working quickly, pour the hot candy mixture onto the prepared baking mat or parchment paper, spreading it out into a thin, even layer.
6- Allow the candy to cool completely at room temperature, then break it into bite-sized pieces to serve.
Pro Tips for Success
- Use fresh, fragrant orange zest for maximum flavor. Avoid the bitter white pith.
- Monitor the temperature closely – 300°F is the magic number for getting the perfect candy texture.
- Pour the mixture onto the baking mat or parchment paper as soon as it reaches temperature to prevent overcooking.
- Let the candy cool completely before breaking it into pieces. Trying to break it too soon will result in a sticky mess.
Serving and Storing Your Homemade Orange Candy
Perfect Pairings for Homemade Orange Candy
This homemade orange candy recipe yields 24 delightful candies, making it perfect for sharing. Serve them alongside a steaming mug of hot tea or coffee for a cozy afternoon treat. They also make a wonderful addition to holiday cookie platters or as a hostess gift.
Storage and Make-Ahead Tips
Homemade orange candy stores beautifully. Keep the cooled, broken pieces in an airtight container at room temperature for up to 2 weeks. For longer storage, you can freeze the candy in a single layer for up to 3 months. When ready to enjoy, simply thaw at room temperature.
If you’d like to get a head start, you can make the candy up to 5 days in advance. Just be sure to store it properly in an airtight container. When it’s time to serve, the candy will be just as fresh and delicious as the day you made it.
Variations and Dietary Adaptations for Homemade Orange Candy
Creative Homemade Orange Candy Variations
While the classic orange candy is a true delight, there are plenty of ways to switch it up. Try adding a teaspoon of orange extract for an even more intense citrus flavor. Or, for a festive twist, stir in a tablespoon of finely chopped candied ginger. You could also experiment with different zest, like lemon or lime, for a fun flavor twist.
Making Homemade Orange Candy Diet-Friendly
Looking to enjoy homemade orange candy while sticking to a specific diet? No problem! For a gluten-free version, simply use a gluten-free sugar substitute. To make it vegan, swap the granulated sugar for coconut sugar or maple syrup. And for a low-carb take, use a keto-friendly sweetener like erythritol or xylitol instead of regular sugar.
Frequently Asked Questions
Q: Can I use orange juice instead of zest?
A: While orange juice can work in some candy recipes, it’s not the best substitute for the zest in this homemade orange candy. The zest provides a much more concentrated and vibrant orange flavor. Stick with the 1 tablespoon of freshly grated zest for best results.
Q: How long does it take to cook the candy to 300°F?
A: The total cook time for the candy to reach 300°F is about 10-12 minutes. Keep a close eye on the temperature and stir the mixture occasionally to ensure even heating.
Q: Can I store the homemade orange candy in the fridge?
A: No need to refrigerate your homemade orange candy. It will keep perfectly well stored in an airtight container at room temperature for up to 2 weeks. Refrigeration can actually cause the candy to become sticky and lose its texture.
Q: How many candies does this recipe make?
A: This homemade orange candy recipe yields 24 delicious bite-sized pieces. It’s the perfect amount for sharing with friends and family.
Q: My candy turned out grainy – what went wrong?
A: If your homemade orange candy ended up with a grainy texture, it’s likely that the sugar didn’t fully dissolve before reaching the right temperature. Next time, be sure to stir the sugar and water mixture constantly until it reaches a rolling boil and the sugar has completely dissolved.

Homemade Orange Candy
- Total Time: 30
- Yield: 24 candies
Description
Elevate your snack game with these irresistible Homemade Orange Candies! Bursting with fresh, zesty orange flavor, these easy-to-make treats are perfect for sharing, gifting, or indulging in as a sweet pick-me-up.
Ingredients
– 2 cups granulated sugar
– 1 cup water
– 1 tablespoon orange zest
– 1/4 teaspoon salt
Instructions
1. In a medium saucepan, combine the sugar and water. Bring to a boil over medium-high heat, stirring frequently until the sugar has dissolved.
2. Reduce the heat to medium-low and let the mixture simmer, without stirring, until it reaches 240°F on a candy thermometer, about 15-20 minutes.
3. Remove the pan from the heat and stir in the orange zest and salt. Pour the mixture onto a baking sheet lined with parchment paper.
4. Allow the candy to cool completely, then use a knife or cookie cutters to cut it into desired shapes.
5. Store the homemade orange candies in an airtight container at room temperature for up to 2 weeks.
Notes
Feel free to experiment with different citrus zests, like lemon or grapefruit, for a twist on the classic orange flavor. These candies also make a wonderful homemade gift!
- Prep Time: 15
- Cook Time: 15
- Category: Dessert
- Method: Stovetop
- Cuisine: American
Conclusion
Homemade orange candy is a true labor of love, but trust me, it’s so worth it. The vibrant citrus flavor and satisfying crunch are simply unbeatable. Whether you’re whipping up a batch for a special occasion or just because, this recipe is sure to become a new family favorite.
I can’t wait for you to experience the joy of making (and eating!) homemade orange candy. Give it a try, and don’t forget to let me know how it turns out in the comments below. Enjoy!


