
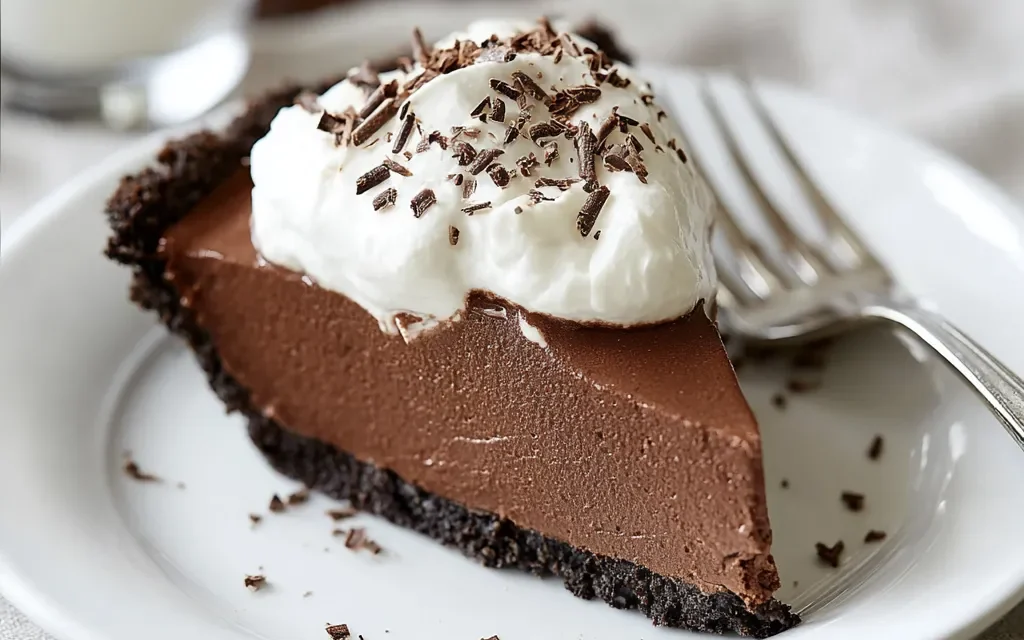
I can still vividly remember the first time my grandmother served up her legendary Chocolate Silk Pie. I was just a little girl, probably no more than 8 or 9 years old, and the moment I took that first heavenly bite, I was hooked. The rich, silky smooth chocolate filling melted on my tongue, while the buttery crust provided the perfect contrast in texture. From that day on, Chocolate Silk Pie became a staple at every family gathering, a dessert that we all eagerly anticipated and absolutely devoured.
Now, as an adult, I’ve tried countless variations of Chocolate Silk Pie, but none of them can quite compare to my grandmother’s original recipe. There’s just something so special and unique about the way she made it, and I’m convinced it has to do with the quality of the ingredients and the love she poured into every step. That’s why I’m thrilled to be sharing her recipe with you today – because I truly believe this Chocolate Silk Pie will become a go-to favorite in your household, just like it is in mine.
Why This Chocolate Silk Pie Recipe Will Become Your Go-To
The Secret Behind Perfect Chocolate Silk Pie
What sets this Chocolate Silk Pie recipe apart is the perfect balance of rich, velvety chocolate and the lightest, most airy texture imaginable. The secret lies in the technique – by carefully melting the chocolate and then whipping it with softened butter, sugar, and eggs, you end up with a filling that’s decadent and indulgent, yet surprisingly light and smooth.
The key is to take your time and really let the ingredients come together properly. Don’t be tempted to rush the process, as each step is crucial to achieving that signature silky-smooth texture. And of course, using high-quality chocolate is an absolute must. I recommend going with a semi-sweet variety, as it provides the perfect contrast to the sweetness of the filling.
Essential Ingredients You’ll Need
Let’s take a closer look at the all-star lineup of ingredients that make this Chocolate Silk Pie so special:
- 1 pre-baked 9-inch pie crust: The foundation of the dish, this buttery, flaky crust provides the perfect contrast to the rich, velvety filling.
- 12 ounces semisweet chocolate, chopped: As I mentioned, the quality of the chocolate is paramount. Look for a high-cocoa percentage to ensure maximum chocolate flavor.
- 1/2 cup unsalted butter, softened: Softening the butter is crucial, as it helps it blend seamlessly into the filling.
- 3/4 cup granulated sugar: This sweetener balances out the bitterness of the chocolate, creating the perfect flavor profile.
- 3 large eggs: The eggs are what give the filling its signature silky-smooth texture, so make sure they’re fresh and at room temperature.
- 1 teaspoon vanilla extract: A touch of vanilla enhances the chocolate flavor and adds a lovely aromatic note.
- 1/4 teaspoon salt: A small pinch of salt helps to highlight all the other flavors in the pie.
Step-by-Step Chocolate Silk Pie Instructions
Preparing Your Chocolate Silk Pie
With a prep time of just 15 minutes and a cook time of 35 minutes, this Chocolate Silk Pie comes together in a snap. All you’ll need is a mixing bowl, a whisk, and a pre-baked 9-inch pie crust. Let’s get started!
1- Begin by melting the chopped semisweet chocolate. You can do this in a double boiler or in the microwave, stirring frequently until the chocolate is smooth and completely melted. Allow the chocolate to cool slightly.
2- In a large mixing bowl, beat the softened butter with a whisk until light and creamy. Gradually add in the granulated sugar, whisking continuously until the mixture is light and fluffy.
3- One at a time, add the eggs to the butter-sugar mixture, whisking well after each addition. This helps to incorporate air into the filling, giving it that signature silky texture.
4- Once all the eggs are incorporated, stir in the vanilla extract and salt until well combined. The filling should be thick, smooth, and glossy.
5- Finally, fold the slightly cooled melted chocolate into the filling until no streaks remain. Be sure not to overmix, as that can cause the filling to lose its airy texture.
6- Gently pour the chocolate silk filling into the pre-baked pie crust, smoothing the top with a spatula. Refrigerate the pie for at least 2 hours before serving.
Pro Tips for Success
- Make sure all your ingredients are at room temperature before you begin. This will help them blend together more seamlessly.
- Don’t skimp on the quality of the chocolate – the better the chocolate, the richer and more intense the flavor will be.
- When melting the chocolate, be careful not to let it get too hot, as that can cause it to seize up and become grainy.
- Whip the butter and sugar for several minutes until they’re light and fluffy – this incorporates air into the filling and gives it that signature silkiness.
- Resist the urge to overmix the chocolate into the filling. Gently fold it in until just combined to preserve the airy texture.
Serving and Storing Your Chocolate Silk Pie
Perfect Pairings for Chocolate Silk Pie
This Chocolate Silk Pie is the ultimate crowd-pleaser, and it pairs beautifully with all sorts of accompaniments. For a classic dessert, serve it with a dollop of freshly whipped cream and a sprinkle of cocoa powder or shaved chocolate. It’s also delicious with a scoop of vanilla ice cream or a drizzle of caramel sauce.
If you’re looking to serve it as part of a larger spread, it makes an excellent addition to a selection of other decadent desserts. Try pairing it with a rich, fudgy brownie or a light and airy chocolate mousse for a truly indulgent treat. And of course, no Chocolate Silk Pie is complete without a steaming mug of strong coffee or a glass of port or sherry on the side.
This recipe makes 8 servings, so it’s perfect for sharing with friends and family. Whether you’re hosting a dinner party or just treating yourself to a special dessert, this Chocolate Silk Pie is sure to be a hit.
Storage and Make-Ahead Tips
One of the best things about this Chocolate Silk Pie is that it keeps beautifully, making it an excellent make-ahead option for busy cooks. Once the pie has chilled and set, you can store it in the refrigerator for up to 5 days. Just be sure to cover it tightly with plastic wrap or foil to prevent the filling from drying out.
If you’d like to get a head start on your holiday baking, you can also freeze the pie for up to 2 months. Simply wrap it tightly in plastic wrap and then in a layer of aluminum foil. When you’re ready to serve it, just thaw it in the refrigerator overnight and give it a quick chill before slicing.
To reheat the pie, simply place it in a 300°F oven for 10-15 minutes, or until it’s warmed through. You can also slice and microwave individual portions for 15-30 seconds if you’re in a hurry. Just be careful not to overheat, as that can cause the filling to separate.
Variations and Dietary Adaptations for Chocolate Silk Pie
Creative Chocolate Silk Pie Variations
While this classic Chocolate Silk Pie is already a total showstopper, there are plenty of ways to put your own spin on it. For a festive twist, try adding a hint of peppermint extract or swirling in some crushed candy canes. You could also experiment with different types of chocolate, like milk, dark, or even white.
Another fun variation is to add a layer of caramel or chopped nuts to the filling for some extra texture and flavor. Or, if you’re feeling really adventurous, you could try adding a splash of your favorite liqueur, like Kahlua or Baileys.
And for the ultimate chocolate lover, you could top the pie with a rich chocolate ganache or a decadent chocolate buttercream frosting. The possibilities are endless!
Making Chocolate Silk Pie Diet-Friendly
For those looking to enjoy this Chocolate Silk Pie while following a special diet, there are a few simple swaps you can make. To make it gluten-free, simply use a store-bought gluten-free pie crust or make your own using a trusted recipe.
If you’re following a vegan diet, you can replace the butter with a high-quality vegan alternative, like coconut oil or margarine. And instead of eggs, you can use a plant-based egg replacer, which you can find at most health food stores.
For a low-carb version, you can use a sugar-free sweetener in place of the granulated sugar. Just be sure to adjust the measurements accordingly, as some sugar substitutes can be sweeter than regular sugar.
No matter which dietary restrictions you’re working with, this Chocolate Silk Pie can be easily adapted to suit your needs. With a few simple tweaks, you can enjoy all the rich, velvety goodness without any guilt.
Frequently Asked Questions
Q: Can I use a different type of chocolate in this recipe?
A: Absolutely! While the recipe calls for semi-sweet chocolate, you can experiment with different varieties like milk, dark, or even white chocolate. Just keep in mind that the flavor and texture of the filling may vary slightly depending on the type of chocolate you use.
Q: How long does it take to make this Chocolate Silk Pie?
A: In total, this recipe takes 50 minutes to prepare – 15 minutes of active prep time and 35 minutes of cooking time. The filling needs to chill for at least 2 hours before serving, so be sure to factor that in as well.
Q: Can I make this Chocolate Silk Pie in advance?
A: Yes, this pie keeps beautifully in the refrigerator for up to 5 days. You can also freeze it for up to 2 months, just be sure to thaw it overnight in the fridge before serving.
Q: How many servings does this Chocolate Silk Pie make?
A: This recipe makes 8 generous servings, so it’s perfect for sharing with friends and family. If you’re serving it as part of a larger dessert spread, you could even get 10-12 servings out of it.
Q: What should I do if the filling doesn’t set up properly?
A: If your Chocolate Silk Pie filling seems a bit too soft or loose, try chilling it for a bit longer. You can also try adding an extra egg yolk or a tablespoon of cornstarch to help it set up more firmly. And be sure not to overmix the filling, as that can cause it to lose its airy texture.

Chocolate Silk Pie
- Total Time: 50
- Yield: 8 servings
Description
Indulge in the rich, velvety goodness of this classic Chocolate Silk Pie. This easy-to-make dessert features a silky smooth chocolate filling nestled in a buttery, flaky crust. Perfect for any occasion, this timeless recipe is sure to satisfy your chocolate cravings.
Ingredients
– 1 pre-baked 9-inch pie crust
– 12 ounces semisweet chocolate, chopped
– 1/2 cup unsalted butter, softened
– 3/4 cup granulated sugar
– 3 large eggs
– 1 teaspoon vanilla extract
– 1/4 teaspoon salt
Instructions
1. Preheat your oven to 325°F (165°C).
2. In a medium saucepan, melt the chopped chocolate over low heat, stirring constantly until smooth. Remove from heat and let cool slightly.
3. In a large bowl, beat the softened butter and sugar together until light and fluffy, about 2-3 minutes.
4. Add the eggs one at a time, beating well after each addition. Stir in the vanilla and salt.
5. Gradually fold the melted chocolate into the butter-egg mixture until well combined.
6. Pour the chocolate filling into the pre-baked pie crust and smooth the top with a spatula.
7. Bake for 30-35 minutes, or until the center is almost set. The pie should still have a slight jiggle in the center when done.
8. Remove from the oven and let cool completely, then refrigerate for at least 2 hours before serving.
Notes
– For a richer flavor, use dark chocolate instead of semisweet.
– Top with whipped cream, berries, or a dusting of cocoa powder before serving.
– Store leftover pie in the refrigerator for up to 4 days.
- Prep Time: 15
- Cook Time: 35
- Category: Dessert
- Method: Baking
- Cuisine: American
Conclusion
This Chocolate Silk Pie is truly a work of art, and I can’t wait for you to experience the magic of my grandmother’s recipe. The rich, velvety filling and the buttery, flaky crust come together in perfect harmony, creating a dessert that’s both indulgent and surprisingly light.
Whether you’re serving it at a special occasion or simply treating yourself to a little something sweet, this Chocolate Silk Pie is sure to impress. And with all the tips and variations I’ve shared, you can make it your own and put your personal stamp on this family favorite.
So what are you waiting for? Gather your ingredients, fire up your oven, and get ready to experience the ultimate in chocolate decadence. I promise, one bite of this Chocolate Silk Pie, and it’ll become a cherished tradition in your household, too.


