
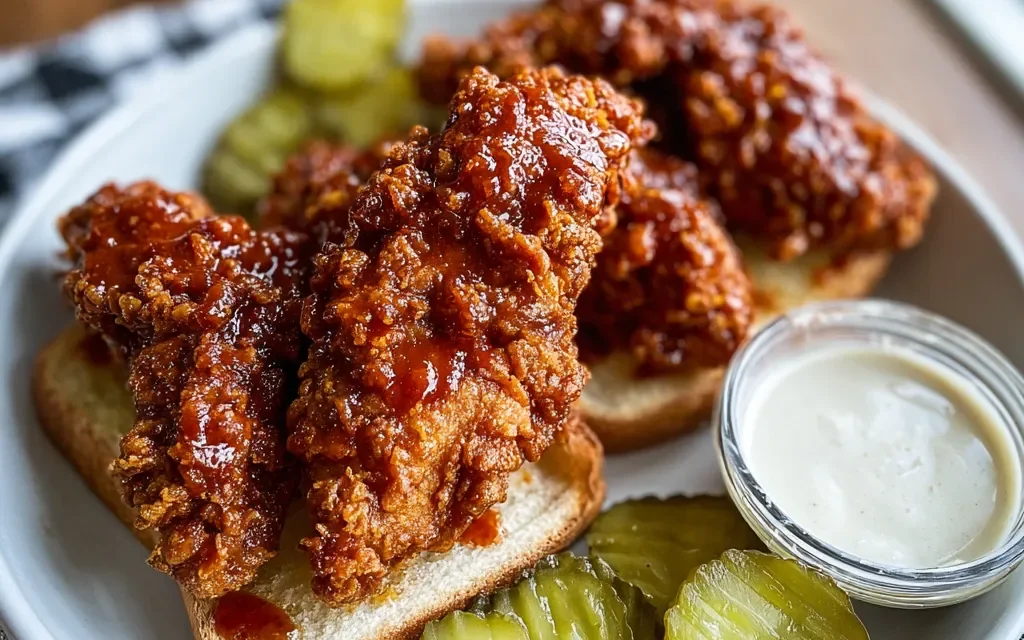
I’ll never forget the first time I tried Nashville Hot Chicken Tenders. It was during a family road trip to Tennessee, and we just had to make a pit stop at the famous Hattie B’s Hot Chicken. The moment I took that first bite, the flavor explosion in my mouth was absolutely unforgettable. The perfect balance of crispy, juicy chicken paired with the signature spicy Nashville seasoning – it was love at first taste.
Ever since that day, I’ve been on a mission to recreate that mind-blowing Nashville Hot Chicken Tenders experience in my own kitchen. After countless experiments and flavor tweaks, I’ve finally landed on a recipe that captures all the magic. Trust me, this is the Nashville Hot Chicken Tenders dish that’s going to become your new go-to.
Why This Nashville Hot Chicken Tenders Recipe Will Become Your Go-To
The Secret Behind Perfect Nashville Hot Chicken Tenders
What sets this Nashville Hot Chicken Tenders recipe apart is the perfect harmony of flavors and textures. The secret lies in the carefully curated seasoning blend, which features a delightful dance of smoky, savory, and subtly sweet notes. The smoked paprika lends a deep, rich complexity, while the garlic powder and onion powder build a robust backbone of flavor.
But the true star of the show is the judicious use of cayenne pepper, which delivers that signature Nashville heat. It’s not about blowing your socks off with scorching spice – it’s about creating a multi-layered, slowly building heat that keeps you reaching for more. The end result is a mouthwatering balance of crispy, juicy chicken and a bold, unforgettable kick of flavor.
Essential Ingredients You’ll Need
To achieve this flavor perfection, you’ll need a few key ingredients:
- 1 pound chicken tenders: The star of the show, these succulent, bite-sized chicken pieces are the perfect canvas for the Nashville-inspired spices.
- 1 cup all-purpose flour: This forms the crispy, golden-brown crust that seals in the juices and carries the bold seasonings.
- 1 teaspoon smoked paprika: Lending a deep, smoky note that’s quintessential to the Nashville Hot Chicken experience.
- 1 teaspoon garlic powder: Adds a savory, umami-rich depth of flavor.
- 1 teaspoon onion powder: Complements the garlic powder, creating a well-rounded seasoning blend.
- 1/2 teaspoon cayenne pepper: The key to that signature Nashville heat that keeps you coming back for more.
- 1/2 teaspoon salt and 1/4 teaspoon black pepper: Balancing the seasoning and enhancing the overall flavor profile.
- 1 cup buttermilk: This tangy, creamy liquid is the secret to achieving that impossibly juicy, tender interior.
- Vegetable oil for frying: Ensuring the chicken tenders reach that irresistible golden-brown crispiness.
Step-by-Step Nashville Hot Chicken Tenders Instructions
Preparing Your Nashville Hot Chicken Tenders
With all the essential ingredients at the ready, let’s get started on this Nashville Hot Chicken Tenders masterpiece. Prep time is just 15 minutes, and cook time is an equally swift 15 minutes, for a total time of 30 minutes from start to finish. You’ll need a heavy-bottomed pan or Dutch oven for frying, as well as a few basic kitchen tools like tongs and a slotted spoon.
1- Begin by mixing the all-purpose flour, smoked paprika, garlic powder, onion powder, cayenne pepper, salt, and black pepper in a shallow bowl. Whisk the dry ingredients together until well combined, creating your seasoned flour blend.
2- In a separate bowl, pour in the buttermilk. Dip each chicken tender into the buttermilk, ensuring the entire surface is coated. Then, transfer the buttermilk-dipped chicken to the seasoned flour mixture, gently pressing to help the flour adhere.
3- Heat about 2 inches of vegetable oil in your heavy-bottomed pan or Dutch oven to 350°F. Once the oil is hot and shimmering, carefully add the coated chicken tenders in batches, being mindful not to overcrowd the pan.
4- Fry the chicken tenders for 3-4 minutes per side, or until they’re golden-brown and crispy. The internal temperature should reach 165°F when checked with a meat thermometer.
5- Transfer the fried chicken tenders to a paper towel-lined plate to drain any excess oil. Season with an extra sprinkle of salt, if desired.
6- Serve your piping hot Nashville Hot Chicken Tenders immediately, garnished with fresh parsley or sliced green onions. Pair them with your favorite sides, like creamy coleslaw, tangy pickles, or fluffy white bread to soak up all that delicious spicy goodness.
Pro Tips for Success
To ensure your Nashville Hot Chicken Tenders turn out perfectly every time, here are a few pro tips:
- Use chilled buttermilk: The cold temperature helps the chicken stay juicy and tender during the frying process.
- Bread the chicken in batches: Avoid overcrowding the pan, as it can lead to uneven cooking and less crispy results.
- Monitor the oil temperature: Keep a close eye on the oil, adjusting the heat as needed to maintain a consistent 350°F.
- Drain the chicken well: Letting the fried tenders rest on a paper towel-lined plate helps remove any excess oil for an extra crispy exterior.
Serving and Storing Your Nashville Hot Chicken Tenders
Perfect Pairings for Nashville Hot Chicken Tenders
This Nashville Hot Chicken Tenders recipe serves 6 people, making it the perfect shareable dish for a family dinner or casual get-together. To complete the experience, pair these delectable tenders with some classic Southern-inspired sides.
A creamy, tangy coleslaw is a natural complement, with its cool, refreshing contrast to the spicy chicken. Serve it alongside fluffy white bread or buttery biscuits to soak up every last bit of that signature Nashville sauce. And don’t forget the pickles – tangy, crunchy dill pickles are a must-have accompaniment.
For beverages, an ice-cold beer or a sweet, fizzy lemonade make excellent choices to balance the heat. You can even get creative with a Nashville-inspired cocktail, like a Bourbon Lemonade or a Spicy Margarita.
Storage and Make-Ahead Tips
Leftover Nashville Hot Chicken Tenders can be stored in an airtight container in the refrigerator for up to 3 days. To reheat, simply place the tenders on a baking sheet and warm them in a 350°F oven for 10-15 minutes, or until they’re heated through and crispy once again.
For longer-term storage, you can freeze the cooked chicken tenders for up to 3 months. Place them in a single layer on a baking sheet, then transfer to a freezer-safe bag or container once fully frozen. When ready to enjoy, thaw the tenders in the refrigerator overnight before reheating in the oven.
To get a head start on your Nashville Hot Chicken Tenders, you can prepare the seasoned flour mixture and have the buttermilk ready to go in advance. Simply store the dry ingredients in an airtight container and the buttermilk in the refrigerator until you’re ready to bread and fry the chicken.
Variations and Dietary Adaptations for Nashville Hot Chicken Tenders
Creative Nashville Hot Chicken Tenders Variations
While the classic Nashville Hot Chicken Tenders recipe is hard to beat, there’s always room for a little creativity. Try swapping out the chicken tenders for bone-in chicken thighs or drumsticks for a heartier, more substantial dish. You can also experiment with different spice blends, such as adding a touch of brown sugar for a sweet-and-spicy twist or incorporating smoked paprika for an extra smoky flavor profile.
For a seasonal spin, try coating the chicken in a cornmeal-based breading and frying it up for a delightful crunch. Or, for a lighter take, bake the coated chicken tenders in the oven instead of frying.
Making Nashville Hot Chicken Tenders Diet-Friendly
Adapting this recipe to accommodate various dietary needs is simpler than you might think. For a gluten-free version, simply replace the all-purpose flour with a gluten-free flour blend. You can also use almond flour or coconut flour for a low-carb, keto-friendly spin.
If you’re looking to make a vegan or vegetarian version, try swapping the chicken tenders for tofu or seitan. Coat the plant-based protein in the seasoned flour and fry it up just the same. To replicate the buttermilk flavor, use a non-dairy milk alternative, like unsweetened almond or oat milk, combined with a touch of apple cider vinegar.
Frequently Asked Questions
Q: Can I use chicken breasts instead of tenders?
A: Absolutely! Chicken breasts will work just as well in this recipe. Just be sure to pound them into an even thickness before breading and frying to ensure even cooking.
Q: How can I adjust the spice level?
A: To make the Nashville Hot Chicken Tenders less spicy, simply reduce the amount of cayenne pepper. Start with 1/4 teaspoon and adjust to your desired heat level. For an extra kick, feel free to increase the cayenne up to 1 teaspoon.
Q: Can I bake the chicken instead of frying?
A: Yes, you can bake the coated chicken tenders in a 400°F oven for 15-20 minutes, flipping halfway through, for a healthier alternative to frying. The texture won’t be as crispy, but the flavor will still be delicious.
Q: How much does this recipe make?
A: This Nashville Hot Chicken Tenders recipe serves 6 people. If you need to feed a larger crowd, simply double or triple the ingredient quantities.
Q: What should I do if the chicken isn’t crispy enough?
A: If your fried chicken tenders aren’t as crispy as you’d like, there are a few troubleshooting tips. Make sure the oil is maintained at the proper 350°F temperature, and fry the chicken in small batches to prevent overcrowding. You can also try letting the breaded chicken rest for 10-15 minutes before frying to allow the coating to adhere better.
Conclusion
Get ready to wow your taste buds and impress your friends and family with this sensational Nashville Hot Chicken Tenders recipe. The perfectly balanced blend of spices, the juicy, tender chicken, and the irresistibly crispy coating come together to create a flavor explosion that will have you reaching for more.
Whether you’re serving it up for a casual game day gathering, a family dinner, or a special occasion, this Nashville Hot Chicken Tenders dish is sure to be the star of the show. So don’t wait – gather your ingredients, fire up the oil, and get ready to enjoy a taste of Tennessee right in your own kitchen. And be sure to let me know how it turns out in the comments below!


