

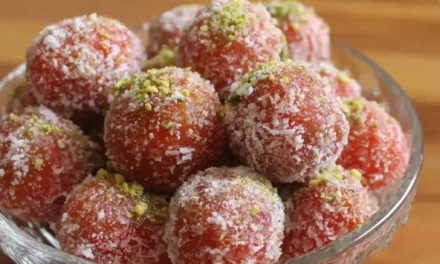
It’s the most wonderful time of the year, and you know what that means – it’s time to break out the Christmas Butterfinger Balls! Growing up, this was always one of my family’s favorite holiday treats. There’s just something about the combination of rich, creamy chocolate and crunchy, peanut-y Butterfinger that screams “Christmas!” to me.
Every year, my grandma would spend hours in the kitchen, meticulously crafting batch after batch of these decadent little balls. The house would fill with the most heavenly aroma, and we’d all gather around, eagerly waiting for the first batch to cool so we could dig in. I can still remember the look of pure joy on my cousin’s face as he popped that first Butterfinger ball into his mouth, the explosion of flavors and textures.
Christmas just wouldn’t be the same without these treats. Even now, as an adult, I find myself craving that nostalgic taste of the holidays. That’s why I’m so excited to share this foolproof recipe for Christmas Butterfinger Balls with you. Trust me, once you try them, they’re going to become a staple on your holiday baking list!
Why This Christmas Butterfinger Balls Recipe Will Become Your Go-To
The Secret Behind Perfect Christmas Butterfinger Balls
The secret to making these Christmas Butterfinger Balls so irresistible is in the attention to detail. It’s all about striking the perfect balance between the rich, creamy texture of the cream cheese and the shatteringly crisp, peanut-y crunch of the Butterfinger pieces. The key is to not overbeat the mixture, which can make it too soft and gooey. Instead, you want to gently fold the ingredients together, allowing the Butterfinger pieces to retain their signature texture.
Another important factor is using high-quality, softened cream cheese. This helps the mixture come together seamlessly, creating a smooth, velvety base for the Butterfinger pieces to shine. And of course, you can’t forget the generous dusting of powdered sugar, which adds a delightful sweetness and gives the balls that signature holiday sparkle.
Essential Ingredients You’ll Need
- 8 ounces cream cheese, softened: The creamy foundation of these Christmas Butterfinger Balls. Make sure to let it come to room temperature for the best, silkiest texture.
- 1 cup powdered sugar: This adds the perfect touch of sweetness and creates a festive, snowy coating on the outside of the balls.
- 2 cups crushed Butterfinger candy bars: The star of the show! The crunchy, peanut-y Butterfinger pieces are what make these balls so irresistible.
Step-by-Step Christmas Butterfinger Balls Instructions
Preparing Your Christmas Butterfinger Balls
With just 15 minutes of prep time and 0 minutes of cook time, these Christmas Butterfinger Balls come together in a snap. All you’ll need is a large mixing bowl, a spatula, and a baking sheet lined with parchment paper.
1- Start by adding the softened cream cheese to the mixing bowl. Use your spatula to gently fold and incorporate the powdered sugar until the mixture is smooth and creamy.
2- Next, carefully fold in the crushed Butterfinger pieces, making sure to evenly distribute them throughout the cream cheese mixture.
3- Once everything is well combined, it’s time to start shaping your balls. Scoop out tablespoon-sized portions of the mixture and roll them gently between your palms to form smooth, round balls.
4- As you shape the balls, place them on the prepared baking sheet, making sure to leave a little space between each one.
5- Once all the balls are formed, give them a final dusting of powdered sugar, ensuring they’re coated in that festive, snowy layer.
6- Pop the baking sheet in the fridge for 30 minutes to help the balls firm up, then serve and enjoy your delicious Christmas Butterfinger Balls!
Pro Tips for Success
- Don’t overbeat the cream cheese mixture – you want to maintain that perfect balance of creaminess and crunch.
- Use fresh, high-quality Butterfinger bars for the best flavor and texture. Avoid pre-crushed pieces, as they can sometimes be stale or dry.
- Chill the balls for at least 30 minutes before serving to help them hold their shape. You can even make them a day in advance and keep them refrigerated until ready to enjoy.
- For an extra festive touch, try drizzling the balls with melted chocolate or rolling them in crushed peppermint candies.
Serving and Storing Your Christmas Butterfinger Balls
Perfect Pairings for Christmas Butterfinger Balls
These Christmas Butterfinger Balls are the perfect sweet treat to serve at any holiday gathering. With 24 balls per batch, you’ll have plenty to share with family and friends. They pair beautifully with a steaming mug of hot chocolate or a glass of eggnog for a classic Christmas pairing. You can also serve them alongside other holiday cookies and candies for a festive dessert spread.
Storage and Make-Ahead Tips
The great thing about these Christmas Butterfinger Balls is that they’re incredibly easy to make ahead and store. Once the balls are formed, simply place them in an airtight container and refrigerate for up to 1 week. When you’re ready to serve, simply take them out of the fridge and enjoy.
For longer-term storage, you can also freeze the balls. Just place them in a single layer on a baking sheet and freeze until solid, then transfer to a freezer-safe bag or container. They’ll keep in the freezer for up to 3 months. To thaw, simply leave them in the fridge overnight or at room temperature for 30 minutes before serving.
Variations and Dietary Adaptations for Christmas Butterfinger Balls
Creative Christmas Butterfinger Balls Variations
While the classic Christmas Butterfinger Balls are absolutely delicious, there’s plenty of room for creativity and experimentation. Try swapping out the Butterfinger for other crushed candy bars, like Snickers or Reese’s Peanut Butter Cups, for a different flavor profile. You can also add a splash of peppermint extract or a dusting of crushed candy canes for a festive twist.
For a more sophisticated take, try dipping the balls in melted dark chocolate or rolling them in finely chopped nuts or coconut. The possibilities are endless!
Making Christmas Butterfinger Balls Diet-Friendly
Looking to make these Christmas Butterfinger Balls a little more diet-friendly? No problem! You can easily swap out the regular cream cheese for a lower-fat or dairy-free version. And for the Butterfinger pieces, you can use a sugar-free or low-carb candy bar instead.
Another option is to make mini balls, which will allow you to enjoy the flavors without the guilt. Just scoop out smaller portions when forming the balls. Whatever adaptations you choose, these Christmas Butterfinger Balls are sure to satisfy your sweet tooth without derailing your healthy eating goals.
Frequently Asked Questions
Q: Can I use a different type of candy bar instead of Butterfinger?
A: Absolutely! Feel free to experiment with other crushed candy bars like Snickers, Reese’s Peanut Butter Cups, or even Twix. Just be sure to use the same 2 cup measurement for the crushed candy.
Q: How long does the 45 minute total time include?
A: The 45 minute total time includes 15 minutes of prep time to mix the ingredients and form the balls, plus 30 minutes of chilling time in the fridge to help the balls firm up.
Q: Can I make these Christmas Butterfinger Balls ahead of time?
A: Absolutely! These balls keep very well. You can store them in an airtight container in the fridge for up to 1 week, or in the freezer for up to 3 months. Just thaw them in the fridge overnight before serving.
Q: How many Christmas Butterfinger Balls does this recipe make?
A: This recipe yields 24 delicious Christmas Butterfinger Balls. Adjust the servings as needed to accommodate a larger crowd.
Q: What if my balls don’t hold their shape?
A: If your Christmas Butterfinger Balls seem a bit too soft or sticky, try popping them in the fridge for an extra 10-15 minutes before serving. The colder temperature will help them firm up. You can also try using slightly less crushed Butterfinger pieces.

Christmas Butterfinger Balls
- Total Time: 45
- Yield: 24 balls
Description
Indulge in the rich, creamy texture of these delightful Christmas Butterfinger Balls – a simple 3-ingredient recipe that’s perfect for holiday parties, gifting, and satisfying your sweet tooth.
Ingredients
– 8 ounces cream cheese, softened
– 1 cup powdered sugar
– 2 cups crushed Butterfinger candy bars
Instructions
1. In a medium bowl, beat the cream cheese until light and fluffy.
2. Add the powdered sugar and mix until well combined.
3. Gently fold in 1 1/2 cups of the crushed Butterfinger pieces.
4. Using a small cookie scoop or spoon, form the mixture into 1-inch balls.
5. Roll the balls in the remaining 1/2 cup crushed Butterfinger pieces to coat.
6. Place the coated balls on a parchment-lined baking sheet and refrigerate for at least 30 minutes before serving.
Notes
For best results, use softened cream cheese and fully crush the Butterfinger candy bars before incorporating. These Christmas Butterfinger Balls can be stored in an airtight container in the refrigerator for up to 1 week.
- Prep Time: 15
- Category: Cookies & Bars
- Method: No-Bake
- Cuisine: American
Conclusion
There’s no better way to celebrate the holiday season than with a batch of these irresistible Christmas Butterfinger Balls. The perfect balance of creamy, crunchy, and sweet makes them an absolute crowd-pleaser, perfect for sharing with family and friends.
I hope this recipe becomes a new Christmas tradition in your home, just like it is in mine. So what are you waiting for? Gather your ingredients, put on some festive tunes, and get to rolling! And don’t forget to let me know how your Christmas Butterfinger Balls turn out – I’d love to hear all about it.

