
I’ll never forget the first time I tried Coconut Cream Pie Cookies. It was a sunny afternoon at my grandmother’s house, and the sweet aroma wafting through the kitchen pulled me in like a magnet. She was whipping up a batch, and I could see the joy on her face as she mixed the ingredients. I was enraptured by the way she folded in the shredded coconut, her hands moving with the kind of grace that only comes from years of practice. I remember asking if I could help, and she handed me the bowl, letting me stir the mixture while she prepared the frosting.
The moment those Coconut Cream Pie Cookies came out of the oven, I knew I was in for a treat. Their golden edges and soft, chewy centers instantly captured my heart. I could hardly wait for them to cool before sneaking a bite, and the flavor explosion was unlike anything I’d ever tasted. The creamy coconut flavor combined with the buttery cookie base was perfection, and I could hardly believe that something so simple could bring me so much joy. Since then, whenever I bake these cookies, I’m reminded of those precious moments with my grandmother, and I can’t help but smile. Now, I’m excited to share this recipe with you, so you can create your own memories with Coconut Cream Pie Cookies!
Why This Coconut Cream Pie Cookies Recipe Will Become Your Go-To
The Secret Behind Perfect Coconut Cream Pie Cookies
What makes this Coconut Cream Pie Cookies recipe truly special is its delightful balance of flavors and textures. The combination of shredded coconut and creamy frosting creates a cookie that’s both chewy and rich, reminiscent of a classic coconut cream pie. Unlike traditional cookies, these gems deliver that nostalgic pie flavor in every bite. The recipe is straightforward, making it accessible even for novice bakers. Plus, the cookies come together in just 30 minutes, so you won’t be spending your entire afternoon in the kitchen. Trust me; once you taste these cookies, they’ll become a staple in your baking repertoire!
Essential Ingredients You’ll Need
To create these Coconut Cream Pie Cookies, you’ll need the following ingredients:
1 cup all-purpose flour
All-purpose flour forms the base of the cookies, giving them structure and a soft texture. It’s essential for achieving the right balance between chewy and crumbly.
1/2 cup shredded coconut
Shredded coconut adds that signature flavor profile and texture that makes these cookies reminiscent of a coconut cream pie. It brings sweetness and a chewy bite.
1/2 cup granulated sugar
Granulated sugar sweetens the cookies and helps them achieve a golden color when baked. It also contributes to the overall texture, making them chewy.
1/2 cup unsalted butter, softened
Unsalted butter is key for flavor and moisture. Softened butter blends easily with the sugar, creating a light and airy dough that bakes beautifully.
1 large egg
The egg acts as a binding agent, helping hold the ingredients together while adding richness to the cookies. It also contributes to the overall texture.
1 tsp vanilla extract
Vanilla extract enhances the cookies’ flavor, adding warmth and depth. It complements the coconut perfectly, making the cookies taste even more indulgent.
1/2 tsp baking soda
Baking soda is a leavening agent that helps the cookies rise and become fluffy. It ensures they don’t turn out too dense.
1/4 tsp salt
Salt enhances the flavors of the other ingredients, balancing the sweetness and bringing out the coconut’s natural flavors.
1/4 cup coconut cream (for frosting)
Coconut cream gives the frosting a creamy texture and an extra coconut kick. It’s the finishing touch that elevates these cookies to a whole new level.
1/2 cup powdered sugar (for frosting)
Powdered sugar sweetens the frosting and provides the perfect consistency for spreading. It complements the creamy coconut cream beautifully.
Step-by-Step Coconut Cream Pie Cookies Instructions
Preparing Your Coconut Cream Pie Cookies
Making Coconut Cream Pie Cookies is simple and takes just 15 minutes to prep and another 12 minutes to cook, totaling 30 minutes. You’ll need a mixing bowl, a baking sheet, and an electric mixer to get started.
1- Preheat your oven to 350°F (175°C). Line a baking sheet with parchment paper to prevent the cookies from sticking. Allow the oven to heat fully, ensuring even baking.
2- In a mixing bowl, cream together the softened unsalted butter and granulated sugar using an electric mixer. Beat on medium speed for about 2-3 minutes until the mixture is light and fluffy. You should see a pale color, indicating that air has been incorporated.
3- Add the large egg and vanilla extract to the butter-sugar mixture. Mix until fully combined, about 1-2 minutes. The batter will look smooth and slightly glossy.
4- In a separate bowl, whisk together the all-purpose flour, baking soda, shredded coconut, and salt. Gradually add this dry mixture to the wet ingredients, mixing on low speed until just combined. Be careful not to overmix; the dough should be slightly sticky but well-blended.
5- Use a cookie scoop or tablespoon to drop rounded balls of dough onto the prepared baking sheet, spacing them about 2 inches apart. Bake in the preheated oven for 10-12 minutes or until the edges turn golden brown. The centers should look soft and slightly underbaked.
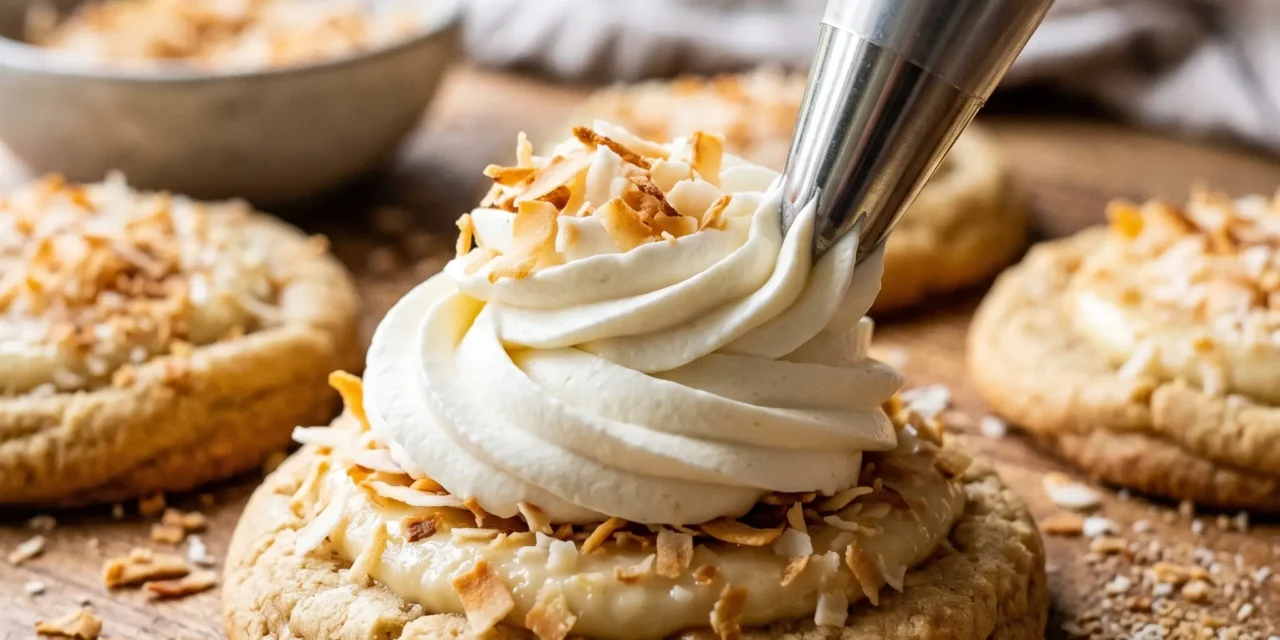
6- Once baked, remove the cookies from the oven and let them cool on the baking sheet for 5 minutes before transferring them to a wire rack. Allow them to cool completely before frosting. To serve, spread a generous layer of coconut cream frosting on top of each cookie, making them extra special.
Pro Tips for Success
- Make sure your butter is softened but not melted. This helps incorporate air into the dough, resulting in a fluffy cookie texture.
- Don’t skip chilling the dough if you prefer thicker cookies. Letting it chill for 15-30 minutes in the refrigerator can prevent spreading.
- Keep an eye on the cookies while baking. They can go from perfectly golden to overbaked quickly, so set a timer and check around the 10-minute mark.
- If you want an extra coconut flavor, toast the shredded coconut in the oven for a few minutes before adding it to the dough. It adds a delightful crunch and depth of flavor.
- For an even more indulgent treat, consider adding chocolate chips or white chocolate chunks to the dough for a decadent twist.
Serving and Storing Your Coconut Cream Pie Cookies
Perfect Pairings for Coconut Cream Pie Cookies
These Coconut Cream Pie Cookies serve 24, making them perfect for gatherings, parties, or simply enjoying at home. Pair them with a tall glass of cold milk or a refreshing iced coffee for a delightful afternoon treat. They also complement tropical fruit salads or a scoop of vanilla ice cream, transforming them into a dessert extravaganza. For special occasions like birthdays or summer barbecues, these cookies are sure to impress your guests.
Storage and Make-Ahead Tips
Storing your Coconut Cream Pie Cookies is simple. Keep them in an airtight container at room temperature for up to 5 days. If you want to make them ahead, you can freeze the unbaked dough. Scoop the dough onto a baking sheet and freeze until solid, then transfer to a zip-top bag. When you’re ready to bake, simply add a couple of minutes to the baking time. If you have leftover cookies, they can also be frozen for up to 3 months. Just thaw them at room temperature before enjoying.
Variations and Dietary Adaptations for Coconut Cream Pie Cookies
Creative Coconut Cream Pie Cookies Variations
Want to mix things up? Here are some creative variations to try with your Coconut Cream Pie Cookies:
- Chocolate Coconut Cream Pie Cookies: Add 1/2 cup of semi-sweet chocolate chips to the cookie dough for a heavenly chocolate-coconut combination.
- Lemon Coconut Cream Pie Cookies: Incorporate the zest of one lemon into the dough for a refreshing citrus twist that complements the coconut.
- Nutty Coconut Cream Pie Cookies: Mix in 1/2 cup of chopped pecans or walnuts along with the shredded coconut for a delightful crunch.
- Caramel Coconut Cream Pie Cookies: Drizzle caramel sauce over the frosted cookies for an extra layer of sweetness and indulgence.
Making Coconut Cream Pie Cookies Diet-Friendly
If you have dietary restrictions, here are some substitutions to make Coconut Cream Pie Cookies more accessible:
- Gluten-Free: Substitute all-purpose flour with a gluten-free all-purpose blend. Make sure it contains xanthan gum for proper texture.
- Vegan: Replace the egg with a flax egg (1 tablespoon ground flaxseed mixed with 2.5 tablespoons water) and use vegan butter instead of regular butter.
- Low-Carb: Swap granulated sugar with a low-carb sweetener like erythritol, and use almond flour instead of all-purpose flour for a keto-friendly version.
- Dairy-Free: Use coconut oil or a dairy-free butter alternative in place of unsalted butter, and ensure your powdered sugar doesn’t contain any dairy.
Frequently Asked Questions
Q: Can I substitute the all-purpose flour with whole wheat flour?
A: Yes, you can use whole wheat flour, but the texture will be denser. For a lighter cookie, consider using half whole wheat and half all-purpose flour.
Q: How do I know when the cookies are done baking?
A: Check around the 10-minute mark; the edges should be golden, and the centers slightly soft. They’ll continue to cook as they cool.
Q: Can I prepare the cookie dough in advance?
A: Absolutely! You can refrigerate the dough for up to 2 days or freeze it for up to 3 months. Just thaw before baking.
Q: What’s the best way to store leftover cookies?
A: Store your cookies in an airtight container at room temperature for up to 5 days. For longer storage, freeze them.
Q: What if my cookies turn out flat?
A: Ensure your butter is softened but not melted to prevent flat cookies. Also, check that your baking soda hasn’t expired, as this can affect the rise.
Conclusion
I hope you’re as excited to try these Coconut Cream Pie Cookies as I am! They’re not just cookies; they’re little bites of nostalgia that bring back sweet memories. With their delightful flavor and chewy texture, they’re sure to become a favorite in your household. I encourage you to give this recipe a go and share your thoughts in the comments. Enjoy baking, and don’t forget to share your delicious creations with friends and family!


