
It was my sister’s birthday last year, and I wanted to bake something extra special for her. I knew she loved the rich, velvety texture of red velvet cake, but I wanted to put my own unique spin on it. That’s when I stumbled upon the idea of Glacier Blue Velvet Cake Pops – a vibrant, azure-hued take on the classic that I just couldn’t wait to try.
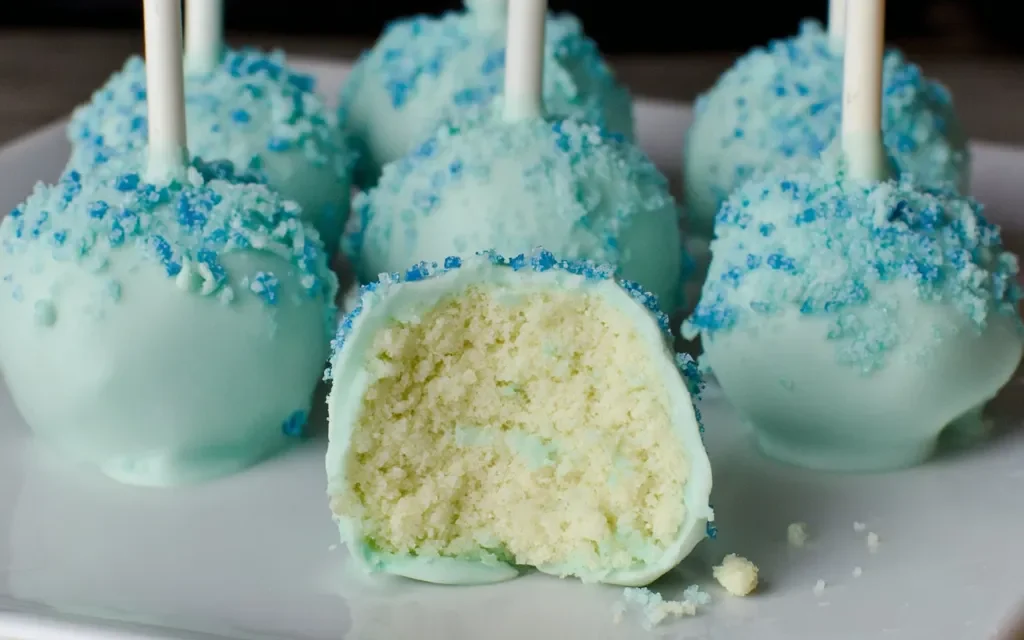
As I mixed the batter and watched the cake transform into a stunning shade of blue, I couldn’t help but feel giddy with excitement. The addition of the blue food coloring created this mesmerizing, almost ethereal effect that just begged to be turned into bite-sized cake pops. When I finally rolled the batter into perfectly round spheres and dipped them in a creamy, vanilla-infused coating, I knew I had created something truly special.
My sister’s face lit up when I presented her with the tray of Glacier Blue Velvet Cake Pops, and she couldn’t wait to take a bite. The look of pure delight on her face as the flavors melted in her mouth was all the reward I needed. From that moment on, I knew this recipe had to be shared with the world. It’s just too good to keep to myself!
Why This Glacier Blue Velvet Cake Pops Recipe Will Become Your Go-To
The Secret Behind Perfect Glacier Blue Velvet Cake Pops
What makes this Glacier Blue Velvet Cake Pops recipe so special is the perfect balance of flavors and textures. The rich, cocoa-infused cake is perfectly complemented by the tangy cream cheese frosting, and the vibrant blue hue adds a truly eye-catching element that will have your guests oohing and aahing.
But the real secret lies in the technique. By baking the cake in a thin layer, you end up with a super moist, tender crumb that practically melts in your mouth. And the trick to getting that gorgeous blue color? It’s all in the blue food coloring – just two teaspoons are all it takes to transform a classic red velvet cake into a stunning, glacier-inspired masterpiece.
Essential Ingredients You’ll Need
- 2 cups all-purpose flour: This provides the structure and base for the cake, ensuring a tender yet sturdy texture.
- 2 cups granulated sugar: The perfect amount of sweetness to balance the cocoa and offset the tanginess of the buttermilk.
- 1 cup unsweetened cocoa powder: This deep, rich chocolate flavor is the foundation of the red velvet taste.
- 1 teaspoon baking soda: Acts as a leavening agent, helping the cake rise and achieve that perfect crumb.
- 1 teaspoon salt: Enhances all the other flavors and provides balance.
- 2 eggs: Binds the batter together and adds moisture.
- 1 cup buttermilk: Provides a subtle tanginess and helps tenderize the cake.
- 1/2 cup vegetable oil: Keeps the cake moist and tender.
- 2 teaspoons blue food coloring: The secret ingredient that transforms this red velvet cake into a stunning Glacier Blue creation.
- 1 package (8 ounces) cream cheese, softened: The base for the creamy, tangy frosting that tops the cake pops.
- 2 cups powdered sugar: Sweetens and thickens the frosting to create the perfect coating for the cake pops.
- 1 teaspoon vanilla extract: Adds a lovely, aromatic note to the frosting.
Step-by-Step Glacier Blue Velvet Cake Pops Instructions
Preparing Your Glacier Blue Velvet Cake Pops
With a prep time of just 30 minutes and a cook time of 30 minutes, this Glacier Blue Velvet Cake Pops recipe is the perfect quick and easy treat to whip up. You’ll need a few basic baking tools, like a mixing bowl, stand mixer, baking sheet, and a cookie scoop or small spoon.
1- Preheat your oven to 350°F and line a baking sheet with parchment paper. In a large mixing bowl, whisk together the all-purpose flour, granulated sugar, cocoa powder, baking soda, and salt until well combined.
2- In a separate bowl, beat the eggs, then stir in the buttermilk, vegetable oil, and blue food coloring until the mixture is fully incorporated and vibrant blue in color.
3- Gradually add the wet ingredients to the dry ingredients, mixing on medium speed until the batter is smooth and lump-free, about 2 minutes.
4- Pour the batter onto the prepared baking sheet, spreading it into an even layer. Bake for 25-30 minutes, until a toothpick inserted in the center comes out clean. Allow the cake to cool completely on a wire rack.
5- Once the cake is cooled, crumble it into a large bowl. Add the softened cream cheese, powdered sugar, and vanilla extract, then use a hand mixer to blend everything together until a smooth, spreadable frosting forms.
6- Using a small cookie scoop or spoon, portion the frosting-cake mixture into 24 equal-sized balls. Place them on a parchment-lined baking sheet and refrigerate for at least 30 minutes to firm up.
Pro Tips for Success
- Make sure to let the cake cool completely before crumbling it – this will ensure the perfect, moist texture for your cake pops.
- When blending the frosting, be sure to use a hand mixer or stand mixer to get the smoothest, creamiest consistency. Mixing by hand can result in a grainy texture.
- Refrigerating the cake pop balls before dipping is crucial – it helps them hold their shape and prevents the coating from melting off.
- Get creative with your toppings! Try sprinkling the chilled cake pops with toasted coconut, crushed cookies, or edible glitter for extra flair.
Serving and Storing Your Glacier Blue Velvet Cake Pops
Perfect Pairings for Glacier Blue Velvet Cake Pops
These Glacier Blue Velvet Cake Pops make for a delightful anytime treat, whether you’re hosting a birthday party, bridal shower, or just looking for a sweet little pick-me-up. They pair beautifully with a hot cup of coffee or tea, or you can serve them alongside a selection of other bite-sized desserts for a fun, interactive spread.
For a truly stunning presentation, arrange the cake pops on a tiered stand or platter, interspersed with fresh berries or edible flowers. This recipe yields 24 cake pops, so it’s perfect for sharing with family and friends.
Storage and Make-Ahead Tips
These Glacier Blue Velvet Cake Pops can be stored in the refrigerator for up to 5 days, making them a great make-ahead option. Simply place the chilled cake pops in an airtight container or zip-top bag and refrigerate.
If you’d like to prepare them further in advance, you can also freeze the cake pops for up to 2 months. To thaw, simply transfer them to the refrigerator overnight. When ready to serve, you can enjoy them as is or lightly warm them in the microwave for 10-15 seconds to soften the coating.
Variations and Dietary Adaptations for Glacier Blue Velvet Cake Pops
Creative Glacier Blue Velvet Cake Pops Variations
For a fun twist on this recipe, try swapping out the blue food coloring for different hues – vibrant purple, deep emerald green, or even a striking black for a gothic, Halloween-inspired version.
You can also get creative with the coatings and toppings. Try dipping the cake pops in white chocolate or melted coconut oil instead of the traditional cream cheese frosting. Top them with sprinkles, crushed cookies, or even a drizzle of caramel or chocolate sauce.
And for a truly seasonal take, consider adding a hint of peppermint extract to the frosting or sprinkling them with crushed peppermint candies for a festive, holiday-ready treat.
Making Glacier Blue Velvet Cake Pops Diet-Friendly
To make this recipe gluten-free, simply substitute the all-purpose flour with your favorite gluten-free flour blend. You may need to adjust the baking time slightly, so keep a close eye on the cake as it bakes.
For a vegan version, replace the eggs with a flax or chia seed “egg” (1 tablespoon ground flax or chia mixed with 3 tablespoons water, let sit for 5 minutes), use plant-based milk instead of buttermilk, and opt for a dairy-free cream cheese alternative.
And if you’re watching your carb intake, you can make these Glacier Blue Velvet Cake Pops keto-friendly by substituting the granulated sugar with a low-carb sweetener like erythritol or monk fruit, and using a sugar-free cream cheese frosting.
Frequently Asked Questions
Q: Can I use a different type of food coloring besides blue?
A: Absolutely! While the blue food coloring is what gives these cake pops their signature “glacier” look, you can absolutely experiment with other colors. Try swapping it out for red, green, or even black food coloring for a dramatic, gothic effect.
Q: How long does it take to make these Glacier Blue Velvet Cake Pops?
A: This recipe has a total time of 60 minutes, with 30 minutes of prep time and 30 minutes of cook time. The key is to allow the cake to cool completely before crumbling and mixing with the frosting, which takes some time.
Q: Can I make the cake pops ahead of time?
A: Yes, these Glacier Blue Velvet Cake Pops are perfect for making ahead of time. You can store them in the refrigerator for up to 5 days or in the freezer for up to 2 months. Just be sure to thaw them in the refrigerator overnight before serving.
Q: How many cake pops does this recipe make?
A: This recipe yields 24 Glacier Blue Velvet Cake Pops. The serving size is perfect for sharing with family and friends, whether you’re hosting a party or just looking for a sweet treat.
Q: Help! My cake pops aren’t holding their shape. What did I do wrong?
A: If your cake pops are having trouble maintaining their round shape, it’s likely because the frosting-cake mixture was too soft. Next time, be sure to refrigerate the portioned balls for at least 30 minutes before dipping to help them firm up. You can also try adding a bit more powdered sugar to the frosting to thicken it up.

Glacier Blue Velvet Cake Pops
- Total Time: 60
- Yield: 24 cake pops
Description
Indulge in the classic elegance of Glacier Blue Velvet Cake Pops, a timeless treat that combines a rich, velvety texture with a striking blue hue. Perfect for parties, celebrations, or satisfying your sweet tooth, these delectable bites are sure to delight.
Ingredients
– 2 cups all-purpose flour
– 2 cups granulated sugar
– 1 cup unsweetened cocoa powder
– 1 teaspoon baking soda
– 1 teaspoon salt
– 2 eggs
– 1 cup buttermilk
– 1/2 cup vegetable oil
– 2 teaspoons blue food coloring
– 1 package (8 ounces) cream cheese, softened
– 2 cups powdered sugar
– 1 teaspoon vanilla extract
Instructions
1. Preheat your oven to 350°F (175°C). Grease and flour a 9×13-inch baking pan.
2. In a large bowl, whisk together the flour, granulated sugar, cocoa powder, baking soda, and salt.
3. In a separate bowl, beat the eggs, buttermilk, and vegetable oil together until well combined.
4. Gradually add the wet ingredients to the dry ingredients, mixing until just combined. Stir in the blue food coloring until the batter is evenly colored.
5. Pour the batter into the prepared baking pan and bake for 30-35 minutes, or until a toothpick inserted into the center comes out clean.
6. Allow the cake to cool completely on a wire rack.
7. In a large bowl, beat the cream cheese with an electric mixer until smooth and creamy. Gradually add the powdered sugar and vanilla extract, mixing until well combined.
8. Crumble the cooled cake into the cream cheese mixture and mix until the ingredients are fully incorporated and the mixture is able to be rolled into balls.
9. Using a small cookie scoop or spoon, form the mixture into 1-inch balls and place them on a parchment-lined baking sheet.
10. Chill the cake pops in the refrigerator for at least 2 hours, or until firm.
11. Serve the Glacier Blue Velvet Cake Pops and enjoy!
Notes
– For a more intense blue color, you can add a few more drops of food coloring to the batter.
– To make the cake pops even more decadent, you can dip them in melted white chocolate or dark chocolate before chilling.
– Store the cake pops in an airtight container in the refrigerator for up to 5 days.
- Prep Time: 30
- Cook Time: 30
- Category: Cakes & No-Bake Sweets
- Method: Baking
- Cuisine: American
Conclusion
These Glacier Blue Velvet Cake Pops are truly a showstopping treat that’s sure to delight your taste buds and impress your guests. With their vibrant blue hue, rich chocolate flavor, and creamy frosting coating, they’re the perfect balance of decadence and whimsy.
What are you waiting for? Gather your ingredients and get baking – I promise these Glacier Blue Velvet Cake Pops will quickly become your new go-to recipe for any occasion. Don’t forget to share your creations with me on social media using the hashtag #GlacierBlueCakePops. I can’t wait to see your unique twists on this delightful dessert!
