
You know, I’ll never forget the first time I had a Butterfinger candy bar. I was just a kid, probably around 8 or 9 years old, and my parents had taken me to the county fair. As we wandered through the bustling crowds, the tantalizing aroma of freshly fried funnel cakes and caramel apples filled the air. But it was the shiny orange packaging of those Butterfinger bars that really caught my eye. I begged my mom to let me try one, and when I finally sank my teeth into that crispy, crunchy, peanut butter-flavored confection, it was love at first bite. From that moment on, Butterfingers became my absolute favorite candy.
Fast forward a few decades, and I still get that same nostalgic feeling whenever I see a Butterfinger. But as an adult who’s a bit more health-conscious, I can’t help but wish there was a way to enjoy that beloved flavor in a more wholesome, homemade form. That’s why I decided to experiment in the kitchen and create my very own Healthy Homemade Butterfingers recipe – and let me tell you, it’s an absolute game-changer!
Why This Healthy Homemade Butterfingers Recipe Will Become Your Go-To
The Secret Behind Perfect Healthy Homemade Butterfingers
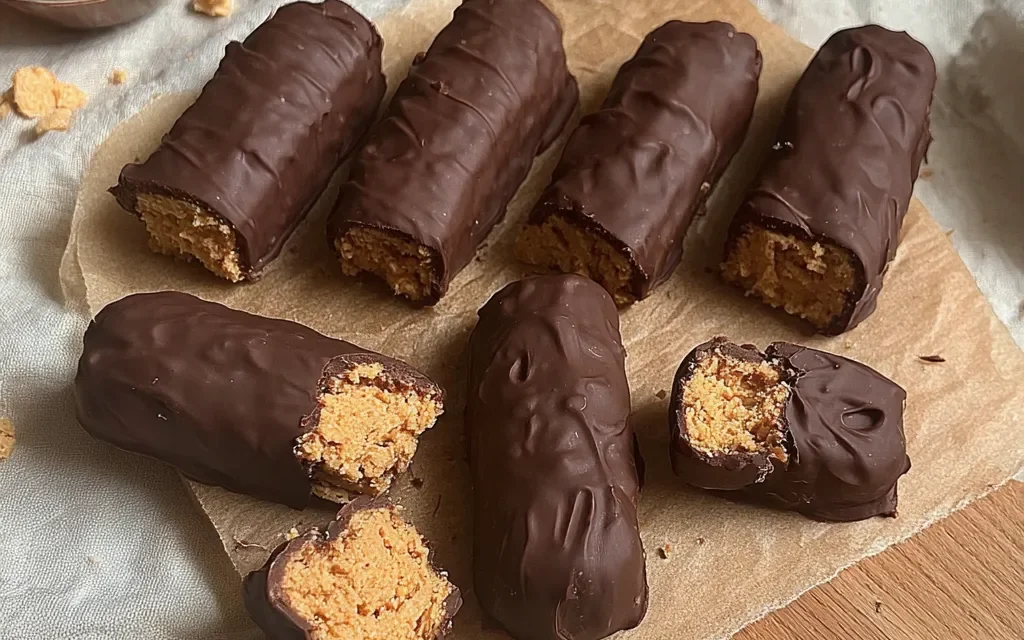
What makes this Healthy Homemade Butterfingers recipe so special is the unique blend of wholesome ingredients and techniques I’ve developed. Instead of using the typical processed candy bar fillings, I’ve crafted a delicious, protein-packed nougat made from real peanut butter and honey. And instead of a sugary, chemically-coated exterior, the crunchy “shell” is made from toasted coconut and a touch of dark chocolate. The result is a treat that’s just as satisfying as the original Butterfinger, but with a fraction of the guilt.
Essential Ingredients You’ll Need
- Creamy peanut butter – the base for the nougat-like center
- Honey – provides natural sweetness and helps bind the nougat
- Coconut oil – gives the outer shell a delectable crunch
- Unsweetened shredded coconut – the star ingredient for the crunchy exterior
- Dark chocolate chips – a drizzle of rich chocolate for the finishing touch
Step-by-Step Healthy Homemade Butterfingers Instructions
Preparing Your Healthy Homemade Butterfingers
This Healthy Homemade Butterfingers recipe is surprisingly easy to make, with just a few simple steps. In total, it takes about 45 minutes to whip up a batch, including the time needed for the nougat to set. You’ll need a few basic kitchen tools like a saucepan, mixing bowls, and a baking sheet, but nothing too fancy.
1- Start by making the peanut butter nougat center. In a medium saucepan, combine the peanut butter and honey, heating and stirring until the mixture is smooth and well-combined.
2- Remove the pan from the heat and stir in a pinch of sea salt. Then, pour the nougat into a parchment-lined baking dish and use a spatula to spread it into an even layer. Refrigerate for 30 minutes to firm up.
3- While the nougat is chilling, toast the shredded coconut in a dry skillet over medium heat, stirring frequently, until golden brown and fragrant. This should take about 5-7 minutes.
4- Once the nougat has set, use a sharp knife to slice it into rectangular “bars.” Carefully transfer each bar to the toasted coconut, pressing gently to coat all sides.
5- In a small bowl, melt the dark chocolate chips, either in the microwave or over a double boiler. Drizzle the melted chocolate over the coated nougat bars.
6- Return the Healthy Homemade Butterfingers to the refrigerator for 10-15 minutes to allow the chocolate to set. Then, enjoy your delicious, guilt-free treat!
Pro Tips for Success
The key to perfect Healthy Homemade Butterfingers is getting the nougat-like center just right. Be sure not to overheat the peanut butter and honey mixture, as that can cause it to become too firm or dry. And when coating the bars in the toasted coconut, work quickly but gently to avoid crumbling.
Another pro tip? Make a double batch! These Healthy Homemade Butterfingers are so good, they tend to disappear fast. Plus, they freeze beautifully, so you can enjoy them for weeks to come.
Serving and Storing Your Healthy Homemade Butterfingers
Perfect Pairings for Healthy Homemade Butterfingers
These Healthy Homemade Butterfingers make a fantastic on-the-go snack, but they’re also delicious as a sweet treat after a meal. I love pairing them with a hot cup of coffee or a cold glass of almond milk for a truly indulgent experience. And they’re the perfect addition to any party or gathering, whether you’re hosting a movie night or bringing a homemade dessert to a potluck.
Storage and Make-Ahead Tips
Luckily, Healthy Homemade Butterfingers have a pretty good shelf life. Store them in an airtight container in the refrigerator for up to 1 week. Or, for longer-term storage, you can freeze them for up to 3 months. Just be sure to let them thaw at room temperature for 10-15 minutes before serving.
If you’re looking to get a head start on your homemade treats, you can actually make the nougat center up to 3 days in advance. Just keep it chilled in the baking dish until you’re ready to assemble the bars.
Variations and Dietary Adaptations for Healthy Homemade Butterfingers
Creative Healthy Homemade Butterfingers Variations
The great thing about this Healthy Homemade Butterfingers recipe is that it’s super versatile. Try switching up the nut butter, using almond or cashew instead of peanut. Or get creative with different coatings, like crushed graham crackers, chopped nuts, or even a drizzle of caramel.
You can also experiment with seasonal flavors. For fall, add a touch of pumpkin pie spice to the nougat. Or for the holidays, roll the bars in crushed candy canes or a dusting of cinnamon sugar.
Making Healthy Homemade Butterfingers Diet-Friendly
This recipe is already pretty darn healthy, but if you have specific dietary needs, there are a few easy modifications you can make. For a gluten-free version, simply use gluten-free peanut butter. To make them vegan, swap the honey for maple syrup or agave nectar, and use dairy-free chocolate chips.
If you’re watching your carbs, you can reduce the amount of honey in the nougat and use a sugar-free chocolate for the drizzle. Just keep in mind that the texture may be slightly different.
Frequently Asked Questions
Q: Can I use crunchy peanut butter instead of creamy?
A: Absolutely! Crunchy peanut butter will give your Healthy Homemade Butterfingers an even more authentic texture. Just be sure to stir it well before adding the honey.
Q: How do I know when the nougat is ready to slice?
A: The nougat should be firm but still pliable when you press on it. After 30 minutes in the fridge, it should be the perfect consistency to slice into bars.
Q: Can I make these Healthy Homemade Butterfingers ahead of time?
A: Yes, these treats actually keep really well! Store them in an airtight container in the fridge for up to 1 week, or in the freezer for up to 3 months.
Q: What’s the best way to reheat frozen Healthy Homemade Butterfingers?
A: For best results, let the frozen bars thaw at room temperature for 10-15 minutes before enjoying. You can also gently warm them in the microwave for 15-20 seconds.
Q: Help! My nougat center is too sticky. What did I do wrong?
A: If the nougat is too sticky to work with, it’s likely because the peanut butter and honey were overheated. Next time, be sure to remove the mixture from the heat as soon as it’s smooth and well-combined.

Healthy Homemade Butterfingers
- Total Time: 30
- Yield: 12 candies
Description
Satisfy your sweet tooth with a healthier twist on the classic Butterfinger candy. These Healthy Homemade Butterfingers feature a crisp, flaky peanut butter center coated in rich, decadent chocolate for a guilt-free indulgence.
Ingredients
– 1 cup creamy peanut butter
– 1/2 cup honey
– 2 tbsp coconut oil, melted
– 1/4 tsp sea salt
– 1 cup dark chocolate chips, melted
Instructions
1. In a medium bowl, mix together the peanut butter, honey, melted coconut oil, and sea salt until well combined.
2. Spread the peanut butter mixture onto a baking sheet lined with parchment paper, forming a thin, even layer.
3. Freeze the peanut butter layer for 30 minutes, or until firm.
4. Break the frozen peanut butter layer into irregular, Butterfinger-shaped pieces.
5. Dip the peanut butter pieces into the melted dark chocolate, coating them completely.
6. Place the chocolate-coated pieces back on the parchment paper-lined baking sheet and refrigerate for 30 minutes, or until the chocolate has set.
7. Enjoy your Healthy Homemade Butterfingers! Store any leftovers in the refrigerator.
Notes
For a crunchier texture, add 1/4 cup chopped roasted peanuts to the peanut butter mixture. You can also experiment with different types of chocolate, such as milk chocolate or white chocolate, to customize the flavor.
- Prep Time: 15
- Cook Time: 15
- Category: Dessert
- Method: No-Bake
- Cuisine: American
Conclusion
There you have it – my secret recipe for irresistible Healthy Homemade Butterfingers! These nostalgic treats are the perfect balance of sweet, crunchy, and satisfying, without all the processed junk. Whether you’re looking for a healthier snack option or just craving that classic Butterfinger flavor, I guarantee this recipe will become your new go-to.
So what are you waiting for? Get in the kitchen and whip up a batch of these Healthy Homemade Butterfingers today. I can’t wait to hear how they turn out – be sure to leave a comment and let me know! Enjoy.

