
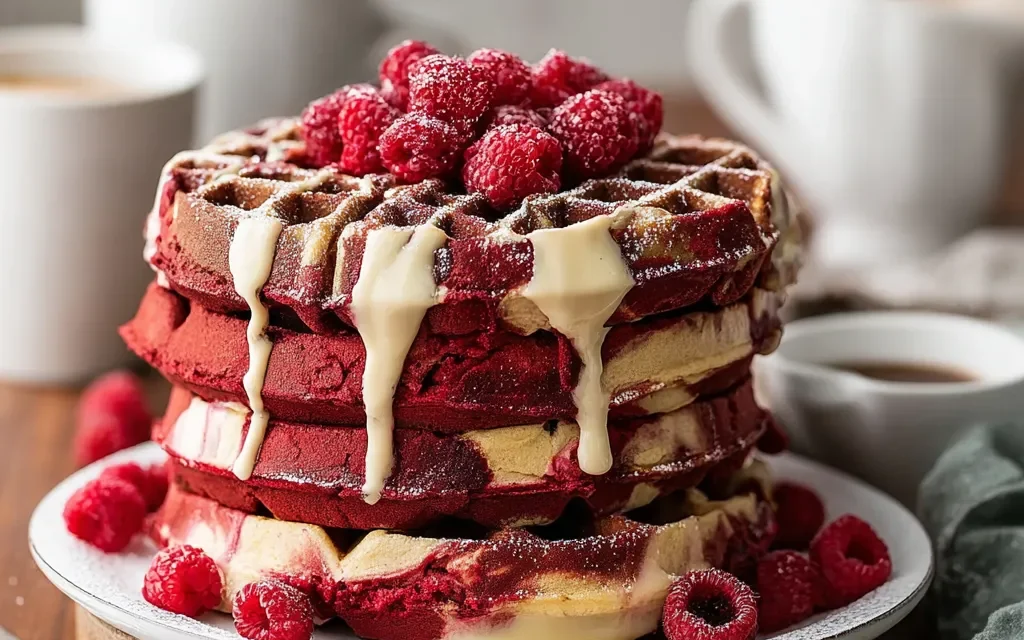
Growing up, I can still vividly remember the aroma of freshly baked waffles wafting through our family kitchen on lazy Sunday mornings. The enticing scent of vanilla, the subtle hint of cocoa, and the unmistakable crimson hue would instantly transport me to a world of pure indulgence. Those Red Velvet Marble Waffles were more than just a breakfast – they were a treasured tradition that brought us all together around the table.
As I’ve grown older, I’ve learned to recreate that nostalgic flavor profile in my own kitchen, and let me tell you, this Red Velvet Marble Waffles recipe is an absolute showstopper. The perfect blend of velvety chocolate and tantalizing vanilla, with a stunning marbled appearance that’s sure to impress, this dish is a true culinary masterpiece. Whether you’re serving it up for a special occasion or simply treating yourself to a decadent weekend brunch, these waffles are guaranteed to become a new family favorite.
Why This Red Velvet Marble Waffles Recipe Will Become Your Go-To
The Secret Behind Perfect Red Velvet Marble Waffles
The key to achieving the iconic Red Velvet Marble Waffles lies in the careful balance of flavors and the unique technique used to create the striking marbled pattern. By incorporating both cocoa powder and red food coloring, we’re able to achieve that rich, velvety chocolate taste and the signature vibrant red hue that sets this dish apart. But the real magic happens when we gently swirl the batter, allowing the contrasting colors to intertwine and create a mesmerizing marbled effect.
Essential Ingredients You’ll Need
- 2 cups all-purpose flour: This provides the sturdy foundation for the waffles, ensuring a perfect texture every time.
- 1/2 cup unsweetened cocoa powder: The heart and soul of the red velvet flavor, this cocoa powder lends a deep, rich chocolate essence.
- 1 1/2 cups granulated sugar: The right amount of sweetness to balance the cocoa and create a well-rounded flavor profile.
- 2 teaspoons baking powder: Crucial for achieving those light and fluffy waffles with a crisp exterior.
- 1 teaspoon baking soda: Working in tandem with the baking powder, this ingredient helps the waffles rise and develop their signature airy texture.
- 1/2 teaspoon salt: A small but essential touch that brings out the flavors and prevents the waffles from tasting flat.
- 2 cups buttermilk: The secret to moist, tender waffles with a subtle tang that complements the chocolate and vanilla notes.
- 2 large eggs: Binding the batter together and contributing to the overall structure and richness of the waffles.
- 1/2 cup unsalted butter, melted: Adding a luxurious, velvety mouthfeel and helping to create a crisp, golden exterior.
- 2 teaspoons vanilla extract: Providing a warm, aromatic backdrop that ties all the flavors together.
- 1-2 tablespoons red food coloring: The magic ingredient that gives these waffles their signature vibrant red hue and unmistakable Red Velvet identity.
Step-by-Step Red Velvet Marble Waffles Instructions
Preparing Your Red Velvet Marble Waffles
With a total time of just 35 minutes (15 minutes for prep and 20 minutes for cooking), this Red Velvet Marble Waffles recipe is the perfect way to indulge in a decadent breakfast or brunch without spending hours in the kitchen. All you’ll need is a waffle iron, a mixing bowl, and a few essential kitchen tools to whip up a batch of these irresistible treats.
1- In a large mixing bowl, whisk together the 2 cups of all-purpose flour, 1/2 cup of unsweetened cocoa powder, 1 1/2 cups of granulated sugar, 2 teaspoons of baking powder, 1 teaspoon of baking soda, and 1/2 teaspoon of salt until well combined.
2- In a separate bowl, whisk together the 2 cups of buttermilk, 2 large eggs, 1/2 cup of melted unsalted butter, and 2 teaspoons of vanilla extract until smooth and fully incorporated.
3- Gradually pour the wet ingredients into the dry ingredients, mixing gently with a whisk or wooden spoon until just combined. Be careful not to overmix, as this can result in tough, dense waffles.
4- Add 1-2 tablespoons of red food coloring to the batter and use a spoon or spatula to gently swirl it through, creating a beautiful marbled effect. The batter should now have a gorgeous deep-red hue with striking white and chocolate swirls.
5- Preheat your waffle iron and lightly grease it with a bit of cooking spray or melted butter. Scoop the batter onto the hot waffle iron, using about 1/2 cup per waffle, and cook until golden brown and crispy, approximately 4-5 minutes.
6- Serve your Red Velvet Marble Waffles hot, with your favorite toppings like whipped cream, fresh berries, or a drizzle of maple syrup. Indulge in the perfect balance of chocolate, vanilla, and that signature red velvet flavor in every bite.
Pro Tips for Success
- For an even more intense chocolate flavor, consider using a high-quality cocoa powder or even melted dark chocolate in the batter.
- Letting the batter rest for 10-15 minutes before cooking allows the flour to fully hydrate, resulting in lighter, fluffier waffles.
- Overmixing the batter can lead to tough, rubbery waffles, so be sure to stop mixing as soon as the ingredients are just combined.
- Experiment with different food coloring amounts to achieve your desired level of redness – some prefer a more subtle hue, while others love a bold, vibrant red.
Serving and Storing Your Red Velvet Marble Waffles
Perfect Pairings for Red Velvet Marble Waffles
These decadent Red Velvet Marble Waffles are the perfect centerpiece for a special brunch or weekend breakfast, serving 6 people comfortably. For an indulgent pairing, top them with a generous dollop of fresh whipped cream and a sprinkle of toasted pecans or walnuts. To balance out the richness, serve with a side of fresh berries or a crisp green salad. And don’t forget the coffee or hot chocolate – the deep chocolate notes in the waffles pair beautifully with these classic breakfast beverages.
Storage and Make-Ahead Tips
If you have any leftover Red Velvet Marble Waffles, they can be stored in an airtight container in the refrigerator for up to 3 days. To reheat, simply pop them in the toaster or oven at 350°F until warmed through and crispy on the outside.
For meal-prepping, you can make the batter in advance and store it in the refrigerator for up to 2 days. When ready to cook, give the batter a quick stir and proceed with the recipe as usual. Alternatively, you can cook the waffles ahead of time, let them cool completely, and then freeze them for up to 3 months. To reheat the frozen waffles, simply place them in the toaster or oven until heated through and crispy.
Variations and Dietary Adaptations for Red Velvet Marble Waffles
Creative Red Velvet Marble Waffles Variations
- Swap out the vanilla extract for a touch of almond or hazelnut extract for a delightful twist.
- Fold in chopped pecans or walnuts for a delightful crunch in every bite.
- Top the waffles with a creamy cream cheese frosting for an extra indulgent treat.
- Serve the waffles with a side of homemade raspberry or cherry compote for a burst of fruity flavor.
Making Red Velvet Marble Waffles Diet-Friendly
For a gluten-free version, replace the all-purpose flour with a high-quality gluten-free flour blend. You may need to adjust the amount of liquid in the batter to achieve the perfect consistency.
To make these waffles vegan, substitute the buttermilk with a plant-based milk, such as unsweetened almond or oat milk, and use a flax or chia egg instead of the regular eggs. Additionally, replace the melted butter with a neutral-tasting plant-based oil.
For a low-carb spin, use a combination of almond flour and coconut flour in place of the all-purpose flour, and sweeten the batter with a sugar-free sweetener like erythritol or monk fruit.
Frequently Asked Questions
Q: Can I use regular milk instead of buttermilk?
A: While you can substitute regular milk for the buttermilk, the waffles may not have the same tender, fluffy texture or subtle tang that the buttermilk provides. For best results, stick to the buttermilk as it’s an essential ingredient in this Red Velvet Marble Waffles recipe.
Q: How long should I cook the waffles?
A: The total cooking time for these Red Velvet Marble Waffles is approximately 4-5 minutes per waffle, depending on your waffle iron. Be sure to preheat the waffle iron thoroughly and cook the waffles until they’re golden brown and crispy on the outside.
Q: Can I make the batter ahead of time?
A: Yes, you can make the Red Velvet Marble Waffles batter up to 2 days in advance and store it in the refrigerator. When ready to cook, give the batter a quick stir and proceed with the recipe as usual.
Q: How many servings does this recipe make?
A: This Red Velvet Marble Waffles recipe yields 6 servings, with each serving consisting of one full-size waffle.
Q: What should I do if the waffles come out too dense or heavy?
A: If your Red Velvet Marble Waffles turn out too dense or heavy, it’s likely due to overmixing the batter. Next time, be sure to mix the wet and dry ingredients just until they’re combined, avoiding any excessive stirring.

Red Velvet Marble Waffles
- Total Time: 35
- Yield: 6 servings
Description
Indulge in the ultimate Red Velvet Marble Waffles – a decadent breakfast treat with a rich, swirled flavor and a perfectly crisp exterior. These homemade waffles are sure to impress your family and friends.
Ingredients
– 2 cups all-purpose flour
– 1/2 cup unsweetened cocoa powder
– 1 1/2 cups granulated sugar
– 2 teaspoons baking powder
– 1 teaspoon baking soda
– 1/2 teaspoon salt
– 2 cups buttermilk
– 2 large eggs
– 1/2 cup unsalted butter, melted
– 2 teaspoons vanilla extract
– 1-2 tablespoons red food coloring
Instructions
1. In a large bowl, whisk together the flour, cocoa powder, sugar, baking powder, baking soda, and salt.
2. In a separate bowl, whisk together the buttermilk, eggs, melted butter, and vanilla extract.
3. Pour the wet ingredients into the dry ingredients and stir just until combined, being careful not to overmix.
4. Divide the batter into two equal parts. Add the red food coloring to one half of the batter and mix until well combined, creating a rich, red velvet color.
5. Preheat your waffle iron and grease it if necessary. Scoop the plain and red velvet batters onto the iron in alternating spoonfuls, creating a swirled pattern.
6. Cook the waffles for 4-5 minutes, or until they’re golden brown and crispy.
7. Serve the Red Velvet Marble Waffles warm, with your favorite toppings such as powdered sugar, maple syrup, whipped cream, or fresh berries.
Notes
For best results, use full-fat buttermilk and ensure that all your ingredients are at room temperature before mixing. Leftover waffles can be stored in the freezer for up to 2 months.
- Prep Time: 15
- Cook Time: 20
- Category: Cakes & No-Bake Sweets
- Method: Baking
- Cuisine: American
Conclusion
These Red Velvet Marble Waffles are truly a breakfast (or brunch) of champions. With their irresistible chocolate-vanilla flavor, striking visual appeal, and unbeatable texture, they’re sure to become a new family favorite in no time. Whether you’re serving them for a special occasion or simply treating yourself to a decadent weekend indulgence, these waffles are guaranteed to impress and delight. So go ahead, fire up that waffle iron, and get ready to enjoy a truly unforgettable Red Velvet Marble Waffles experience. Don’t forget to share your creations and let me know how you liked the recipe!


