
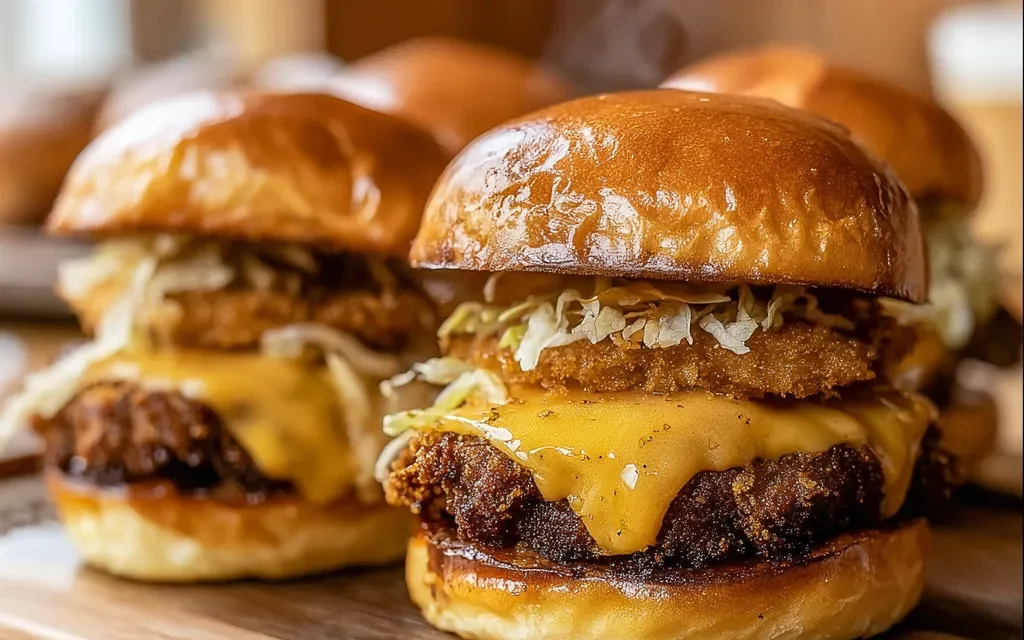
I can still remember the first time I sank my teeth into a perfectly cooked Tallow-Fried Smash Slider. It was at a small, unassuming burger joint tucked away in the heart of the city. The moment the first bite hit my taste buds, I was in burger heaven. The way the crisp, golden exterior of the patty gave way to the juicy, melt-in-your-mouth beef, all nestled between soft, pillowy brioche buns – it was an unforgettable culinary experience.
From that day on, I’ve been on a mission to recreate that same magic at home. After countless experiments and tweaks, I’ve perfected the ultimate Tallow-Fried Smash Sliders recipe. And today, I’m excited to share it with you, so you can enjoy the same mouthwatering burgers in the comfort of your own kitchen.
Why This Tallow-Fried Smash Sliders Recipe Will Become Your Go-To
The Secret Behind Perfect Tallow-Fried Smash Sliders
The secret to these Tallow-Fried Smash Sliders lies in the use of tallow, a traditional cooking fat that’s making a comeback in the culinary world. Tallow not only adds a rich, savory flavor to the patties, but it also helps create a delightfully crisp, caramelized crust that seals in all the juices. The result is a burger that’s bursting with flavor in every bite.
But the magic doesn’t stop there. The “smash” technique, where you press the patties down onto a hot griddle or pan, creates a thin, evenly cooked burger that’s perfectly seared on the outside and juicy on the inside. This method ensures that each slider is packed with beefy goodness, making it the ultimate comfort food.
Essential Ingredients You’ll Need
To make these Tallow-Fried Smash Sliders, you’ll need a few key ingredients:
- 1 pound ground beef: The foundation of the perfect burger, this high-quality beef is the star of the show.
- 2 tablespoons tallow: As mentioned, this traditional cooking fat is the secret to achieving that irresistible crispy exterior and rich, savory flavor.
- 8 small brioche or potato slider buns: Soft, slightly sweet buns are the perfect vessel for these juicy sliders.
- 8 slices cheddar cheese: A classic topping that melts beautifully on the hot patties.
- 1 teaspoon garlic powder: This adds a subtle, aromatic depth to the beef.
- 1 teaspoon onion powder: Enhancing the natural sweetness of the onions.
- 1 teaspoon salt: Bringing out the natural flavors of the ingredients.
- 1/2 teaspoon black pepper: Adding a hint of heat and complexity.
- Toppings (optional): Pickles, onions, lettuce, and tomatoes can all elevate these sliders to new heights.
Step-by-Step Tallow-Fried Smash Sliders Instructions
Preparing Your Tallow-Fried Smash Sliders
With a prep time of just 10 minutes and a cook time of 10 minutes, these Tallow-Fried Smash Sliders come together in a flash – perfect for a quick and satisfying meal. All you’ll need is a hot griddle or cast-iron pan, a spatula, and a few simple ingredients.
1- Start by dividing the 1 pound of ground beef into 8 equal portions. Gently shape each portion into a small, loosely packed ball.
2- Heat the 2 tablespoons of tallow in your griddle or pan over medium-high heat. Once the tallow is shimmering, carefully place the beef balls onto the hot surface and use a sturdy spatula to smash them down into thin patties.
3- Let the patties sear for about 30 seconds to 1 minute, or until the edges begin to turn golden brown and crispy.
4- Flip the patties and cook for another 30 seconds to 1 minute, or until they’re cooked to your desired doneness. The centers should be slightly pink for a juicy, medium-rare texture.
5- Top each patty with a slice of cheddar cheese and let it melt for about 30 seconds.
6- Assemble your Tallow-Fried Smash Sliders by placing the cheesy patties on the brioche or potato buns. Add any desired toppings, such as pickles, onions, lettuce, and tomatoes, and serve hot.
Pro Tips for Success
- Use freshly ground beef for the best texture and flavor. Pre-ground beef can sometimes have a denser, chewier consistency.
- Be gentle when shaping the patties – you want them to be loosely packed to ensure maximum juiciness.
- Make sure your griddle or pan is ripping hot before adding the tallow and beef. This helps create that signature sear.
- Don’t be afraid to really smash the patties down – the thinner they are, the better they’ll cook and crisp up.
Serving and Storing Your Tallow-Fried Smash Sliders
Perfect Pairings for Tallow-Fried Smash Sliders
These Tallow-Fried Smash Sliders are the ultimate crowd-pleasing dish, serving up 8 servings of pure burger bliss. They pair perfectly with crispy fries, creamy coleslaw, or a fresh, crunchy salad for a well-rounded meal. And to wash it all down, nothing beats an ice-cold beer or a thick, creamy milkshake.
Whether you’re hosting a backyard barbecue, a game day gathering, or just craving a delicious dinner, these sliders are sure to be a hit.
Storage and Make-Ahead Tips
Tallow-Fried Smash Sliders are best enjoyed fresh off the griddle, but if you have any leftovers, they can be stored in the refrigerator for up to 3 days. To reheat, simply place the sliders on a baking sheet in a 350°F oven for 5-10 minutes, or until heated through.
For even greater convenience, you can prepare the uncooked patties in advance and store them in the freezer for up to 3 months. When ready to cook, simply thaw the patties in the refrigerator overnight and follow the same cooking instructions.
Variations and Dietary Adaptations for Tallow-Fried Smash Sliders
Creative Tallow-Fried Smash Sliders Variations
While the classic Tallow-Fried Smash Sliders are hard to beat, there are plenty of ways to put your own spin on this recipe:
- Southwest-Style: Top the patties with pepper jack cheese, crispy onion strings, and a drizzle of spicy chipotle mayo.
- Bacon & Bleu: Add crispy bacon and crumbled blue cheese for a flavor-packed twist.
- Mushroom Swiss: Sauté mushrooms in the tallow and top the patties with melted Swiss cheese.
- Hawaiian: Top the patties with grilled pineapple slices and a tangy teriyaki sauce.
Making Tallow-Fried Smash Sliders Diet-Friendly
For those following a gluten-free diet, simply swap out the brioche or potato buns for gluten-free slider rolls. Looking to cut down on carbs? Skip the buns altogether and serve the Tallow-Fried Smash Sliders on a bed of leafy greens.
Vegans can get in on the action too by using plant-based ground “meat” and dairy-free cheese alternatives. Just be sure to use a high-quality vegan tallow substitute to achieve that signature crispy crust.
Frequently Asked Questions
Q: Can I use a different type of fat instead of tallow?
A: While tallow is the star of this recipe, you can substitute it with other high-smoke-point fats like avocado oil, ghee, or even bacon fat if you prefer.
Q: How long do I need to cook the Tallow-Fried Smash Sliders?
A: With a total time of just 20 minutes (10 minutes for prep and 10 minutes for cooking), these sliders come together in a flash. Be sure to sear the patties for about 30 seconds to 1 minute per side for that perfect crispy exterior.
Q: Can I make the Tallow-Fried Smash Sliders ahead of time?
A: Absolutely! The uncooked patties can be frozen for up to 3 months. Just thaw them in the refrigerator overnight before cooking.
Q: How many Tallow-Fried Smash Sliders does this recipe make?
A: This recipe yields 8 servings of Tallow-Fried Smash Sliders, so it’s perfect for feeding a crowd or enjoying leftovers throughout the week.
Q: What should I do if the patties stick to the griddle?
A: Make sure your griddle or pan is properly preheated and that the tallow is shimmering before adding the patties. If they still seem to be sticking, try using a thin metal spatula to gently lift and release them.
Conclusion
Tallow-Fried Smash Sliders are the ultimate comfort food, combining juicy beef, crispy tallow-fried edges, and soft, pillowy buns. This recipe is a game-changer, allowing you to bring the flavors of your favorite burger joint right into your own kitchen.
Whether you’re hosting a backyard BBQ, settling in for a Netflix binge, or just craving a delicious and satisfying meal, these Tallow-Fried Smash Sliders are sure to become a new family favorite. So what are you waiting for? Fire up your griddle and get ready to sink your teeth into the best sliders you’ve ever had!
Don’t forget to let me know how your Tallow-Fried Smash Sliders turn out. I’d love to hear your thoughts and see your creations. Happy cooking!


