
Growing up in a bustling Turkish neighborhood, the aroma of freshly baked Turkish bread would fill the air, drawing me in like a warm embrace. The sight of the golden, perfectly crusted loaves cooling on windowsills was a common occurrence, and the taste of that soft, pillowy interior was something I could never forget. It’s more than just a simple bread; it’s a piece of culture, a comfort food that transports me back to those cherished memories.
That’s why this Turkish Bread recipe has become a go-to in my kitchen. It’s not just about the end result – it’s about the journey, the satisfaction of creating something so authentically Turkish with your own two hands. From the moment you start mixing the dough to the final, triumphant presentation, this recipe is a true labor of love.
Why This Turkish Bread Recipe Will Become Your Go-To
The Secret Behind Perfect Turkish Bread
What sets this Turkish Bread recipe apart is the attention to detail and the respect for traditional techniques. By using the perfect blend of ingredients – 3 cups (375g) of all-purpose flour, 1 teaspoon (5g) of salt, 1 teaspoon (5g) of active dry yeast, 1 1/4 cups (295ml) of warm water, and 2 tablespoons (30ml) of olive oil – you’ll achieve a texture and flavor that’s simply unparalleled.
The key is in the kneading process. By working the dough with your hands, you’re not only developing the gluten structure but also infusing the bread with your own unique energy. It’s a tactile experience that connects you to the centuries-old tradition of Turkish bread-making. And the results speak for themselves – a soft, pillowy interior with a perfectly crisp crust that’s irresistible.
Essential Ingredients You’ll Need
The foundation of this Turkish Bread recipe is the all-purpose flour. This versatile ingredient provides the structure and substance that you’ll need for a truly authentic loaf. The 3 cups (375g) of flour create a dough that’s just the right consistency, allowing for optimal rise and texture.
Next, the 1 teaspoon (5g) of salt is crucial for enhancing the overall flavor profile. It’s the unsung hero that brings out the natural sweetness of the bread and adds depth to the aroma.
The 1 teaspoon (5g) of active dry yeast is the magic ingredient that transforms this dough into a living, rising masterpiece. As the yeast feasts on the sugars in the flour, it releases carbon dioxide, creating those coveted air pockets that give Turkish Bread its signature lightness.
To bring it all together, the 1 1/4 cups (295ml) of warm water and 2 tablespoons (30ml) of olive oil create a perfectly hydrated dough that’s easy to work with and results in a truly exceptional loaf.
Step-by-Step Turkish Bread Instructions
Preparing Your Turkish Bread
With a prep time of just 15 minutes and a cook time of 15 minutes, this Turkish Bread recipe is a true time-saver. All you’ll need is a large mixing bowl, a sturdy spoon, and a lightly floured surface for kneading. Once you have your ingredients assembled, you’ll be well on your way to creating a masterpiece.
1- In the large mixing bowl, combine the 3 cups (375g) of all-purpose flour, 1 teaspoon (5g) of salt, and 1 teaspoon (5g) of active dry yeast. Use a spoon to gently mix the dry ingredients together, creating a well in the center.
2- Slowly pour in the 1 1/4 cups (295ml) of warm water and 2 tablespoons (30ml) of olive oil, and use your hands to bring the dough together. Knead the dough on a lightly floured surface for about 5 minutes, until it becomes smooth and elastic.
3- Place the dough in a lightly greased bowl, cover it with a damp towel, and let it rise for 10 minutes. During this time, the yeast will work its magic, filling the dough with air pockets and creating that signature Turkish Bread texture.
4- Punch down the dough to release any excess air, then shape it into an oval or round loaf. Transfer the dough to a parchment-lined baking sheet, cover it with the damp towel, and let it rise for another 5 minutes.
5- Preheat your oven to 400°F (200°C). Once the dough has had its final rise, use a sharp knife to score the top, creating a few shallow slashes. This will allow the bread to expand and develop that beautiful, crackly crust.
6- Bake the Turkish Bread for 15 minutes, until it’s golden brown and the crust is crisp. Remove it from the oven and let it cool for a few minutes before serving. The result is a warm, fragrant loaf that’s ready to be enjoyed with your favorite toppings or dipped into flavorful sauces.
Pro Tips for Success
To ensure your Turkish Bread turns out perfectly every time, here are a few expert tips:
- Use lukewarm water for the dough – not too hot, not too cold. This helps the yeast activate and rise properly.
- Knead the dough for the full 5 minutes to develop the gluten and create that signature chewy texture.
- Don’t be afraid to add a bit more flour if the dough feels too sticky. The right consistency is key for easy shaping and baking.
- Let the dough rise in a warm, draft-free spot for the best results. A slightly warmer oven with the light on works great.
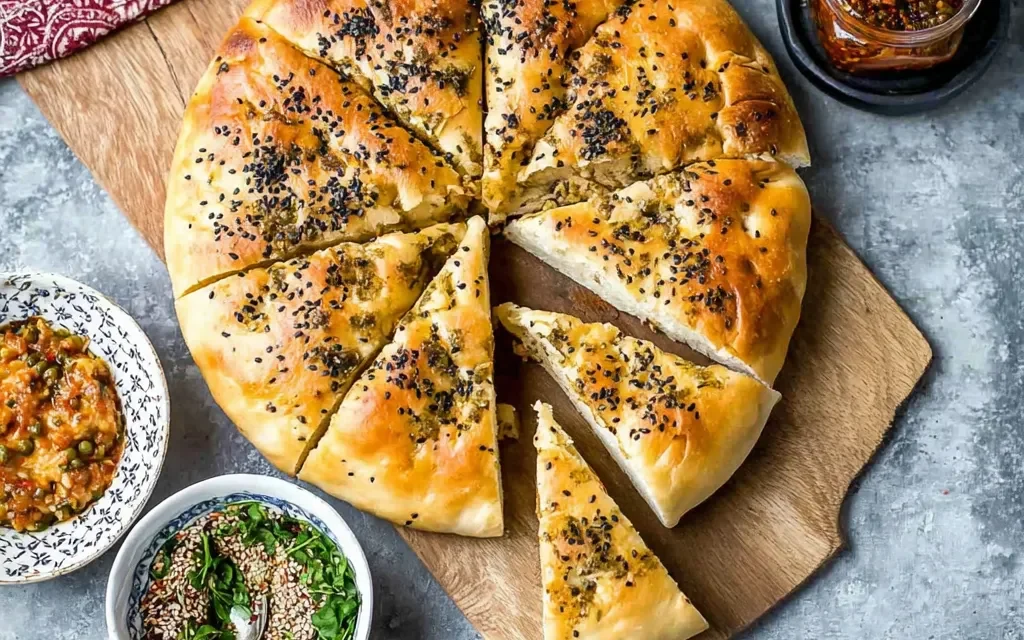
Serving and Storing Your Turkish Bread
Perfect Pairings for Turkish Bread
This Turkish Bread recipe yields 8 servings, making it a wonderful accompaniment to a variety of meals. Serve it alongside rich and flavorful dishes like lamb stew, lentil soup, or a traditional Turkish breakfast spread with olives, cheese, and fresh produce. The soft, pillowy interior and crisp crust pair beautifully with bold, savory flavors.
For a lighter pairing, try dipping the bread in olive oil and balsamic vinegar, or using it to soak up the juices from a hearty salad. The possibilities are endless – the versatility of Turkish Bread makes it a true staple in any kitchen.
Storage and Make-Ahead Tips
One of the best things about this Turkish Bread recipe is that it’s easy to make ahead and store for later. Once the loaf has cooled completely, you can wrap it tightly in plastic or foil and keep it at room temperature for up to 3 days. For longer-term storage, the bread can be frozen for up to 2 months.
When you’re ready to enjoy the bread again, simply thaw it at room temperature or reheat it in the oven at 350°F (175°C) for 5-10 minutes until warmed through. This makes it easy to have fresh, homemade Turkish Bread on hand whenever the craving strikes.
Variations and Dietary Adaptations for Turkish Bread
Creative Turkish Bread Variations
While the classic Turkish Bread recipe is a true delight, there’s room for creativity and personalization. Try adding freshly chopped herbs, such as rosemary or thyme, to the dough for a fragrant twist. You can also experiment with different shapes, like braided loaves or mini buns, to change up the presentation.
For a sweeter take, incorporate a touch of honey or a sprinkle of sesame seeds into the dough. And if you’re feeling adventurous, you can even stuff the bread with savory fillings like feta cheese, spinach, or za’atar seasoning.
Making Turkish Bread Diet-Friendly
If you’re following a special diet, fear not – this Turkish Bread recipe can be easily adapted to suit your needs. For a gluten-free version, simply substitute the all-purpose flour with a high-quality gluten-free flour blend. You may need to adjust the hydration slightly, but the end result will still be a delicious, authentic-tasting loaf.
For a vegan take, replace the olive oil with a plant-based oil of your choice, and consider using a dairy-free milk or water instead of the warm water. And if you’re watching your carb intake, you can experiment with low-carb flour alternatives, such as almond or coconut flour, to create a Turkish Bread that fits your dietary requirements.
Frequently Asked Questions
Q: Can I substitute a different type of flour for the all-purpose flour?
A: While all-purpose flour is the traditional choice for Turkish Bread, you can experiment with other flours, such as bread flour or whole wheat flour, to achieve different textures and flavors. However, the proportions and hydration may need to be adjusted.
Q: How long does the dough need to rise, and can I let it rise for longer?
A: The recipe calls for two 10-minute rises, which is the optimal timing to achieve the perfect texture. Letting the dough rise for too long can result in an overly airy or dense loaf. If you need to let it rise for a bit longer, keep an eye on it and stop once it’s doubled in size.
Q: Can I make this Turkish Bread ahead of time?
A: Absolutely! This bread keeps well for up to 3 days at room temperature, and you can also freeze it for up to 2 months. Simply thaw it at room temperature or reheat it in the oven before serving.
Q: How many servings does this Turkish Bread recipe make?
A: This recipe yields 8 servings, making it a great choice for sharing with family and friends. You can easily scale the recipe up or down to suit your needs.
Q: What if my dough is too sticky or too dry?
A: If the dough is too sticky, gradually add a bit more flour, a tablespoon at a time, until it reaches the right consistency. If it’s too dry, add a splash of water and knead it in until the dough is smooth and elastic.

Turkish Bread
- Total Time: 30
- Yield: 8 servings
- Diet: Vegetarian
Description
Homemade Turkish Bread is a soft, fluffy flatbread that’s perfect for dipping, serving with soups and stews, or enjoying on its own. This simple 30-minute recipe yields a comforting and delicious bread that’s sure to become a family favorite.
Ingredients
– 3 cups (375g) all-purpose flour
– 1 teaspoon (5g) salt
– 1 teaspoon (5g) active dry yeast
– 1 1/4 cups (295ml) warm water
– 2 tablespoons (30ml) olive oil
Instructions
1. In a large bowl, combine the flour, salt, and yeast. Stir to mix.
2. Add the warm water and olive oil, and stir until a shaggy dough forms.
3. Turn the dough out onto a lightly floured surface and knead for 5-7 minutes, until the dough is smooth and elastic.
4. Place the dough in a lightly greased bowl, cover with a damp towel, and let rise for 15 minutes.
5. Punch down the dough to release any air bubbles, then divide it into 8 equal pieces.
6. Roll or stretch each piece into a flat, oval shape, about 1/4-inch thick.
7. Heat a large skillet or griddle over medium-high heat. Cook the breads for 2-3 minutes per side, until golden brown and puffed.
8. Serve the Turkish Bread warm, with your favorite dips, soups, or enjoy it on its own.
Notes
For a softer texture, brush the cooked breads with melted butter or olive oil. Leftover bread can be stored in an airtight container for up to 3 days.
- Prep Time: 15
- Cook Time: 15
- Category: Tarts, Toasts & Flatbreads
- Method: Stovetop
- Cuisine: Turkish
Conclusion
This Turkish Bread recipe is a true masterpiece, combining centuries-old traditions with modern convenience. From the moment you mix the dough to the final, triumphant presentation, it’s a journey that’s as rewarding as it is delicious. With its soft, pillowy interior and perfectly crisp crust, this bread will quickly become a staple in your kitchen.
So, what are you waiting for? Gather your ingredients, dust off your apron, and let’s embark on a delightful adventure in Turkish bread-making. I promise, once you take that first bite, you’ll be hooked – and this recipe will become your new go-to for all your bread-loving needs.


