
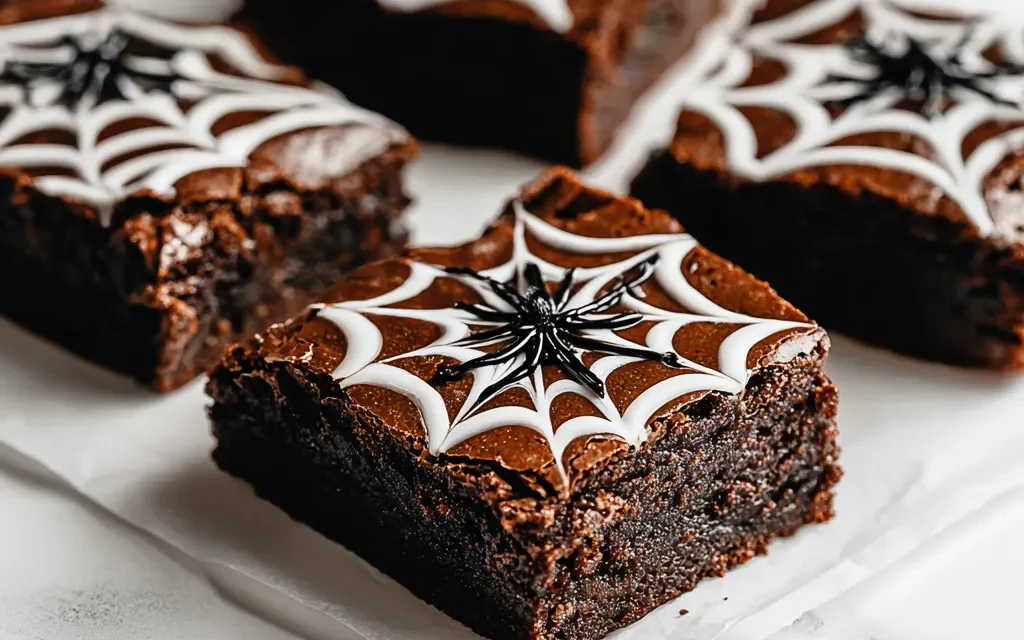
I’ll never forget the Halloween party a few years back when I served up my famous White Chocolate Spiderweb Brownies. It was the talk of the entire neighborhood – everyone raved about how delicious and spooky they were! I spent the whole day baking in the kitchen, making sure every last detail was perfect. The silky white chocolate swirls, the fudgy brownie base, and the festive webbing on top… it all came together in the most irresistible way.
When my guests started arriving, they couldn’t believe their eyes. The White Chocolate Spiderweb Brownies were the centerpiece of the dessert table, and people were lining up to get a slice. I remember one of my friends, Jenny, taking a big bite and her eyes lighting up. “Oh my gosh, these are incredible!” she exclaimed. “How did you make the webbing look so realistic?” I just smiled and told her it was all in the technique.
Throughout the night, people kept coming back for more of the White Chocolate Spiderweb Brownies. They couldn’t believe how rich and decadent they were, with that perfect balance of fudgy chocolate and creamy white chocolate. And the spider web design on top? Absolute perfection. I felt like a baking superhero!
Why This White Chocolate Spiderweb Brownies Recipe Will Become Your Go-To
These White Chocolate Spiderweb Brownies are truly a showstopper. Not only do they taste incredible, but the spider web design on top makes them a must-have for any Halloween party or gathering. The secret is in the swirling technique – it takes a bit of practice, but once you get the hang of it, you’ll be able to create those stunning white chocolate webs with ease. Plus, the rich, fudgy brownie base is out of this world. Your guests will be begging you for the recipe!
The Secret Behind Perfect White Chocolate Spiderweb Brownies
The key to these White Chocolate Spiderweb Brownies is all in the technique. By carefully swirling the melted white chocolate over the top of the brownies, you can create those intricate, realistic-looking spider webs. It takes a bit of practice, but once you get the hang of it, you’ll be able to make these show-stopping treats again and again. And the brownie base? Incredibly fudgy and decadent, with a perfect balance of chocolate flavor.
Essential Ingredients You’ll Need
- Unsweetened chocolate: This is the base for the rich, fudgy brownie.
- Butter: Adds richness and moisture to the brownies.
- Granulated sugar: Sweetens the brownies and helps create that perfect crackly top.
- Eggs: Binds the brownies together and gives them their signature texture.
- All-purpose flour: Provides structure and helps create the fudgy consistency.
- White chocolate chips: The star of the show – these create the beautiful spider web design on top.
Step-by-Step White Chocolate Spiderweb Brownies Instructions
Preparing Your White Chocolate Spiderweb Brownies is a bit more involved than a typical brownie recipe, but I promise it’s worth the extra effort! The total time to make these treats is around 1 hour, and you’ll need a mixing bowl, a baking pan, and a spoon or spatula.
1- Preheat your oven to 350°F and grease an 8×8-inch baking pan. In a medium-sized bowl, melt the unsweetened chocolate and butter together using a double boiler or the microwave. Stir until smooth and fully combined.
2- In a separate bowl, whisk together the granulated sugar, eggs, and a pinch of salt. Slowly pour the chocolate mixture into the egg mixture, stirring constantly to prevent the eggs from scrambling.
3- Gently fold in the all-purpose flour until just combined, being careful not to overmix. Pour the batter into the prepared baking pan and smooth the top.
4- Bake the White Chocolate Spiderweb Brownies for 25-30 minutes, until a toothpick inserted in the center comes out clean. Allow the brownies to cool completely in the pan.
5- Once the brownies are cooled, melt the white chocolate chips in a double boiler or the microwave, stirring frequently until smooth.
6- Drizzle the melted white chocolate back and forth over the top of the brownies in a web-like pattern. Allow the white chocolate to set before slicing and serving.
Pro Tips for Success
The key to perfect White Chocolate Spiderweb Brownies is all in the technique. Make sure to melt the chocolate gently over low heat to prevent it from seizing up. And when it comes time to create the spider web design, work quickly but with a steady hand for the best results.
One common mistake is over-baking the brownies, which can make them dry and crumbly. Keep a close eye on them in the oven, and don’t be afraid to start checking a few minutes early. You want them to be fudgy and moist in the center.
Serving and Storing Your White Chocolate Spiderweb Brownies
Perfect Pairings for White Chocolate Spiderweb Brownies
These White Chocolate Spiderweb Brownies are the ultimate Halloween treat, but they’re also delicious any time of year. Serve them up at your next scary movie night or fall gathering, and they’re sure to be a hit.
For a festive touch, pair the brownies with a scoop of vanilla ice cream or a dollop of whipped cream. And don’t forget the spooky Halloween-themed sprinkles or candy pieces to really make them pop!
Storage and Make-Ahead Tips
The great thing about these White Chocolate Spiderweb Brownies is that they can be made in advance. Once the white chocolate webbing has set, you can store the brownies in an airtight container at room temperature for up to 5 days.
If you want to get a head start, you can bake the brownies a day or two ahead of time and then add the white chocolate webbing right before serving. They’ll stay fresh and delicious, and the spooky design will still look perfect.
To reheat, simply pop the brownies in the microwave for 15-20 seconds. The white chocolate webbing will soften up just enough to make them extra gooey and irresistible.
Variations and Dietary Adaptations for White Chocolate Spiderweb Brownies
Creative White Chocolate Spiderweb Brownies Variations
There are so many ways to put a unique spin on these White Chocolate Spiderweb Brownies! For a fun fall twist, try adding a teaspoon of pumpkin spice to the brownie batter. Or, for a festive holiday version, use red and green swirled white chocolate instead of plain white.
You could also experiment with different flavors of white chocolate, like raspberry or mint. And if you really want to take them over the top, try topping the white chocolate webbing with crushed Oreos, Halloween sprinkles, or even a drizzle of caramel sauce.
Making White Chocolate Spiderweb Brownies Diet-Friendly
Believe it or not, you can make these White Chocolate Spiderweb Brownies a little more diet-friendly without sacrificing any of the delicious flavor. Try swapping out the regular flour for a gluten-free all-purpose blend, and use sugar-free white chocolate chips instead of the regular variety.
For a vegan version, use dairy-free butter and replace the eggs with a flax or chia seed “egg.” You can also opt for a dark chocolate base instead of the traditional fudgy brownie. Whatever dietary needs you have, these White Chocolate Spiderweb Brownies can be easily adapted to fit your lifestyle.
Frequently Asked Questions
Q: Can I use milk chocolate instead of white chocolate for the webbing?
A: While you can certainly try using milk chocolate, I’d recommend sticking with the classic white chocolate for the best results. The white chocolate really makes the spider web design pop and provides a nice contrast to the rich, fudgy brownie base.
Q: How do I get the white chocolate webbing to look so perfect?
A: The key is to work quickly and with a steady hand when drizzling the melted white chocolate over the brownies. Start by drizzling it back and forth in one direction, then go the opposite way to create the web-like pattern. You may need to practice a few times to get the technique down, but it’s worth it for that show-stopping look.
Q: Can I make these White Chocolate Spiderweb Brownies ahead of time?
A: Absolutely! In fact, I recommend making the brownies a day or two in advance and then adding the white chocolate webbing right before serving. This helps ensure the spider web design stays crisp and perfect. Just store the baked and cooled brownies in an airtight container at room temperature until you’re ready to decorate them.
Q: How many White Chocolate Spiderweb Brownies does this recipe make?
A: This recipe will yield 16 generous brownies when cut into a 4×4 grid. You can certainly make them smaller if you’d like, which would give you around 20-24 servings. Just be sure to keep an eye on the baking time if you’re making smaller portions.
Q: What do I do if the white chocolate seizes up or gets too thick?
A: If the white chocolate starts to thicken up and become difficult to drizzle, simply add a teaspoon or two of vegetable oil and stir gently until it’s smooth and pourable again. This will help keep the white chocolate at the perfect consistency for creating those intricate spider web designs.

White Chocolate Spiderweb Brownies
- Total Time: 40
- Yield: 16
Description
Indulge in the ultimate Halloween treat with these fudgy and decadent White Chocolate Spiderweb Brownies. Bursting with rich white chocolate flavor and topped with a mesmerizing spider web design, this easy-to-make dessert is sure to impress your guests and become an unforgettable addition to your spooky celebrations.
Ingredients
– 1 cup (2 sticks) unsalted butter, melted
– 2 cups granulated sugar
– 4 large eggs
– 1 teaspoon vanilla extract
– 1/2 teaspoon salt
– 1 cup all-purpose flour
– 1 cup white chocolate chips
– 1/4 cup white chocolate, melted
Instructions
1. Preheat your oven to 350°F (175°C). Grease a 9×13 inch baking pan and set it aside.
2. In a large bowl, whisk together the melted butter and granulated sugar until combined.
3. Add the eggs one at a time, beating well after each addition. Stir in the vanilla extract and salt.
4. Gradually fold in the all-purpose flour until just combined, being careful not to overmix.
5. Gently fold in the white chocolate chips.
6. Pour the brownie batter into the prepared baking pan and spread it out evenly.
7. Drizzle the melted white chocolate in a spiral pattern over the top of the brownies, then use a toothpick or a skewer to create the spider web design by dragging the chocolate from the center to the edges.
8. Bake the brownies for 25-30 minutes, or until a toothpick inserted into the center comes out clean.
9. Allow the brownies to cool completely in the pan before cutting and serving.
Notes
– For a more intense white chocolate flavor, you can use white chocolate chunks instead of chips.
– To make the spider web design more defined, chill the brownies in the refrigerator for 30 minutes before cutting.
– Store the brownies in an airtight container at room temperature for up to 5 days.
- Prep Time: 15
- Cook Time: 25
- Category: Dessert
- Method: Baking
- Cuisine: American
Conclusion
These White Chocolate Spiderweb Brownies are truly a showstopper, both in terms of flavor and presentation. The rich, fudgy brownie base is the perfect canvas for the stunning white chocolate webbing on top. And the best part? They’re actually pretty easy to make, once you get the hang of that swirling technique.
I can’t wait for you to try this recipe and experience the same rave reviews I got at that Halloween party years ago. Your guests are going to be absolutely blown away by these White Chocolate Spiderweb Brownies – they’re sure to become your new go-to dessert for any spooky (or not-so-spooky!) occasion. So what are you waiting for? Preheat your oven and let’s get baking!

