
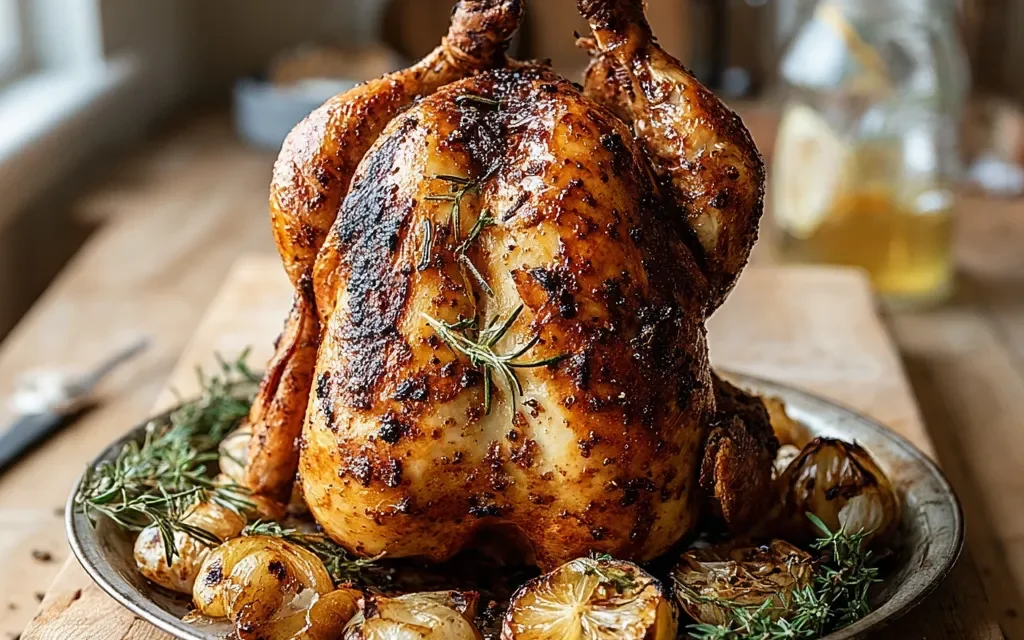
It was a sunny summer afternoon when I first learned about the magic of Beer Can Chicken. My friend Alex had invited me over for a backyard BBQ, and as soon as I stepped into his yard, the mouthwatering aroma of roasted chicken filled the air. “You’ve got to try this,” he said, gesturing towards a chicken perched atop a beer can, sizzling away on the grill. I was skeptical at first – beer and chicken? But one bite of that perfectly crispy, juicy meat had me hooked. From that day on, Beer Can Chicken has become a staple in my recipe repertoire, and it’s sure to become a favorite in your household too.
Why This Beer Can Chicken Recipe Will Become Your Go-To
The Secret Behind Perfect Beer Can Chicken
There’s just something about the way the beer steams and infuses the chicken from the inside out that takes this dish to the next level. The carbonation in the beer keeps the meat incredibly moist and tender, while the can itself props the bird up, allowing for even cooking and that signature crispy skin. And the best part? It’s so easy to make! With just a few simple ingredients and a little bit of patience, you can create a show-stopping meal that’s guaranteed to impress your family and friends.
Essential Ingredients You’ll Need
At the heart of this recipe is, of course, the whole chicken. Look for a nice, plump bird that weighs between 4-5 pounds – this will ensure plenty of delicious meat to go around. The beer can is the secret ingredient that really makes this dish shine. I prefer to use a nice, full-bodied lager, but you can experiment with different varieties to find your perfect pairing.
The dry rub is what gives the chicken its amazing flavor. Garlic powder and paprika add warmth and depth, while salt and pepper provide the perfect balance of seasoning. And a drizzle of olive oil helps the spices adhere to the skin for that irresistible crispness.
Step-by-Step Beer Can Chicken Instructions
Preparing Your Beer Can Chicken
With a total time of 75 minutes (15 minutes of prep and 60 minutes of cook time), this recipe is the perfect weeknight dinner or weekend feast. You’ll need a few essential tools: a whole chicken, a 12-ounce can of beer, a rimmed baking sheet or roasting pan, and a pair of tongs.
1- Start by preheating your oven or grill to 375°F. While that’s heating up, rinse the chicken under cold water and pat it dry with paper towels. This will help the skin get extra crispy.
2- Next, crack open that beer can and pour out about a third of the liquid. Carefully place the chicken over the can, making sure it’s stable and upright. Use your hands to gently rub the olive oil all over the skin, then sprinkle on the garlic powder, paprika, salt, and pepper.
3- When your oven or grill is ready, transfer the beer can chicken to the center of the baking sheet or roasting pan. Be very careful, as the setup will be quite wobbly and unstable.
4- Roast for 60 minutes, or until the juices run clear and the internal temperature reaches 165°F. Keep an eye on it towards the end, as you want that skin to get beautifully browned and crispy.
5- Once it’s done, use your trusty tongs to carefully transfer the chicken to a cutting board, leaving the can in place. Let it rest for 10 minutes before carving.
6- Slice into the juiciest, most flavorful chicken you’ve ever tasted. Serve it up with your favorite sides and enjoy!
Pro Tips for Success
- Make sure to thoroughly pat the chicken dry before seasoning – this is the key to achieving that perfect crispy skin.
- Try experimenting with different types of beer to find your signature flavor. Darker lagers or even ales can add an extra depth of richness.
- Don’t be afraid to get creative with the rub! Add a little smoked paprika for a subtle sweetness, or a pinch of cayenne for some heat.
- Keep a close eye on the chicken towards the end of cooking to prevent the skin from burning. Tent it with foil if it’s browning too quickly.
Serving and Storing Your Beer Can Chicken
Perfect Pairings for Beer Can Chicken
This Beer Can Chicken recipe serves 4 hearty portions, making it the perfect centerpiece for a summer cookout or cozy family dinner. Serve it alongside roasted potatoes, a fresh green salad, or a creamy coleslaw for a complete and satisfying meal. And of course, you can’t go wrong with an ice-cold beer to complement the savory flavors.
Storage and Make-Ahead Tips
If you end up with any leftovers (which is unlikely!), you can store the cooked chicken in an airtight container in the fridge for up to 4 days. To reheat, simply place it in a 350°F oven for 10-15 minutes until warmed through. You can also shred the leftover meat and use it in salads, wraps, or even fried rice.
For make-ahead convenience, you can prepare the dry rub in advance and store it in an airtight container. Then, when you’re ready to cook, simply rub it all over the chicken and proceed with the rest of the steps. This is a great time-saver when you’re short on time but still want to enjoy this delicious dish.
Variations and Dietary Adaptations for Beer Can Chicken
Creative Beer Can Chicken Variations
While the classic Beer Can Chicken is hard to beat, there are plenty of ways to put your own spin on this recipe. Try swapping out the beer for cider or even cola for a sweet and tangy twist. You can also experiment with different seasoning blends, like a Cajun-inspired rub or a zesty lemon-herb blend.
For a festive holiday version, try stuffing the cavity with aromatics like rosemary, thyme, and lemon wedges. And in the summer, you can even grill the chicken for that smoky, chargrilled flavor.
Making Beer Can Chicken Diet-Friendly
This recipe can easily be adapted to fit a variety of dietary needs. For a gluten-free version, simply swap the regular beer for a gluten-free variety. And for a lower-carb option, you can omit the beer entirely and use a flavorful broth or even water in the can.
If you’re vegan or vegetarian, you can recreate the signature beer can effect by using a sturdy, hollowed-out vegetable, like a zucchini or eggplant, in place of the chicken. Just be sure to adjust the cooking time accordingly.
Frequently Asked Questions
Q: Can I use a different type of beer?
A: Absolutely! Feel free to experiment with different beer varieties to find your perfect flavor pairing. Darker lagers or ales can add a nice depth of richness, while lighter beers will result in a more subtle flavor.
Q: How long does it take to cook the Beer Can Chicken?
A: This recipe has a total time of 75 minutes, with 15 minutes of prep and 60 minutes of cook time. Be sure to keep an eye on the chicken towards the end to ensure the skin gets nice and crispy.
Q: Can I make this recipe ahead of time?
A: Yes, you can prepare the dry rub in advance and store it in an airtight container. When you’re ready to cook, simply rub it all over the chicken and proceed with the recipe. As for leftovers, cooked Beer Can Chicken will keep in the fridge for up to 4 days.
Q: How many servings does this recipe make?
A: This Beer Can Chicken recipe serves 4 generous portions, making it the perfect centerpiece for a family dinner or small gathering.
Q: What should I do if the skin starts to burn?
A: If the skin is browning too quickly, simply tent the chicken with a piece of foil to prevent further burning. You can also lower the oven temperature slightly to slow down the cooking process.
Conclusion
Beer Can Chicken is truly a culinary masterpiece – juicy, flavorful, and downright show-stopping. With its easy-to-follow instructions and endless variations, it’s a recipe that’s sure to impress your family and friends, time and time again. So fire up that grill or oven, grab a cold one, and get ready to experience the best darn chicken you’ve ever tasted. Don’t forget to let me know how it turns out in the comments below!


