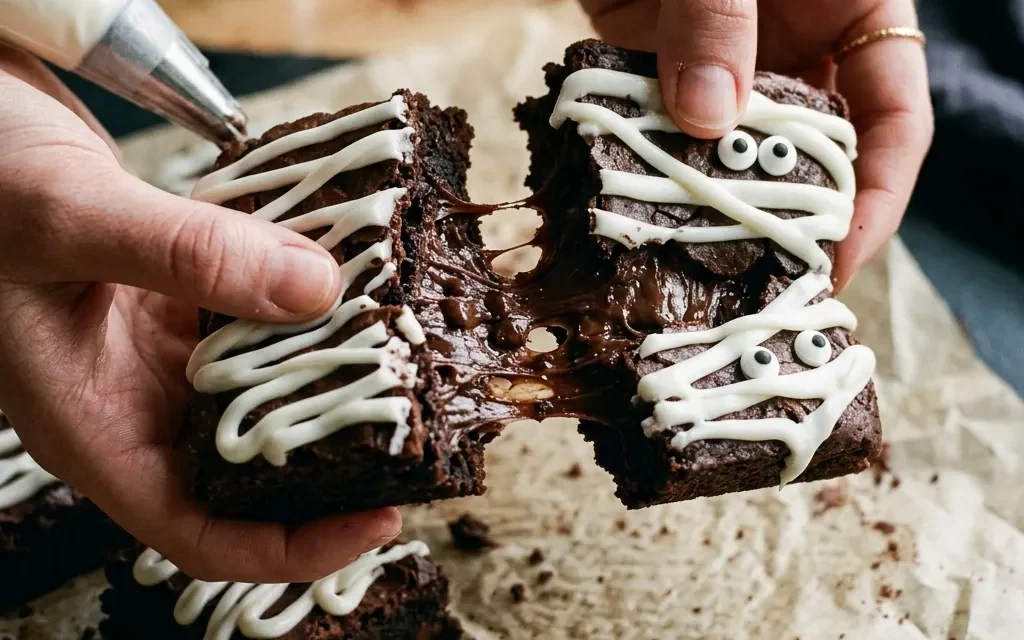
Growing up, Halloween was always one of my favorite times of year. I remember the crisp autumn air, the excitement of picking out costumes, and, of course, the endless array of treats. One year, my mom decided to throw a Halloween party for my friends and me. Among the usual candy corn and pumpkin-shaped cookies, she introduced us to her delightful Mummy Brownies. They were a hit! Each brownie was adorned with white chocolate strips that resembled mummy wrappings, and those adorable candy eyes peering out from the top made them irresistible.
The moment I bit into those fudgy brownies, I was hooked. The rich chocolate flavor combined with the sweetness of the white chocolate created a perfect balance. I don’t think I’d ever seen my friends so enchanted by a dessert before! We spent the evening trying to guess the secret ingredient while giggling in our costumes. That Halloween party left a lasting impression, and since then, Mummy Brownies have become a staple in my kitchen during the spooky season. Now, every time I make them, I’m transported back to that magical night of laughter, fun, and of course, delicious treats. If you’re looking to create some Halloween magic of your own, you’ll definitely want to try this Mummy Brownies recipe.
Why This Mummy Brownies Recipe Will Become Your Go-To
The Secret Behind Perfect Mummy Brownies
This Mummy Brownies recipe is special for several reasons. First and foremost, it combines the decadent richness of chocolate with a playful Halloween theme. The texture is wonderfully fudgy, making each bite a delightful experience. The melted butter and sugar create a moist base, while the cocoa powder lends a deep chocolate flavor that’s hard to resist. The addition of white chocolate chips for decoration not only enhances the visual appeal but adds a creamy sweetness that perfectly offsets the brownies’ richness.
One unique technique in this recipe is the way the brownies are baked to achieve that perfect fudgy consistency. By carefully mixing the ingredients and avoiding overmixing, you’ll ensure that your brownies are dense and chewy rather than cakey. Plus, the candy eyes add an element of fun, transforming an ordinary brownie into a spooky treat that’s sure to impress! With a prep time of just 15 minutes and a total time of 45 minutes, you’ll find that this recipe is not only quick but also a crowd-pleaser, making it your go-to for Halloween gatherings—or any time you want to indulge in a sweet treat.
Essential Ingredients You’ll Need
To create these delightful Mummy Brownies, you’ll need specific ingredients that contribute to their rich flavor and fun presentation:
1 cup unsalted butter, melted
Using unsalted butter allows you to control the saltiness of your brownies and ensures a rich, creamy texture that enhances the overall flavor.
2 cups granulated sugar
Granulated sugar is essential for sweetness and helps create that delightful fudgy texture we all love in brownies.
1 teaspoon vanilla extract
This adds a warm aroma and flavor that complements the chocolate beautifully, enhancing the overall taste of your brownies.
4 large eggs
Eggs are crucial for binding the ingredients together and providing the structure that gives the brownies their chewy texture.
1 cup all-purpose flour
Flour helps to create the right consistency; too much can make your brownies cakey, but just the right amount keeps them fudgy.
1 cup unsweetened cocoa powder
Cocoa powder is the star of the show, delivering that deep chocolate flavor that makes these brownies irresistible.
1/2 teaspoon salt
Salt balances the sweetness and enhances the chocolate flavor, making your brownies taste even more delicious.
1/2 teaspoon baking powder
This helps the brownies rise slightly, giving them a light texture while still maintaining that fudgy center.
1 cup white chocolate chips (for decoration)
These add a delightful sweetness and also create the spooky mummy effect when drizzled on top of the brownies.
Candy eyes (for decoration)
These fun little decorations are what truly transform your brownies into Mummy Brownies, making them perfect for Halloween.
Step-by-Step Mummy Brownies Instructions
Preparing Your Mummy Brownies
Before diving into the recipe, gather your equipment. You’ll need a mixing bowl, a whisk, a spatula, an 8×8 inch baking pan, parchment paper, and an oven preheated to 350°F. With a prep time of just 15 minutes and a cook time of 30 minutes, your total time comes to 45 minutes. Let’s get started!
1- Begin by preheating your oven to 350°F (175°C). While it’s heating, prepare your baking pan by lining it with parchment paper. This ensures easy removal of the brownies later and helps with cleanup. You want to make sure the paper fits snugly in the pan, leaving some overhang to lift the brownies out once they’re cooled.
2- In a large mixing bowl, combine 1 cup of melted unsalted butter with 2 cups of granulated sugar. Whisk these together until the mixture is smooth and shiny, which should take about 1-2 minutes. This step is crucial as it incorporates air into the mixture, leading to a lighter texture in your brownies.
3- Next, add in 1 teaspoon of vanilla extract and 4 large eggs, one at a time. Make sure to mix well after each addition. Once all the eggs are combined, you’ll notice the mixture becoming even more glossy. This process should take around 3-4 minutes, and you want to ensure everything is well combined before moving on.
4- Slowly sift in 1 cup of all-purpose flour and 1 cup of unsweetened cocoa powder, along with 1/2 teaspoon of salt and 1/2 teaspoon of baking powder. Using a spatula, gently fold the dry ingredients into the wet ingredients. Be careful not to overmix; you want to stop as soon as you see no dry flour remaining. The batter will be thick and luscious, which is exactly what you want.
5- Pour the brownie batter into your prepared pan and spread it evenly. Bake in your preheated oven for 30 minutes. You’ll know they’re done when the edges look set and a toothpick inserted into the center comes out with a few moist crumbs attached. The aroma will fill your kitchen, creating an irresistible environment!
6- Once baked, remove the brownies from the oven and allow them to cool in the pan for about 10 minutes. Then, carefully lift them out using the parchment paper and place them on a wire rack to cool completely. Once cooled, melt 1 cup of white chocolate chips in a microwave-safe bowl, heating in 30-second intervals until smooth. Drizzle the melted chocolate over the brownies in a crisscross pattern to mimic mummy wrappings. Finally, add candy eyes atop the brownies for that spooky touch!
Pro Tips for Success
1- Make sure your butter is melted but not too hot; if it’s too hot, it could cook the eggs when mixed in. Let it cool slightly before adding the eggs.
2- Don’t overmix the batter once you add the dry ingredients. This can lead to tougher brownies, and we want them to be perfectly fudgy.
3- Check your brownies a few minutes before the 30-minute mark. Ovens can vary, and you don’t want them to overbake.
4- If you want to add an extra layer of flavor, consider incorporating a teaspoon of espresso powder into the batter. It enhances the chocolate flavor beautifully.
5- For a more intense chocolate flavor, you can replace some of the all-purpose flour with additional cocoa powder, but be careful not to alter the balance too much.
Serving and Storing Your Mummy Brownies
Perfect Pairings for Mummy Brownies
These Mummy Brownies serve up to 12 people, making them perfect for parties, school events, or family gatherings. They pair wonderfully with a scoop of vanilla ice cream or a dollop of whipped cream, which provides a delightful contrast to the rich chocolate. For beverages, consider serving them with a glass of cold milk, a warm cup of cocoa, or even a spiced pumpkin latte during the fall season. These pairings will enhance the overall experience, making your dessert table the highlight of the event!
Storage and Make-Ahead Tips
To store your Mummy Brownies, let them cool completely, then cut them into squares and place them in an airtight container. They can be stored at room temperature for up to 3 days. If you need to keep them longer, consider freezing them. Wrap each brownie individually in plastic wrap and place them in a freezer-safe container. They’ll last for up to 3 months in the freezer. When you’re ready to enjoy them, simply thaw them at room temperature for a few hours or microwave them for a few seconds.
Variations and Dietary Adaptations for Mummy Brownies
Creative Mummy Brownies Variations
While the classic Mummy Brownies are fantastic, you can easily switch things up! Try adding a layer of peanut butter or caramel sauce between the brownie batter for a gooey surprise. You can also fold in some chopped nuts, like walnuts or pecans, for added texture. For a seasonal twist, why not incorporate a hint of pumpkin spice into the batter? Just replace a few tablespoons of flour with pumpkin puree. If you want to make them even more festive, use colored candy melts instead of white chocolate for the mummy wrap to match your party theme!
Making Mummy Brownies Diet-Friendly
If you have dietary restrictions, don’t worry! You can make these brownies gluten-free by substituting all-purpose flour with a 1:1 gluten-free flour blend. For those needing a vegan option, substitute the eggs with flax eggs (1 tablespoon of ground flaxseed mixed with 2.5 tablespoons of water for each egg) and use a vegan butter alternative. You can also find dairy-free white chocolate chips for decoration. For a low-carb version, swap the sugar with a low-carb sweetener like erythritol or stevia, adjusting the quantities according to the sweetener’s potency.
Frequently Asked Questions
Q: Can I substitute the unsalted butter for another fat?
A: Yes, you can use coconut oil or a dairy-free butter alternative if you’re looking for a vegan option. Just ensure it’s melted for the best texture.
Q: How can I tell when the brownies are done baking?
A: The total baking time is 30 minutes. Check for set edges and a toothpick inserted in the center should come out with a few moist crumbs but not wet batter.
Q: Can I make these brownies ahead of time?
A: Absolutely! You can bake them a day or two in advance. Store them in an airtight container at room temperature until you’re ready to serve.
Q: How many servings does this recipe yield?
A: This recipe serves a total of 12 servings, making it perfect for parties or gatherings where you want to impress a crowd!
Q: What should I do if my brownies come out too dry?
A: If your brownies turn out dry, you might have overbaked them. Make sure to check for doneness a few minutes early, and consider adding a scoop of ice cream to add moisture when serving.
Conclusion
Mummy Brownies are not just a treat; they’re an experience filled with nostalgia and fun! With their rich chocolate flavor and playful presentation, they’ll surely be a hit at any gathering. I encourage you to whip up a batch this Halloween season—or any time you crave a deliciously spooky dessert. If you try this recipe, drop a comment below and let me know how they turned out. Happy baking!