
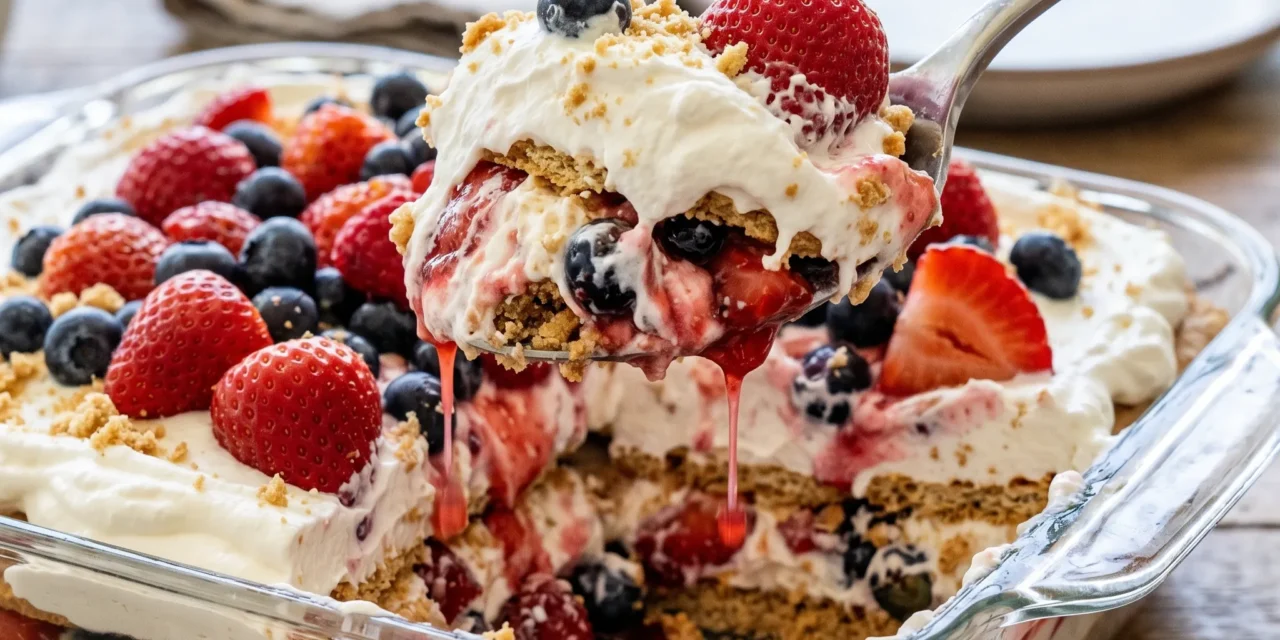
I remember the first time I ever made a Red, White and Blue Icebox Cake for a Fourth of July gathering. I was a young mom, excited to celebrate with friends and family, but honestly a bit overwhelmed by the thought of baking something elaborate. I distinctly recall flipping through a recipe book, heart racing as I stumbled upon this delightful dessert. It seemed so simple—just layers of graham crackers, fresh berries, and whipped cream. I thought, “This is perfect! Easy and looks impressive!”
I gathered my ingredients, including those bright red strawberries and vibrant blueberries, and started whipping the cream. As I folded in the powdered sugar and vanilla extract, the sweet aroma filled the kitchen. My kids were buzzing around, eager to help, and I could feel the anticipation building. When I finally layered the graham crackers with the luscious cream and fruits, it felt like a masterpiece in the making. I placed it in the fridge and let it chill, knowing that the magic would happen as those layers melded together.
When it was time to serve, the Red, White and Blue Icebox Cake emerged, looking like a festive flag. Everyone loved it! There’s something special about sharing a dessert that’s not only delicious but also visually stunning. That day cemented my love for this cake, and it quickly became a go-to for summer celebrations. It’s so easy to make and brings everyone together, creating memories just like the ones I cherish from that day.
Why This Red, White and Blue Icebox Cake Recipe Will Become Your Go-To
The Secret Behind Perfect Red, White and Blue Icebox Cake
What makes this Red, White and Blue Icebox Cake truly special is its simplicity combined with its stunning presentation. You’re not just throwing ingredients together; you’re creating a layered masterpiece that looks as good as it tastes. The graham crackers soak up the whipped cream, becoming soft and cake-like, while the fresh berries provide bursts of flavor and color. The rich, creamy texture of the heavy whipping cream complements the sweetness of the strawberries and the tartness of the blueberries, making each bite a delightful experience.
Moreover, the beauty of this cake lies in its versatility. Whether you’re celebrating the Fourth of July, Memorial Day, or just a sunny Saturday, this Red, White and Blue Icebox Cake is perfect for any occasion. It’s also an excellent way to involve kids in the kitchen; they can help layer the ingredients and get creative with the presentation. Trust me, once you try this recipe, it’ll become a staple in your home, bringing smiles and joy to every gathering.
Essential Ingredients You’ll Need
2 cups heavy whipping cream
The star of the show! Heavy whipping cream creates a rich and velvety texture that forms the base of this icebox cake. When whipped, it becomes light and airy, providing that delightful mouthfeel we all love.
1/2 cup powdered sugar
This ingredient sweetens the whipped cream and gives it a silky smooth consistency. Powdered sugar dissolves effortlessly, ensuring there are no gritty textures in your cake.
1 teaspoon vanilla extract
Vanilla extract adds a warm, aromatic flavor that complements the cream beautifully. It enhances the overall taste of the cake, making every bite more enjoyable.
1 package (14 oz) graham crackers
Graham crackers serve as the cake’s structure, layering between the cream and fruit. They absorb moisture and soften, creating a cake-like texture while adding a hint of sweetness and crunch.
2 cups fresh strawberries, sliced
Strawberries provide vibrant color and a sweet, juicy flavor. Their freshness is crucial; using ripe strawberries ensures that your cake bursts with flavor.
2 cups fresh blueberries
Blueberries add a slightly tart contrast to the sweetness of the strawberries and the cream. Their deep blue color makes the cake visually appealing and adds a healthy twist to your dessert.
Step-by-Step Red, White and Blue Icebox Cake Instructions
Preparing Your Red, White and Blue Icebox Cake
This delightful Red, White and Blue Icebox Cake requires only 15 minutes of prep time, and there’s no cooking involved, making it a hassle-free dessert. With a total time of 240 minutes, most of that is chilling in the fridge, allowing the flavors to meld beautifully. You’ll need a mixing bowl, a hand or stand mixer, a spatula, and a 9×13-inch baking dish to bring this cake to life.
1- Start by chilling your mixing bowl and beaters in the freezer for about 10 minutes. This helps the heavy whipping cream whip up faster and achieve a better consistency. Once chilled, pour the heavy whipping cream into the bowl, and beat it on medium-high speed until it begins to thicken, about 2-3 minutes.
2- Gradually add the powdered sugar and vanilla extract to the whipped cream. Continue beating until you reach stiff peaks. This means the cream should hold its shape when you lift the beaters. Be careful not to overwhip, or you’ll end up with butter!
3- Now it’s time to layer. Start by spreading a thin layer of whipped cream on the bottom of your baking dish. This helps the graham crackers adhere better. Next, arrange a layer of graham crackers on top of the whipped cream, ensuring they’re fully covered.
4- Add another layer of whipped cream over the graham crackers, followed by a generous layer of sliced strawberries and blueberries. The vibrant colors will make your cake pop! Repeat this process, alternating graham crackers, whipped cream, and berries, until you’ve used all your ingredients, finishing with a layer of whipped cream on top.
5- For the final touch, decorate the top layer with remaining strawberries and blueberries. You can get creative with the arrangement, making it look festive for your occasion. Cover the dish with plastic wrap, ensuring it’s sealed tightly.
6- Refrigerate the cake for at least 4 hours or overnight if possible. This allows the graham crackers to soften and the flavors to meld together beautifully. Once ready to serve, slice into squares and enjoy the glorious layers of your Red, White and Blue Icebox Cake.
Pro Tips for Success
To ensure your Red, White and Blue Icebox Cake turns out perfectly, consider these expert tips. First, always use fresh, ripe fruits for the best flavor; they make a significant difference in the final taste. Second, if you want to save time, you can use store-bought whipped topping instead of making your own, though homemade is always best.
Be mindful of how long you whip the cream; stopping once you reach stiff peaks is crucial to avoid graininess. Additionally, for a firmer cake, let it chill overnight. This will enhance the flavors and make slicing easier. Lastly, if you’re making this cake for a gathering, you can prepare it a day ahead, allowing you to enjoy your time with guests without last-minute stress.
Serving and Storing Your Red, White and Blue Icebox Cake
Perfect Pairings for Red, White and Blue Icebox Cake
This Red, White and Blue Icebox Cake is perfect for any summer gathering, serving 12 generous portions. To complement the cake, consider pairing it with a refreshing fruit salad or a light, zesty lemon sorbet. The bright flavors will enhance the dessert without overpowering it.
For beverages, a chilled glass of lemonade or iced tea makes a fantastic match. If you’re feeling a bit indulgent, serve it with a scoop of vanilla ice cream. This dessert is versatile enough for picnics, barbecues, or even a casual family dinner, making it a must-have for your summer menu.
Storage and Make-Ahead Tips
Storing your Red, White and Blue Icebox Cake is simple. Keep it covered in the refrigerator, and it’ll stay fresh for up to 3 days. If you want to make it ahead, consider assembling it the day before your event to allow the layers to set perfectly.
If you have leftovers, you can freeze individual slices wrapped in plastic wrap and aluminum foil for up to a month. To enjoy, simply thaw them in the fridge overnight. Reheating isn’t necessary since this cake is best served chilled, so just slice and serve!
Variations and Dietary Adaptations for Red, White and Blue Icebox Cake
Creative Red, White and Blue Icebox Cake Variations
One of the best things about the Red, White and Blue Icebox Cake is its versatility! You can easily switch up the flavors to suit your taste. For a tropical twist, try adding sliced bananas and pineapple instead of strawberries and blueberries.
Another delicious variation is to layer in some chocolate pudding between the whipped cream layers for a “chocolate berry” cake. If you want to embrace fall flavors, consider using pumpkin puree mixed into the cream, with layers of graham crackers and chopped pecans for a festive touch.
For a fun twist, you could also experiment with different flavored whipped creams, such as adding cocoa powder for a chocolate version or using almond extract instead of vanilla for a nutty flavor.
Making Red, White and Blue Icebox Cake Diet-Friendly
If you’re looking to adapt this Red, White and Blue Icebox Cake for dietary restrictions, there are plenty of options! For a gluten-free version, substitute the graham crackers with gluten-free cookies or cake alternatives.
To make it vegan, use coconut cream or a dairy-free whipped topping in place of heavy whipping cream and powdered sugar. You can also replace the strawberries and blueberries with any seasonal fruits that fit your dietary needs.
For a low-carb option, consider using sugar-free whipped topping and low-carb graham crackers or a nut-based crust. These substitutions will allow you to enjoy this festive dessert while accommodating different dietary preferences.
Frequently Asked Questions
Q: Can I substitute heavy whipping cream with something else?
A: You can use coconut cream or a dairy-free whipped topping for a non-dairy version. However, the texture and flavor may differ slightly from the original recipe.
Q: How long do I need to chill the cake?
A: For the best results, chill the Red, White and Blue Icebox Cake for at least 4 hours, but overnight is ideal. This allows the flavors to meld and the graham crackers to soften.
Q: How do I store leftover cake?
A: Keep the cake covered in the refrigerator for up to 3 days. For longer storage, wrap individual slices in plastic wrap and foil and freeze for up to a month.
Q: How many servings does this recipe yield?
A: This Red, White and Blue Icebox Cake serves 12 generous portions. It’s perfect for gatherings or celebrations where you want to impress your guests.
Q: What should I do if my whipped cream doesn’t thicken?
A: If your whipped cream isn’t thickening, ensure your bowl and beaters are chilled and that you’re using heavy whipping cream. If it’s still not whipping, it may be too warm; try refrigerating it for a bit before whipping again.
Conclusion
I hope you’re as excited to try this Red, White and Blue Icebox Cake as I was when I first made it! It’s an easy, no-bake dessert that’s perfect for any summer occasion, bringing together family and friends in a delicious way. The layers of whipped cream, fresh fruit, and graham crackers create a beautiful and tasty treat that everyone will love.
So go ahead, dive into this recipe, and let me know how it turns out for you! Please feel free to share your thoughts in the comments or share this recipe with friends. I can’t wait to hear about your experiences with this delightful cake!