
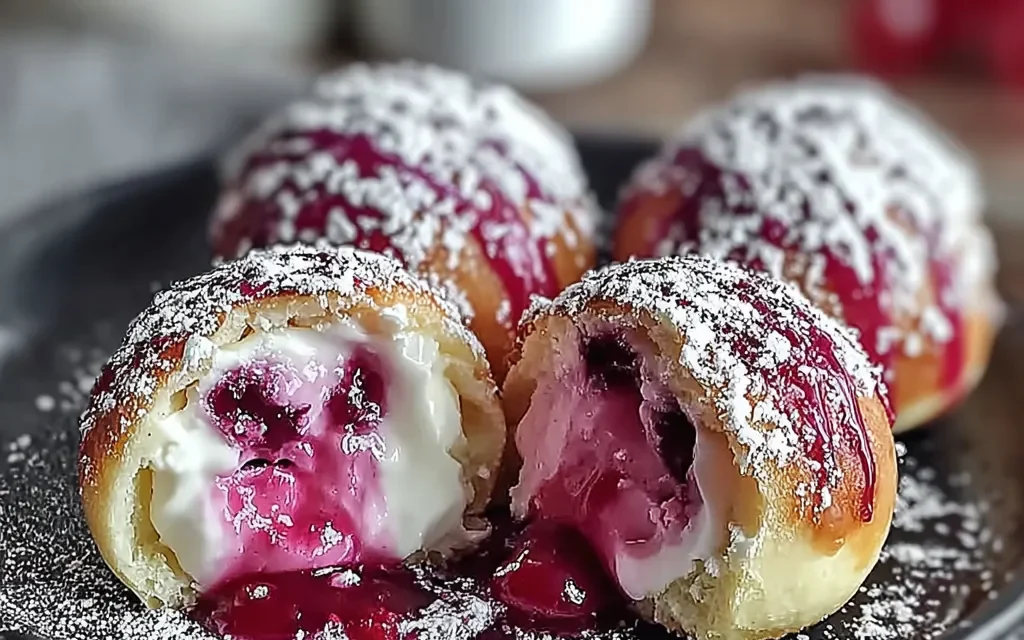
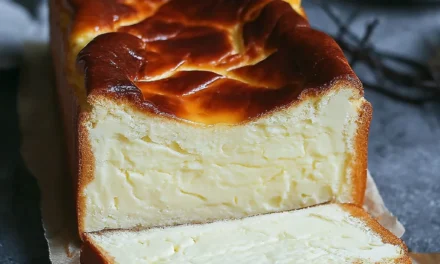
I’ll never forget the first time I sank my teeth into a Rhubarb Cheesecake Bomb. It was at my cousin’s housewarming party, and the moment I popped that irresistible bite-sized treat into my mouth, I was in heaven. The tart rhubarb perfectly balanced the rich, creamy cheesecake filling, all nestled in a buttery graham cracker crust. From that day on, I knew I had to master this recipe and share it with everyone I know.
Why This Rhubarb Cheesecake Bombs Recipe Will Become Your Go-To
The Secret Behind Perfect Rhubarb Cheesecake Bombs
What makes this Rhubarb Cheesecake Bomb recipe so special is the careful balance of flavors and textures. The key is in the rhubarb – when cooked just right, it retains its tangy, slightly sweet flavor, which beautifully complements the creamy cheesecake filling. And the graham cracker crust? It adds the perfect amount of crunch to every bite.
But the real secret? It’s all in the technique. By dicing the rhubarb into small pieces, you ensure it cooks evenly and integrates seamlessly into the cheesecake batter. And the trick to getting that signature light and fluffy texture? Whipping the cream cheese until it’s silky smooth before adding the other ingredients.
Essential Ingredients You’ll Need
To make these Rhubarb Cheesecake Bombs, you’ll need just a few simple ingredients:
- 1 pound fresh rhubarb, diced: The star of the show! Rhubarb’s tart, slightly sweet flavor is the perfect foil for the rich cheesecake.
- 16 ounces cream cheese, softened: The creamy base that gives these bombs their decadent texture.
- 1 cup granulated sugar: Balances the rhubarb’s tartness and adds just the right amount of sweetness.
- 2 large eggs: Helps bind the cheesecake filling and gives it that classic, smooth consistency.
- 1 teaspoon vanilla extract: Enhances the overall flavor profile.
- 1 (9-inch) graham cracker crust: The perfect crunchy foundation to hold all that delicious filling.
Step-by-Step Rhubarb Cheesecake Bombs Instructions
Preparing Your Rhubarb Cheesecake Bombs
Prep time for these Rhubarb Cheesecake Bombs is just 15 minutes, and the total cooking time is 30 minutes, for a total time of 45 minutes. All you’ll need is a mixing bowl, an electric mixer, and a 9-inch springform pan.
1- Start by preheating your oven to 350°F. Then, dice the fresh rhubarb into small, even pieces, about 1/2-inch in size. This ensures the rhubarb cooks evenly and incorporates seamlessly into the cheesecake batter.
2- In a large mixing bowl, use an electric mixer to beat the softened cream cheese until it’s light and fluffy, about 2-3 minutes. Be sure to scrape down the sides of the bowl as needed.
3- Gradually add in the granulated sugar, mixing well after each addition, until the mixture is smooth and creamy. Then, beat in the eggs one at a time, followed by the vanilla extract.
4- Gently fold in the diced rhubarb until it’s evenly distributed throughout the cheesecake batter. The mixture should have a nice, uniform consistency.
5- Pour the Rhubarb Cheesecake Bomb filling into the prepared graham cracker crust, smoothing the top with a spatula.
6- Bake the cheesecake for 30 minutes, or until the center is just set. Allow it to cool completely at room temperature, then refrigerate for at least 2 hours before serving.
Pro Tips for Success
- Make sure to use fresh, firm rhubarb for the best texture and flavor. Avoid any stalks that are limp or discolored.
- Let the cream cheese come to room temperature before beating it – this ensures a smooth, lump-free texture.
- Be gentle when folding in the rhubarb to prevent the pieces from breaking down too much.
- Chill the cheesecake thoroughly before serving for the best texture and slice-ability.
Serving and Storing Your Rhubarb Cheesecake Bombs
Perfect Pairings for Rhubarb Cheesecake Bombs
This Rhubarb Cheesecake Bombs recipe serves 12 people, making it perfect for sharing at parties, potlucks, or special occasions. Pair it with a refreshing fruit salad or a scoop of vanilla ice cream for a delightful contrast of flavors and textures. And don’t forget the coffee or tea – the tart rhubarb and rich cheesecake pair beautifully with a hot beverage.
Storage and Make-Ahead Tips
To store your Rhubarb Cheesecake Bombs, simply cover the pan tightly with plastic wrap or foil and refrigerate for up to 5 days. For longer-term storage, you can freeze the cheesecake for up to 2 months. When ready to serve, thaw it in the refrigerator overnight.
If you’d like to get a head start on this recipe, you can easily make the cheesecake filling up to 3 days in advance and store it in the refrigerator until you’re ready to assemble the bombs. The graham cracker crust can also be made and stored at room temperature for up to 1 week.
Variations and Dietary Adaptations for Rhubarb Cheesecake Bombs
Creative Rhubarb Cheesecake Bombs Variations
Looking to mix things up? Try topping your Rhubarb Cheesecake Bombs with a streusel made with oats, brown sugar, and cinnamon. Or, for a seasonal twist, fold in some fresh strawberries or blueberries along with the rhubarb. You could even swap the graham cracker crust for an Oreo cookie crust for a delightfully chocolatey twist.
Making Rhubarb Cheesecake Bombs Diet-Friendly
To make these Rhubarb Cheesecake Bombs gluten-free, simply use a gluten-free graham cracker crust or make your own with ground gluten-free crackers or cookies. For a lower-carb version, replace the granulated sugar with a sugar-free substitute and opt for a low-carb or keto-friendly crust.
Frequently Asked Questions
Q: Can I use frozen rhubarb instead of fresh?
A: Yes, you can use frozen rhubarb in this recipe. Just be sure to thaw it completely and pat it dry before adding it to the cheesecake batter.
Q: How long does it take to bake the Rhubarb Cheesecake Bombs?
A: The total baking time for this recipe is 30 minutes. Be sure to keep a close eye on the cheesecake, as you want the center to be just set when it’s done.
Q: Can I make the Rhubarb Cheesecake Bombs in advance?
A: Absolutely! You can make the entire cheesecake up to 5 days in advance and store it in the refrigerator until ready to serve. You can also freeze the baked and cooled cheesecake for up to 2 months.
Q: How many servings does this recipe make?
A: This Rhubarb Cheesecake Bombs recipe yields 12 servings. The cheesecake can be easily sliced into 12 equal pieces for sharing.
Q: What if my cheesecake cracks on top?
A: Don’t worry, a cracked top is a common issue with cheesecakes. To prevent this, be sure not to overmix the batter and avoid opening the oven door during baking. If you do end up with a cracked top, you can easily cover it with a layer of whipped cream or a fruit compote.

Rhubarb Cheesecake Bombs
- Total Time: 45
- Yield: 12 servings
Description
Indulge in the perfect balance of tart and creamy with these Rhubarb Cheesecake Bombs – a delightful bite-sized treat that’s sure to impress.
Ingredients
– 1 pound fresh rhubarb, diced
– 16 ounces cream cheese, softened
– 1 cup granulated sugar
– 2 large eggs
– 1 teaspoon vanilla extract
– 1 (9-inch) graham cracker crust
Instructions
1. Preheat the oven to 350°F.
2. In a large mixing bowl, beat the cream cheese until light and fluffy. Gradually add the sugar and beat until well combined.
3. Add the eggs one at a time, beating well after each addition. Stir in the vanilla extract.
4. Fold in the diced rhubarb until evenly distributed.
5. Scoop the rhubarb cheesecake batter into the graham cracker crust, smoothing the top.
6. Bake for 30-35 minutes, or until the center is set. Allow to cool completely before cutting into bite-sized squares.
7. Refrigerate the rhubarb cheesecake bombs for at least 2 hours before serving.
Notes
For a sweeter version, you can add a teaspoon of lemon zest to the batter. These rhubarb cheesecake bombs can be stored in the refrigerator for up to 5 days.
- Prep Time: 15
- Cook Time: 30
- Category: Dessert
- Method: Baking
- Cuisine: American
Conclusion
These Rhubarb Cheesecake Bombs are truly a dessert lover’s dream come true. The perfect balance of tart and sweet, creamy and crunchy, makes them an absolute showstopper. I can’t wait for you to try this recipe and experience the pure joy of sinking your teeth into one of these delightful bites. Be sure to let me know how they turn out in the comments below, and don’t forget to share this recipe with all your friends and family!
