As a kid, summer meant family barbecues and long afternoons spent in the sun. One of my favorite memories is of my grandmother pulling out her famous Fruit-Tart Flag for our Fourth of July celebrations. The way she’d slice into that beautiful tart—each cut revealing a rainbow of fresh berries—was like unveiling a treasure. I can still hear the laughter and chatter of family members as we gathered around, eagerly waiting for our slice. The Fruit-Tart Flag was more than just dessert; it was a symbol of our togetherness, a way to celebrate the season, and a reminder of the sweet moments in life.
I remember watching her whip the heavy cream, the sound of the mixer blending together the powdered sugar and vanilla extract until it formed soft peaks. She’d always say, “It’s not just about how it looks; it’s about how it tastes!” And how right she was. Each bite of that tart was a burst of sweetness from the strawberries, blueberries, and, occasionally, raspberries. The tart was a canvas, and the fruits were the vibrant colors of a flag, waving proudly on our picnic table. To this day, whenever I make a Fruit-Tart Flag, I can almost hear her voice guiding me through the process. It’s a tradition that’s been passed down, and I’m thrilled to share this recipe with you, hoping it’ll create similar memories for you and your loved ones.
Why This Fruit-Tart Flag Recipe Will Become Your Go-To
The Secret Behind Perfect Fruit-Tart Flag
What makes this Fruit-Tart Flag special is its simplicity combined with a burst of flavor. The pre-made tart shell saves time, allowing you to focus on the fun part—decorating! The heavy whipping cream is whipped to a perfect consistency, creating a creamy and rich filling that complements the tartness of the fresh fruits. The vibrant colors of strawberries, blueberries, and optional raspberries not only make the tart visually stunning but also provide a delightful mix of sweet and slightly tart flavors that dance on your palate. This recipe is quick to prepare, making it perfect for summer gatherings or any festive occasion. Plus, the aesthetic appeal of a Fruit-Tart Flag makes it a conversation starter at any table, drawing everyone in for a slice.
Essential Ingredients You’ll Need
To create your own Fruit-Tart Flag, you’ll need a few essential ingredients that come together beautifully. Each plays a crucial role in achieving that perfect balance of flavor and texture.
- 1 pre-made tart shell (9-inch): The base of your tart, this shell saves time and effort, allowing you to jump straight to the fun part—decorating with vibrant fruits.
- 1 cup heavy whipping cream: This ingredient is key for a rich and creamy filling. When whipped, it transforms into a light, airy texture that holds its shape perfectly on the tart.
- 1/4 cup powdered sugar: This adds just the right amount of sweetness without being overpowering. It blends smoothly into the cream, enhancing the overall flavor.
- 1 tsp vanilla extract: A splash of vanilla elevates the taste of the whipped cream, providing a warm, aromatic undertone that complements the fresh fruits.
- 1 cup strawberries, sliced: These juicy gems bring a burst of sweetness and a pop of red color, making them a star ingredient in your Fruit-Tart Flag.
- 1 cup blueberries: Their deep blue color contrasts beautifully with the strawberries and adds a slightly tart flavor that balances the sweetness of the cream.
- 1/2 cup raspberries (optional for decoration): While optional, these berries add an extra layer of color and a delightful tartness that can enhance the overall flavor profile of your tart.
Step-by-Step Fruit-Tart Flag Instructions
Preparing Your Fruit-Tart Flag
Making this Fruit-Tart Flag is a breeze! With a prep time of just 15 minutes and a cook time of 30 minutes, you’ll have a beautiful dessert ready in only 45 minutes. You’ll need a mixer, a spatula, and a 9-inch tart pan to get started.
1- Begin by preheating your oven to 350°F (175°C). Place your pre-made tart shell on a baking tray to catch any drips. Bake it for about 10-12 minutes until it’s lightly golden and slightly firm to the touch. This step ensures the shell has a crisp texture that will hold up against the cream and fruits.
2- While the tart shell is baking, grab a mixing bowl and pour in 1 cup of heavy whipping cream. Add 1/4 cup of powdered sugar and 1 tsp of vanilla extract. Using an electric mixer, whip the ingredients together on medium speed until soft peaks form, which should take about 3-5 minutes. You’ll know it’s ready when you can lift the beaters, and the cream holds its shape without collapsing.
3- Once the tart shell is baked and cooled, carefully remove it from the oven. Allow it to cool completely for about 10 minutes. This cooling period is crucial; a warm shell could melt your whipped cream filling.
4- Once cooled, spoon the whipped cream mixture into the tart shell, spreading it evenly with a spatula. Aim for a smooth, even layer that’s about an inch thick. The cream should have a fluffy texture and white color, creating a beautiful contrast against the baked shell.
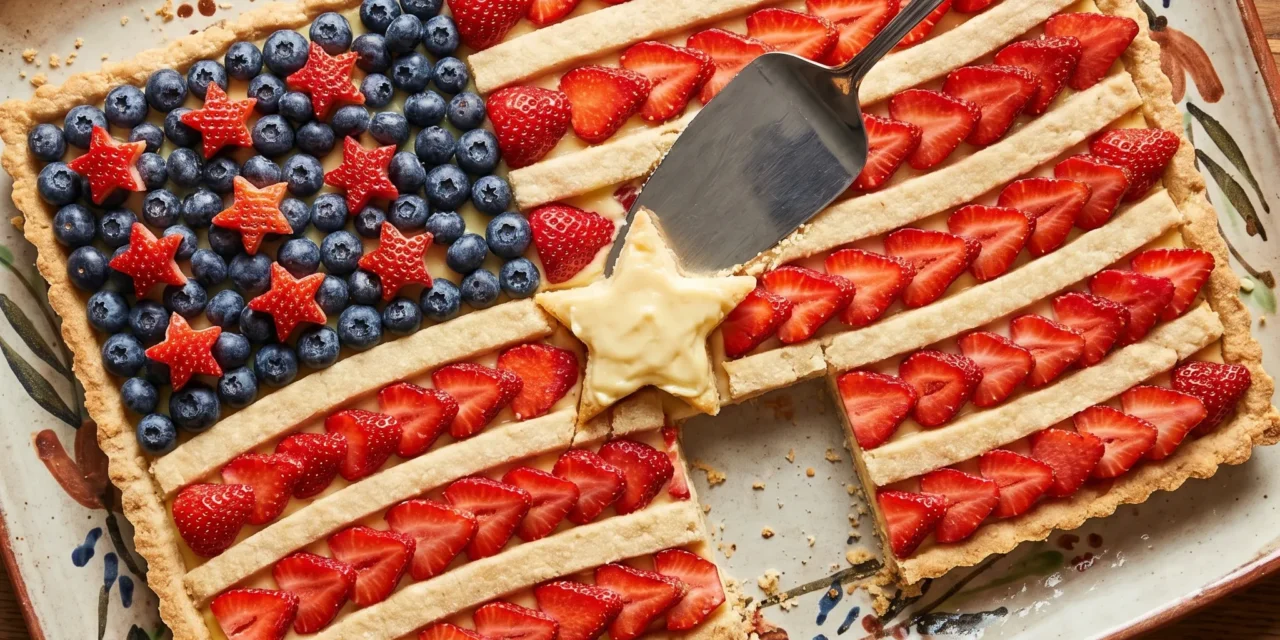
5- Next, it’s time to decorate! Slice your strawberries and arrange them in a row to form the stripes of the flag, placing them on top of the whipped cream. Then, fill the top left corner with blueberries, mimicking the stars on a flag. For an extra touch, you can scatter a few raspberries around the edges for decoration.
6- Finally, place your Fruit-Tart Flag in the refrigerator for about 15-20 minutes to set the cream and allow the flavors to meld together. When ready to serve, slice into equal portions, making sure to get a bit of each fruit on every plate for that iconic look.
Pro Tips for Success
To ensure your Fruit-Tart Flag turns out perfectly, here are some expert tips to keep in mind:
- Use cold equipment: For the best whipped cream, chill your mixing bowl and beaters beforehand. Cold equipment helps the cream whip up faster and hold its shape better.
- Don’t over-whip the cream: Keep an eye on the cream as you whip it. Over-whipping can turn it grainy and lead to butter formation, which you want to avoid for a smooth filling.
- Choose ripe fruits: Opt for fresh, ripe strawberries, blueberries, and raspberries. They’ll not only taste better but will also add vibrant color to your tart.
- Serve immediately: While this tart can be stored in the fridge, it’s best enjoyed fresh. The longer it sits, the more the cream may weep, so serve it shortly after assembling.
- Experiment with fruit: Feel free to switch up the fruit based on what’s in season or your personal preferences. Peaches, kiwi, or even mango can add a unique twist to your tart.
Serving and Storing Your Fruit-Tart Flag
Perfect Pairings for Fruit-Tart Flag
This Fruit-Tart Flag serves 8 servings, making it perfect for gatherings or celebrations. Pair it with a light, refreshing drink like iced tea or lemonade to balance the sweetness. For a more indulgent option, consider serving it alongside a scoop of vanilla ice cream or a dollop of whipped cream. It’s also a fantastic dessert for picnics or potlucks—its eye-catching design will surely impress your guests!
Storage and Make-Ahead Tips
If you need to prepare your Fruit-Tart Flag in advance, you can store the tart shell and whipped cream separately. The tart shell can be kept in an airtight container at room temperature for up to 2 days. For the whipped cream, store it in the refrigerator for up to 24 hours, but avoid adding the fruit until just before serving. This will ensure the cream remains light and fluffy, and the fruits stay fresh and vibrant.
To freeze, wrap individual slices of the tart in plastic wrap and store in an airtight container. They’ll keep for up to a month, but keep in mind that the texture may change slightly upon thawing. When ready to enjoy, thaw in the refrigerator for a few hours before serving.
Variations and Dietary Adaptations for Fruit-Tart Flag
Creative Fruit-Tart Flag Variations
Feel free to get creative with your Fruit-Tart Flag! Here are some fun variations you can try:
- Tropical Twist: Swap out the berries for tropical fruits like mango, kiwi, and pineapple for a sunny, island-inspired tart.
- Chocolate Drizzle: Add a layer of chocolate ganache over the whipped cream for a decadent twist. Melt some chocolate and drizzle it over the fruits just before serving.
- Nutty Addition: Sprinkle some chopped nuts like almonds or walnuts on top for an added crunch and flavor contrast.
- Herb Infusion: Infuse the whipped cream with a hint of fresh mint or basil for a refreshing herbal note that pairs beautifully with the fruit.
Making Fruit-Tart Flag Diet-Friendly
If you’re looking to adapt the Fruit-Tart Flag for specific dietary needs, here are some options:
- Gluten-Free: Use a gluten-free tart shell or make your own from almond flour or gluten-free cookies.
- Vegan: Substitute the heavy cream with coconut cream and use a vegan powdered sugar alternative. Ensure the tart shell is also vegan-friendly.
- Low-Carb: For a low-carb version, opt for a nut-based crust and sweeten the whipped cream with a sugar substitute like erythritol.
- Dairy-Free: Use a dairy-free whipped topping and ensure the tart shell is free from dairy ingredients.
Frequently Asked Questions
Q: Can I substitute the heavy whipping cream with something else?
A: Yes! You can use coconut cream or a dairy-free whipped topping for a lighter option. Just ensure it holds its shape when whipped.
Q: How long does it take to make this Fruit-Tart Flag?
A: The total time is just 45 minutes, with 15 minutes for prep and 30 minutes for baking. It’s a quick and delightful dessert to whip up!
Q: How should I store leftovers?
A: Store any leftover slices in an airtight container in the refrigerator for up to 2 days. It’s best enjoyed fresh, so try to consume it quickly.
Q: How many servings does this recipe make?
A: This Fruit-Tart Flag serves 8 servings, perfect for sharing at gatherings or family events.
Q: What should I do if my whipped cream isn’t thickening?
A: Ensure your mixing bowl and beaters are cold. If it still doesn’t thicken, you can add a stabilizer like gelatin or a bit of cornstarch to help it hold its shape.
Conclusion
I hope this Fruit-Tart Flag recipe brings as much joy to your gatherings as it has to mine! It’s a simple yet stunning dessert that’s perfect for any occasion, and I encourage you to try it out. Don’t hesitate to share your experiences or variations in the comments—I’d love to hear how it turned out for you! Remember, it’s not just about the dessert; it’s about making memories with your loved ones. So gather around, slice up that tart, and enjoy every delicious moment!