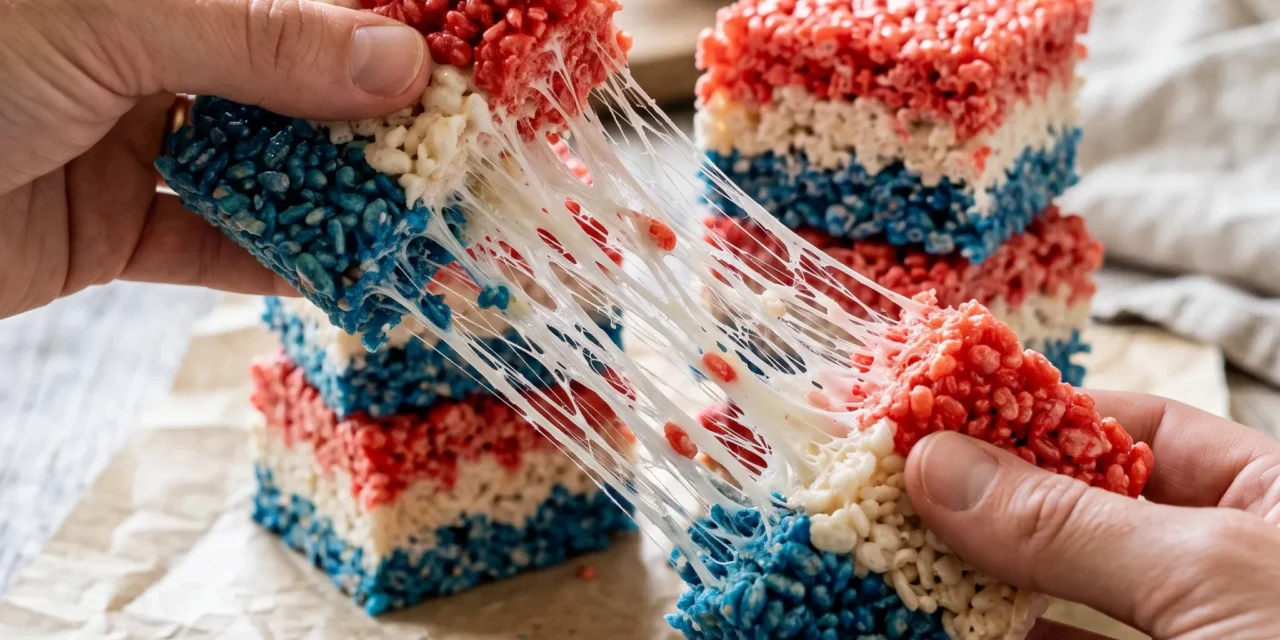
I still remember that one summer afternoon when my cousin and I decided to throw a backyard barbecue for the Fourth of July. The sun was blazing, and we were determined to create the most festive celebration possible. We were tasked with dessert, which led us to concoct a colorful treat that would not only please our taste buds but also be a feast for the eyes. That’s when we whipped up a batch of Red, White and Blue Crispy Rice Treats.
As we melted the marshmallows and mixed in the rice cereal, the kitchen filled with that unmistakable sweet aroma. I can still hear my cousin exclaiming how it felt like we were crafting edible fireworks with every spoonful of gooey goodness. We divided the mixture into three bowls, adding red and blue food coloring to create the patriotic layers. When we finally pressed the mixture into our baking dish, I couldn’t help but feel a sense of pride as we transformed simple ingredients into a stunning dessert.
Those Red, White and Blue Crispy Rice Treats became the highlight of our barbecue, drawing compliments from family, and even the neighbors! Every bite was a reminder of summer fun, laughter, and the joy of creating something delicious together. Now, every time I make these treats, I’m transported back to that sunny day, surrounded by loved ones, and I can’t help but smile. Trust me, once you try this recipe, you’ll understand why these Red, White and Blue Crispy Rice Treats are a staple in my summer celebrations!
Why This Red, White and Blue Crispy Rice Treats Recipe Will Become Your Go-To
The Secret Behind Perfect Red, White and Blue Crispy Rice Treats
What sets this recipe apart from the countless other crispy rice treat recipes? It’s all about the vibrant colors and the delightful crunch that make these Red, White and Blue Crispy Rice Treats a show-stopper. Using mini marshmallows ensures a super gooey texture, while the addition of sprinkles adds a fun crunch that kids (and adults!) can’t resist. The layers of red and blue not only look stunning, but they also add a touch of festivity to any occasion, making these treats perfect for Independence Day, Memorial Day, or even birthday parties.
One of the best things about this recipe is its simplicity. With just a few ingredients and minimal cooking time, you can whip up a treat that looks like a labor of love. The optional food coloring allows you to customize your treats to match any theme or holiday, making this a versatile recipe you’ll turn to time and again. Plus, the nostalgia of crispy rice treats combined with modern flair will make these a family favorite that everyone will want to recreate!
Essential Ingredients You’ll Need
To create the perfect Red, White and Blue Crispy Rice Treats, you’ll need the following ingredients:
6 cups rice cereal
Rice cereal is the backbone of this treat, providing that iconic crunchy texture. Opt for a classic brand for the best flavor and consistency.
4 cups mini marshmallows
Mini marshmallows melt beautifully and create a gooey, sticky mixture that holds your treats together perfectly. They also add sweetness and a delightful chewiness.
3 tablespoons unsalted butter
Butter enhances the overall flavor and adds richness to your treats. Unsalted butter gives you control over the sweetness, allowing the marshmallows to shine.
1 cup red sprinkles
These sprinkles not only add a vibrant color but also a fun crunch that complements the soft marshmallow and cereal mixture. They bring festive cheer to every bite!
1 cup blue sprinkles
Just like the red sprinkles, blue sprinkles add a pop of color and texture. They help create that patriotic theme, making your treats visually appealing.
1/2 teaspoon vanilla extract
Vanilla extract rounds out the flavors, adding warmth and depth. It’s a small but mighty ingredient that elevates the overall taste.
Optional: Red and blue food coloring
Using food coloring allows you to intensify the vibrant colors of your treats. It’s perfect for customizing your treats for any occasion!
Step-by-Step Red, White and Blue Crispy Rice Treats Instructions
Preparing Your Red, White and Blue Crispy Rice Treats
This delightful recipe takes only 15 minutes of prep time and 10 minutes of cook time, resulting in a total time of 25 minutes. You’ll need a large mixing bowl, a medium saucepan, and a baking dish to get started. With everything in place, let’s dive into the fun!
1- In a medium saucepan over low heat, melt the unsalted butter. Stir continuously until the butter is completely melted and begins to bubble slightly, releasing a warm, inviting aroma. This should take about 2-3 minutes.
2- Once melted, add in the mini marshmallows and continue stirring until they’re fully melted and the mixture is smooth. This will take about 5 minutes. You should see a glossy, sticky mixture that looks almost like a thick liquid.
3- Remove the saucepan from the heat and add 1/2 teaspoon of vanilla extract. Stir well to incorporate the vanilla, which will add an aromatic essence and enhance the sweetness of your Red, White and Blue Crispy Rice Treats.
4- Next, gradually fold in the 6 cups of rice cereal. Use a spatula to gently mix, ensuring every piece of cereal is coated in the marshmallow mixture. This step is crucial; you want to see the cereal glistening with the marshmallow coating.
5- Divide the mixture into two bowls. In one bowl, add the red food coloring and in the other, the blue food coloring. Mix well until you achieve your desired colors. You’ll see vibrant hues that will make these treats pop!
6- Now, it’s time to layer! In a greased baking dish, press the red mixture into the bottom, packing it down firmly. Next, add a layer of plain crispy rice mixture, followed by the blue mixture on top. Press down each layer gently to create a nice, even surface.
Pro Tips for Success
To make sure your Red, White and Blue Crispy Rice Treats turn out perfectly, here are some expert tips:
- Use fresh marshmallows. Stale marshmallows won’t melt properly and can lead to a grainy texture.
- Don’t rush the melting process. Keeping the heat low and stirring continuously ensures a velvety marshmallow mixture.
- Grease your hands or spatula when pressing the mixture into the pan. This prevents sticking and makes it easier to create even layers.
- Allow the treats to cool completely before cutting. This will help them hold their shape and prevent them from crumbling.
- Experiment with flavors! Add a pinch of salt for contrast or some mini chocolate chips for extra sweetness.
Serving and Storing Your Red, White and Blue Crispy Rice Treats
Perfect Pairings for Red, White and Blue Crispy Rice Treats
These Red, White and Blue Crispy Rice Treats serve 12, making them perfect for sharing at parties or gatherings. They pair wonderfully with fresh fruit skewers, like strawberries and blueberries, which enhance the patriotic theme.
For beverages, consider serving them alongside lemonade or iced tea. The citrusy notes of lemonade balance the sweetness of the treats, while iced tea offers a refreshing contrast. If you’re hosting a barbecue, these treats make an excellent addition to a dessert table filled with summer favorites.
Storage and Make-Ahead Tips
To store your Red, White and Blue Crispy Rice Treats, keep them in an airtight container at room temperature for up to 3 days. If you want to make them in advance, they can be prepared a day ahead and stored.
If you have leftovers, you can freeze them! Cut the treats into squares, wrap them individually in plastic wrap, and place them in a freezer-safe bag. They’ll last in the freezer for up to 2 months. When you’re ready to enjoy them again, simply thaw them at room temperature for about 30 minutes.
Variations and Dietary Adaptations for Red, White and Blue Crispy Rice Treats
Creative Red, White and Blue Crispy Rice Treats Variations
While the classic version is delicious, here are some fun variations to try:
- Chocolate Drizzle: Melt some chocolate chips and drizzle over the top for a decadent twist. The combination of chocolate and marshmallows is always a winner!
- Fruit Additions: Fold in some freeze-dried strawberries and blueberries into the mixture for an added fruity punch.
- Nutty Treats: Add chopped nuts or nut butter to the mixture for a crunchy texture and a boost of protein.
- Layered Treats: Create a rainbow effect by using different colors of food coloring to make more layers.
Making Red, White and Blue Crispy Rice Treats Diet-Friendly
If you’re looking to adapt this recipe for various dietary needs, here are some substitutions:
- Gluten-Free: Ensure the rice cereal is labeled gluten-free. Most brands are naturally gluten-free, but it’s always best to check.
- Vegan: Substitute the unsalted butter with vegan butter and use dairy-free marshmallows. This way, you can cater to your vegan friends without sacrificing flavor.
- Low-Carb: For a lower-carb version, consider using a sugar-free marshmallow alternative and a low-carb cereal.
Frequently Asked Questions
Q: Can I substitute the rice cereal with something else?
A: Yes! You can use puffed quinoa or any other puffed grain cereal as a gluten-free alternative. Just ensure it has a similar texture.
Q: Can I make these treats ahead of time?
A: Absolutely! You can prepare these Red, White and Blue Crispy Rice Treats a day in advance. Just store them in an airtight container to keep them fresh.
Q: How should I store leftovers?
A: Store your treats in an airtight container at room temperature for up to 3 days. If you plan to keep them longer, freeze them for up to 2 months.
Q: How many servings does this recipe yield?
A: This recipe makes 12 servings, perfect for sharing at gatherings or family events. You can easily scale the recipe up or down as needed.
Q: What should I do if my treats are too sticky?
A: If your mixture feels too sticky, it likely needs more cereal. Gradually mix in more rice cereal until you reach your desired texture.
Conclusion
I hope you’re as excited to make these Red, White and Blue Crispy Rice Treats as I am! They’re not just a treat; they’re a celebration of flavors, colors, and memories. Whether you’re hosting a summer gathering or just want to enjoy a nostalgic treat at home, these are sure to impress.
Give this recipe a try, and I’d love to hear how it turned out for you! Feel free to share your experiences or any variations you tried in the comments below. Happy cooking!